


Softphone
Make, receive, transfer, record, and conference calls right from your browser.
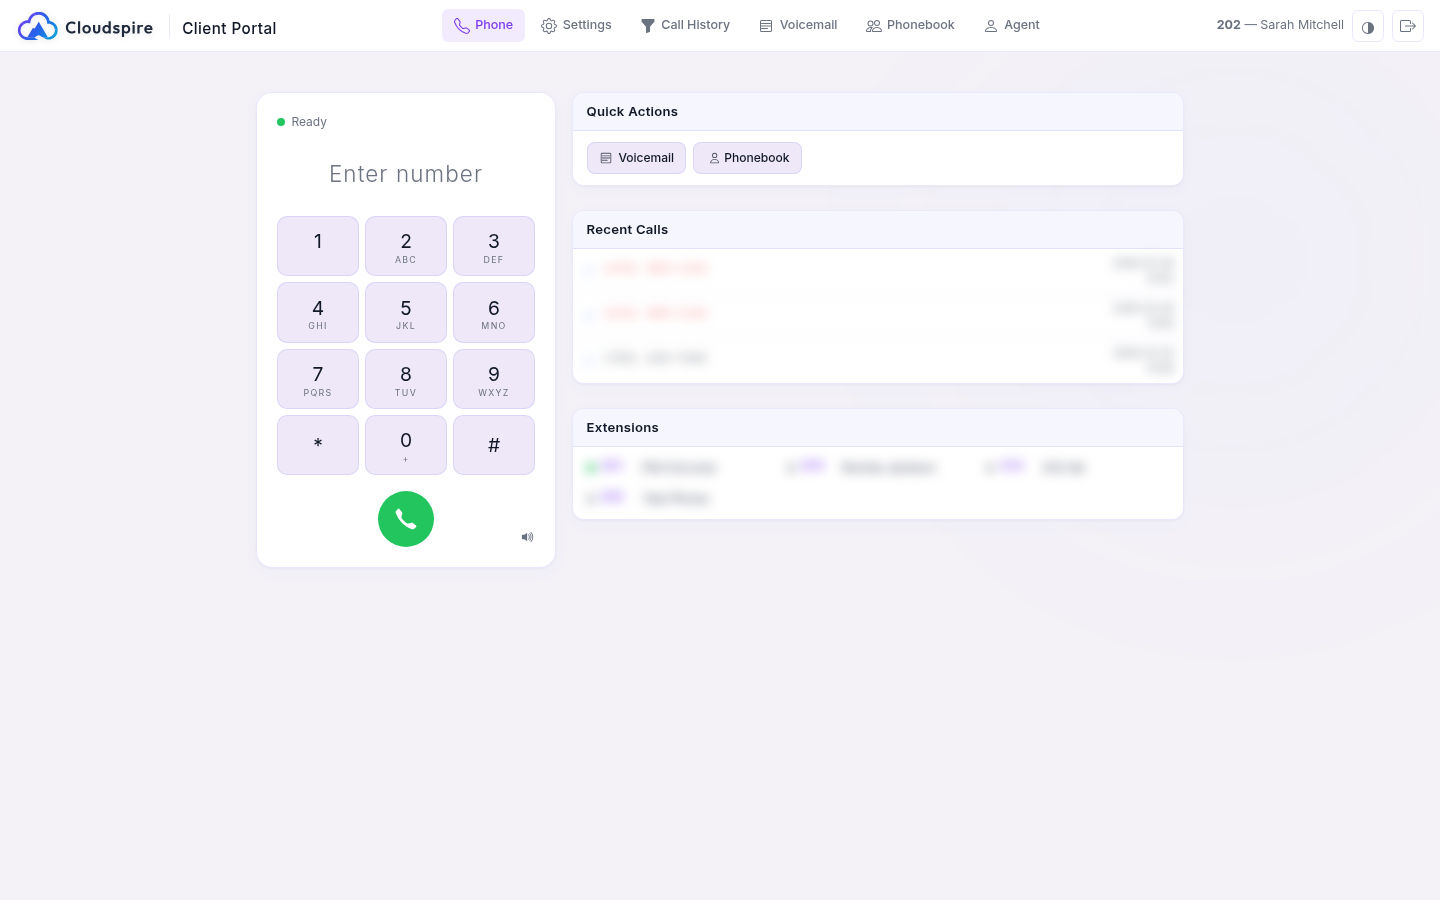
The Phone tab is a built-in softphone that lets you make and receive calls directly from your browser. It works right inside Chrome, Edge, Safari, and Firefox; no plugins, downloads, or additional software needed.
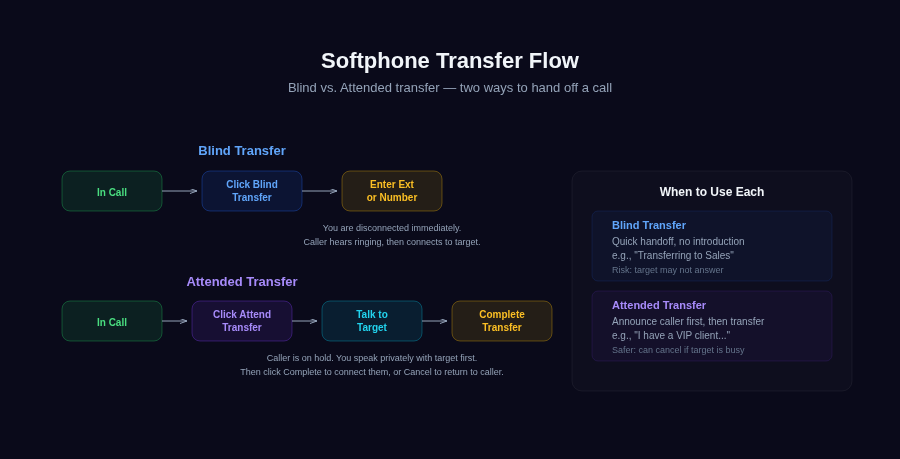
Two transfer modes: Blind (instant handoff) vs Attended (talk to target first, then connect)
Requirements
- A modern web browser (Chrome, Edge, Firefox, or Safari)
- A microphone (built-in or external)
- Speakers or headset for audio output
- The browser must have microphone permission granted for the portal site
Connection Status
The softphone displays its connection status at the top of the Phone tab:
| Status | Indicator | Meaning |
|---|---|---|
| Ready | Green dot | Connected and ready to make or receive calls |
| Connecting... | Yellow dot | Establishing connection to the phone system |
| Disconnected | Red dot | Not connected; try refreshing the page |
| In Call | Green dot | Currently on an active call |
Connection & Call Path
The softphone works even on locked-down networks (a corporate office, a hotel, or guest Wi-Fi) that allow only standard web traffic on port 443 and block the ports voice calls normally use. On those networks the softphone automatically routes your call audio over an encrypted relay so the call still connects and stays clear; there is nothing for you to configure.
The dial pad shows a small indicator of how the current call is connected:
- Direct: your audio is taking the most efficient path between you and the other party.
- Relayed: your audio is going through Cloudspire’s encrypted relay. This is normal on restrictive networks and on calls that switch networks; quality is unaffected.
Either way the call audio is encrypted in transit on every hop it takes. The indicator is mainly useful when you are troubleshooting a quality question with support; it tells them at a glance whether the call went direct or via the relay.
If the other person cannot hear you at all from the start of a call, for example because your Wi-Fi or a VPN is blocking part of the connection, the softphone notices within about ten seconds and tries to reconnect your audio through the encrypted relay, so you usually do not need to hang up and redial.
Making a Call
- Click the Phone tab (if not already selected)
- Enter the phone number or extension using the dial pad, by clicking the number field, or by simply typing on your keyboard: digit keys automatically go to the dialer
- Press the green Call button or press Enter
For external calls, dial the number as you normally would from your desk phone. For internal calls, enter the extension number (e.g., 101).
If you paste a number that carries an extension after a comma (for example (670) 555-7233, 8158 from a contact card), the softphone dials the number before the comma. Once the call connects, use the in-call Keypad to enter the extension.
To redial someone you spoke to recently, click their entry in the Recent Calls card on the side panel; it dials straight away.
Receiving a Call
When an incoming call arrives, a notification overlay appears with the caller's information (if available). You have two options:
- Answer: Click the green phone button or press Enter to accept the call
- Reject: Click the red button or press Escape to decline the call (the caller hears your voicemail or the configured no-answer destination)
A ringtone plays while the call is ringing. The notification shows the caller's name and number when available.
In-Call Controls
During an active call, the following controls appear below the call timer:
| Button | Function |
|---|---|
| Mute | Mutes your microphone. The other party cannot hear you. Click again to unmute. |
| Hold | Places the call on hold. The other party hears hold music. Click again to resume. |
| Record | Starts or stops recording the current call mid-conversation. The button is shown only when your administrator has granted on-demand recording for your extension. When recording starts, both parties hear the audible cue your administrator configured (a beep, a spoken announcement, or nothing; depends on the tenant policy). Stopping is silent. Pressing Record a second time stops the segment; pressing it again starts a new segment in the same call. |
| Transfer | Opens the transfer dialog. Enter the destination and choose Blind Transfer (instant handoff) or Attended Transfer (speak with the target first). |
| Conference | Starts a 3-way conference: sends the other party to your conference room and joins you in with them. See Conference Calls below. |
| Keypad | Shows a dial pad for sending touch-tones during a call (for example, when navigating a phone menu like “press 1 for billing”). |
| Hang Up | Ends the current call. You can also press Escape on your keyboard. |
Recording Calls
The browser softphone supports the platform's full call-recording feature. There are two independent things to know about: full-time recording (your administrator turns it on for inbound calls to a phone number, or for your outbound calls, and the system records every call automatically) and on-demand recording (you click a button mid-call to start or stop). This section is about on-demand, the part you control yourself.
Prerequisites
Two things must be true before on-demand recording works for you. Both are admin-controlled:
- Your tenant administrator must have call recording enabled for your tenant overall (master switch).
- Your tenant administrator must have Allow on-demand recording turned on for your specific extension.
If both are on, the Record button appears in the in-call control bar (alongside Mute, Hold, Transfer). If either is off, the button is hidden entirely; you won't see a grayed-out button or an error message. Ask your administrator to enable it if you need the feature.
How to start and stop a recording
There are three ways to do it, and they all behave the same way and produce the same recording:
- The Record button in the browser: click to start; click again to stop. The button changes to a highlighted “Stop Recording” state while a recording is in progress.
- The
*1DTMF code from the in-call Keypad: click the Keypad button on the active-call screen and dial*1. First press starts; second press stops. Useful as a keyboard alternative to the on-screen button. - The
*1DTMF code from a desk phone or iPhone app on the same extension: if your extension is logged in on multiple devices and the call was answered on a different one, pressing*1there toggles recording for the whole call. The browser softphone's Record button updates to reflect the change within a second.
The audible cue
Whenever recording starts (whether full-time or on-demand) the system can play a short cue into the bridge so both parties hear it. Three policies, set by your administrator at the tenant level:
- None: silent start. Default for new tenants.
- Beep: one short tone. Conservative posture for two-party-consent jurisdictions (California, Florida, Illinois, Maryland, Massachusetts, Montana, Nevada, New Hampshire, Pennsylvania, Washington in the US, plus most of Canada and the European Union).
- Announcement: a short voice prompt explicitly stating that the call is being recorded.
Stopping is always silent; no cue plays when you click Stop. The cue plays each time recording starts, including every restart in a multi-segment call.
Multi-segment recording in one call
You can stop and restart recording multiple times in the same call, and each on/off cycle is captured as its own recording. Note that the player in your call history plays the first segment of a call. If you need every segment of a multi-segment recording, ask your administrator.
What the call covers
Click Record while you're bridged in a normal conversation with another person, and the recording captures both sides of the conversation from the moment you click. Recording attaches to your call leg specifically, so:
- Hold doesn't stop recording; the channel is still up; the recording continues for the duration of the hold.
- Transfer ends the recording. Blind or attended, your call leg ends at the transfer, and the recording finalizes at that moment. If the transfer recipient also has on-demand enabled, they can press Record themselves to start a fresh one.
- Park-and-retrieve continues recording on whichever channel stays alive across the parking step.
If you routinely transfer calls and need uninterrupted coverage, ask your administrator to turn on full-time inbound recording for the relevant DID, or full-time outbound for your extension; on-demand is for situations where a normal call unexpectedly turns into something worth capturing.
When the button doesn't do anything
The Record button is hidden, and pressing *1 on the keypad returns silently or plays a short error tone, in these situations:
- Tenant master switch is off, or your extension's Allow on-demand recording flag is off.
- You're not in a bridged call, for example, you're listening to an IVR menu, waiting in a queue, leaving a voicemail message, or talking to a Cloudspire AI agent. On-demand recording requires you to be in a person-to-person bridge.
- The call is to your own conference room or a parked-call slot; these are not human-to-human bridges in the sense the on-demand feature requires.
Where recordings live and how to listen back
A recording becomes playable 10 minutes after the call started, once it has synced to Cloudspire's secure cloud storage. Open the call from Call History in the customer portal: until the recording is ready the row shows a dimmed clock icon, and once it is ready that becomes a play button with an inline player. Recordings are kept for the tenant's configured retention period (typically 30-90 days, set by your administrator).
Compliance reminder
Recording laws vary by jurisdiction. In two-party-consent regions, every party on the call must be aware that the call is being recorded. If your tenant's administrator has set the recording start notification to None and you're in a two-party-consent jurisdiction, you are responsible for verbally informing the other party that you're recording before pressing the button. Cloudspire Voice does not provide legal advice; check with your administrator or legal department about your local rules.
Transferring a Call
During an active call, click Transfer to open the transfer dialog. Enter the destination extension or phone number, then choose one of two transfer modes:
Blind Transfer
Click Blind Transfer to send the call immediately. The caller is connected to the destination and your call ends. Use this when you don't need to speak with the recipient first.
Attended Transfer
Click Attended Transfer to speak with the recipient before connecting them to the caller:
- Your original call is automatically placed on hold
- A consultation call is placed to the destination
- Once the recipient answers, you can speak with them (e.g., introduce the caller or explain the situation)
- Click Complete Transfer to connect the caller with the recipient; your call ends and the two parties are bridged together
- Or click Cancel to hang up the consultation call and return to your original caller
If the recipient doesn't answer or the consultation call fails, you are automatically returned to your original caller.
Conference Calls
The softphone can merge two active calls into a conference and let you keep adding participants, all bridged together on the server so everyone can speak and hear each other.
Starting a Conference: one-tap from any active call
While on a 2-party call, press the Conference button in the in-call action row. The other party is sent to your conference room first, and your softphone joins them automatically. Add more participants from there using the steps below.
If the active call is to a number that can't be conferenced (voicemail, a parked call, an IVR menu, or anything not in a normal bridged state), the original call stays connected and a brief notice explains why.
The button is hidden when you're already in a conference, in the middle of an attended transfer, or already on a call to your own conference room (you can't add yourself to your own room).
Starting a Conference: from an attended transfer
If you'd rather consult with the second party first before bringing both of you into the room, use the attended-transfer flow:
- While on a call, click Transfer and enter the number of the second person you want to add.
- Click Attended Transfer and wait for the second person to answer.
- Once they pick up, instead of clicking Complete Transfer, click Merge to Conference.
- All three of you are now connected in a shared conference room. The header shows In Conference: Room 999XX.
Adding More Participants
Once you're in a conference, the Transfer button opens an Add Participant dialog instead of the usual transfer options:
- Click Transfer and enter the next person's number.
- Click Call Participant to consult with them first (your existing conference is held while you talk).
- Click Send to Conference to drop them into the conference. You stay connected; they join everyone already in the room.
- Repeat as needed, up to 10 participants.
Leaving & Rejoining
If you hang up, the conference keeps running as long as at least one other person is still in it. A Your Conference pill appears at the top of your softphone while the room is active; tap Join to rejoin without looking up the room number. Conferences automatically end when everyone has left.
Discoverable Rooms
By default, your ad-hoc conference is private; only you and the people you've transferred in can hear the call. If you want to open the room up so anyone on your team can join with a single tap, press the 🌐 button on the Your Conference pill.
- When you tap 🌐 the first time in a session, you'll get a quick confirmation prompt reminding you that everyone in your tenant will see the room. Confirm to continue.
- The pill turns green to indicate the room is now discoverable. A small banner appears in every teammate's softphone showing your name, the room number, and how many people are in it.
- Teammates can click Join to enter the room instantly.
- Tap 🌐 again at any time to make the room private again. The banner disappears from everyone's softphone; participants already in the room stay.
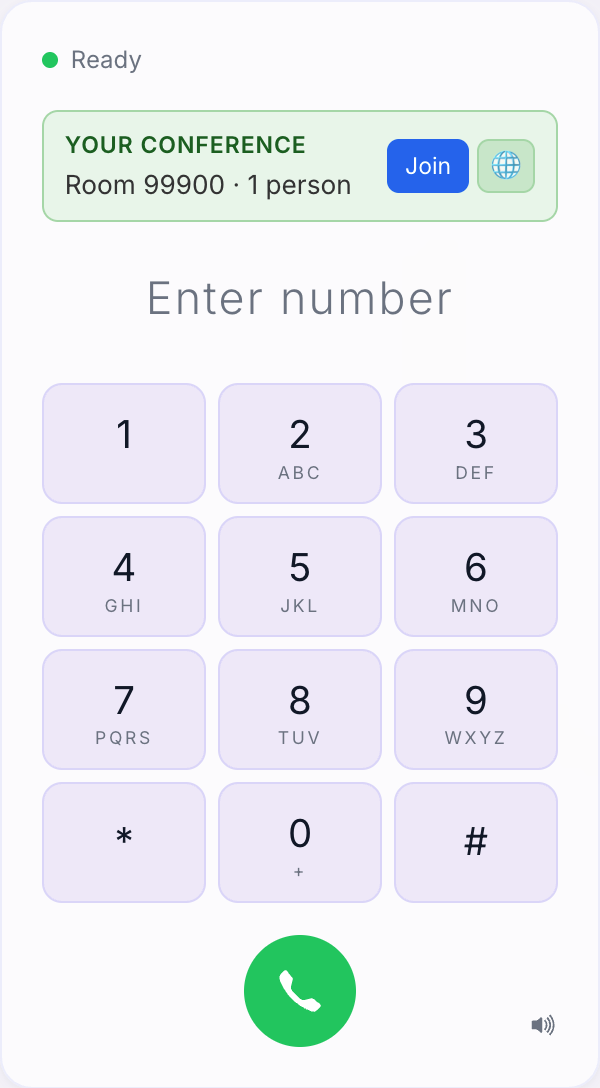
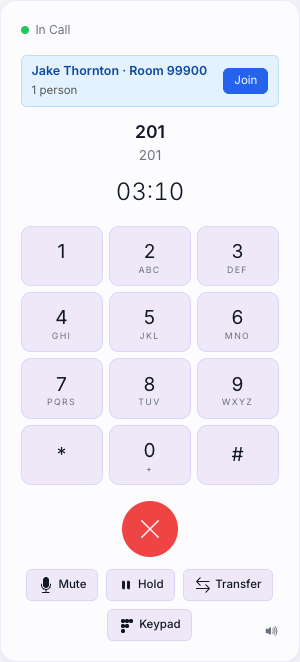
When more than two rooms are open across your tenant, the list collapses into a 🌐 N open rooms ▾ tray you can expand from the softphone header. Admins can disable discoverable rooms tenant-wide if the feature isn't wanted.
Desk Phone Conference Key
If your admin has programmed a Conference key on your desk phone, it lights up whenever you have an active conference room and goes dark when the room ends. Press the key anytime to rejoin your room, or use the *38 feature code: while on a call, press your phone's Transfer button and dial *38 to drop that call into your conference. Repeat for each person you want to add, then press the Conference key (or dial *38 by itself) to join the room.
Side Panel
The softphone includes a collapsible side panel with quick-access features that are always available, even during calls:
| Panel | Description |
|---|---|
| BLF Keys | Shows your BLF (Busy Lamp Field) key layout with real-time presence indicators for monitored extensions. The softphone detects your call state and chooses the right behavior automatically. Click a BLF key when you're not on a call to dial that extension. Click it during an active call and the transfer dialog opens with that extension already filled in; you choose Blind Transfer or Attended Transfer. Parking-slot and conference keys are the exception: tapped mid-call they hand the call straight over, since there is nobody on the other end to consult. |
| Recent Calls | Lists your last 20 calls, showing the contact name or number, direction, and time. Diagnostic and system-placed calls are filtered out. Click an entry to dial. |
| Extensions | Lists the extensions in your organization with live presence dots. Click an entry to call. For a searchable directory with contact details, use the Phonebook tab. |
| Voicemail | Displays a badge with the count of new voicemail messages waiting in your mailbox. |
| DND Status | Shows your current Do Not Disturb status. When DND is active, an indicator appears on the side panel. Toggling DND here sets system-wide DND: the state syncs instantly to your desk phone, the mobile app, your BLF keys, and the admin console, and your presence flips to Do Not Disturb. This is different from the DND button on the desk phone itself, which only silences that one phone’s ringer and is invisible to the rest of the system. |
The side panel stays accessible when you switch to other portal tabs, so you can browse contacts or check recent calls while on a call.
Audio Devices
Click the speaker icon at the bottom of the softphone to expand the audio device selector. Here you can choose:
- Audio Output: Select which speaker or headset plays the call audio
- Microphone: Select which microphone captures your voice
If you connect a new headset or audio device, click the speaker icon to refresh the list and select the new device.
Browser Permissions
The first time you use the softphone, your browser will ask for permission to access your microphone. You must Allow this for the softphone to work. If you accidentally deny the permission:
- Click the lock/site-info icon in your browser's address bar
- Find the microphone permission and change it to Allow
- Refresh the page
If a call cannot start, for example because the microphone is blocked or not connected, the status line at the top of the softphone turns red and says why, such as Microphone blocked; allow it and redial, No microphone found; connect one and redial or Call failed; redial. Fix what it names, then place the call again. The same message appears with try again when an incoming call could not be answered.
Keyboard Shortcuts
The softphone supports full keyboard control so you can make calls, answer, hang up, and manage calls without using the mouse. Shortcuts are automatically disabled when you are typing in other areas of the portal (such as chat or search fields).
| When | Key | Action |
|---|---|---|
| Not on a call | 0-9, *, # | Types digits into the dialer (auto-focuses the number field) |
| Enter | Places the call | |
| Backspace | Deletes the last digit | |
| Incoming call ringing | Enter | Answers the call |
| Escape | Declines the call | |
| On a call | 0-9, *, # | Sends touch-tones (for navigating phone menus) |
| Escape | Hangs up | |
| M | Toggles mute | |
| H | Toggles hold |
Tips
- Use a headset for the best audio quality and to avoid echo
- The softphone stays connected as you switch between other tabs (Settings, Call History, etc.); you won't miss incoming calls
- Leaving the Voice Portal is different from switching tabs: opening the Admin or Client portal, opening your profile, or signing out reloads the page and ends a call in progress. If you have a call ringing or connected, you'll be asked to confirm before that happens
- If you experience audio issues, check your audio device selection and ensure no other application is using the microphone exclusively
- You can click phone numbers in the Phonebook tab to dial them directly through the softphone
- You can dial entirely from the keyboard; just start typing a number, press Enter to call, and Escape to hang up