


The Cloudspire App for iPhone
Take your office extension anywhere with calls, texts, voicemail, and presence on your iPhone.
The Cloudspire iPhone app turns your iPhone into a full business phone: make and take calls, text, listen to voicemail, see who’s on the phone, and reach the company directory, all from one place. Incoming calls ring just like a regular iPhone call, even when the app is closed.
Launch screen when you open the app
Using Cloudspire AI agents? The same app has an AI side for their requests, questions and controls: see The AI Side of the App.
Getting the App
The Cloudspire app is available on the Apple App Store. There is no Android app today.

Direct link: apps.apple.com/us/app/cloudspire-voice/id6761955305. Search for Cloudspire in the App Store if you prefer. Once installed, open the app and use either the QR code from your welcome email (easiest) or a manual sign-in with your email address and password.
One-Scan Setup (QR Code)
Install the app first, then scan. The QR code in your welcome email signs the app in; it does not install it. If you scan the code before the app is installed, your iPhone shows “No usable data found”. That message means the app is not installed yet: download the Cloudspire app from the App Store (link above), then follow the steps below. The code still works; a scan that failed this way does not use it up.
- Install the Cloudspire app from the App Store.
- Your administrator sends you a welcome email. Inside is a QR code.
- Open the Cloudspire app and tap Scan QR Code.
- Point the camera at the QR code in the email. The app fills in the server, tenant code, extension, and credentials automatically and logs you in.
The QR code is single-use and expires 7 days after the welcome email is sent.
If it has expired or you have already used it, you can issue yourself a fresh one; no administrator needed. In the customer portal on a desktop browser, open Settings, find the Mobile App card, and click Generate QR Code. The code appears on screen with a countdown showing how long it stays valid (7 days), and you scan it with the app exactly as you would the one from the welcome email.
Manual Login
If you can’t use a QR code, enter your email address (the same email your administrator set for you) and your portal password under or sign in manually on the sign-in screen, then tap Sign In.
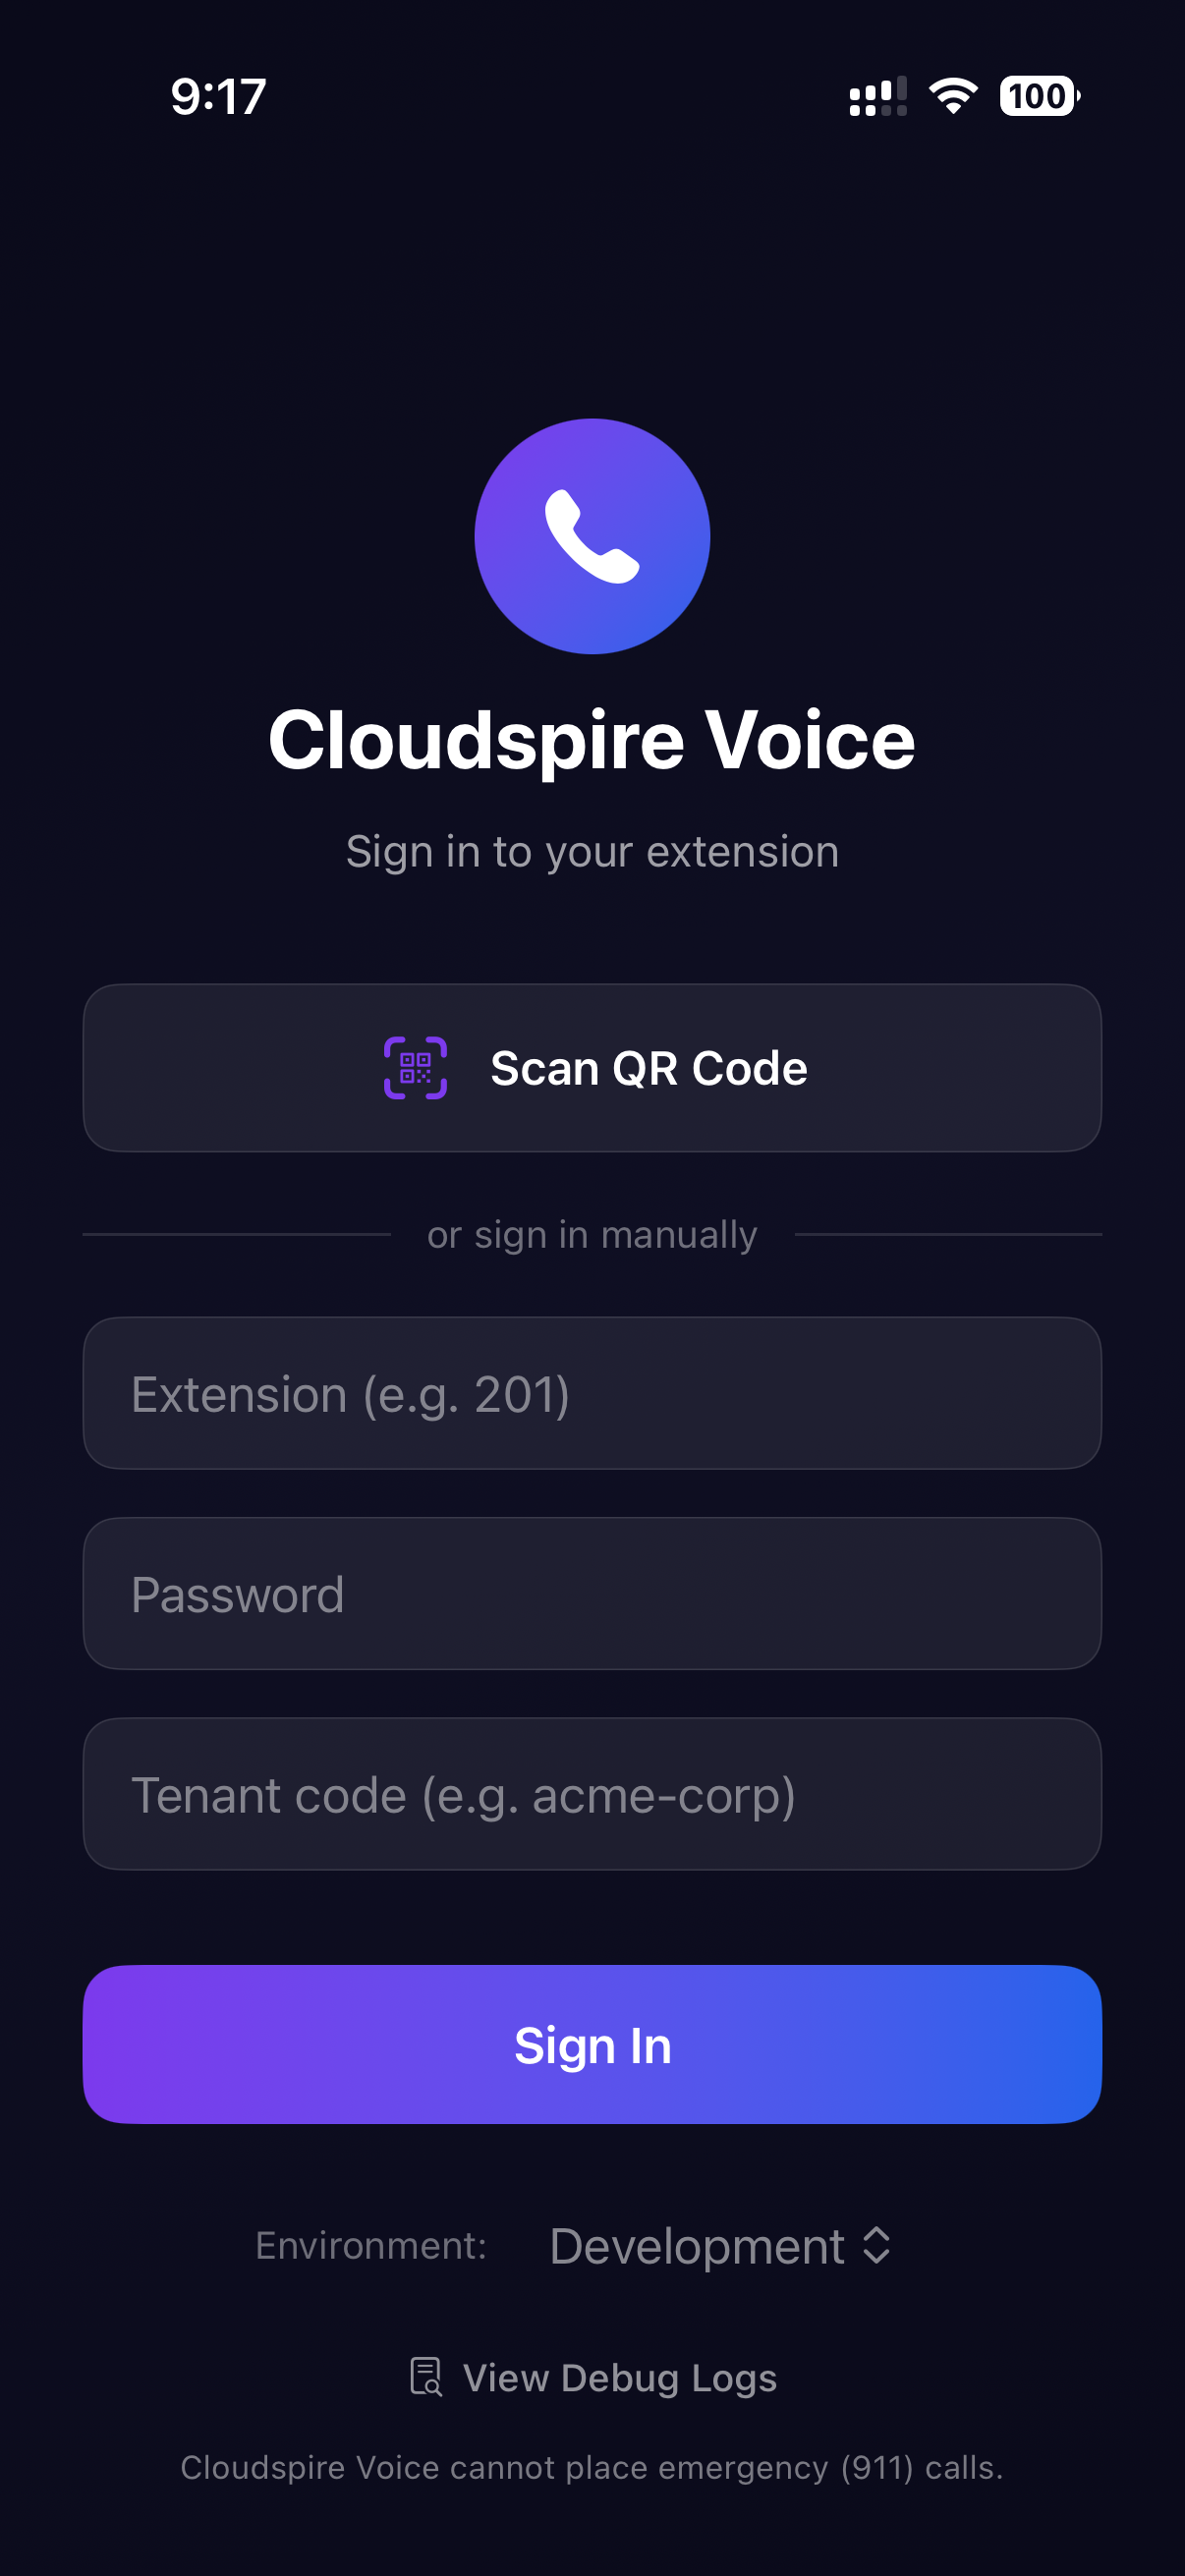
The sign-in screen: QR scan is the default, with email and password below
App Navigation
The app has five bottom tabs. Tap a tab to switch screens; tap it again to scroll to the top.
| Tab | What it does |
|---|---|
| Keypad | The dialpad. Type a number, or start typing a name (old-style phone-keypad style: 2 for A/B/C, 3 for D/E/F, etc.) and the app searches your coworkers, phonebooks, and iPhone contacts all at once. Shows your name, extension, and current status. An optional grid of BLF keys (up to two rows) sits above the dialpad so you can see at a glance which coworkers are available or on a call. |
| Calls | Segmented picker between Recent (call history for your extension with direction, duration, and recording status) and Voicemail (visual voicemail list with unread badge, inline transcripts, and embedded playback). Swipe to delete, long-press to copy number. |
| Messages | Your text inbox. Handles both outside text messages (sent from your business phone number) and internal team chat. Shows unread counts, typing indicators, read receipts, and picture messages. Tap a conversation to open the full thread. |
| Contacts | Three tabs in one: Extensions (internal users with live presence), Phonebook (shared directories assigned to your extension), and iPhone (your device address book, after you grant Contacts permission). All tabs are searchable and tap-to-dial. |
| Settings | Account info, connection status, notification toggles, call-handling settings (Do Not Disturb, call forwarding, voicemail, queue agent controls), outbound caller-ID picker, a Preferences submenu, About screen, and Sign Out. |
If you also have the AI side, on iOS 26 or later the fifth button is AI, which switches to the AI side, and Settings is the gear at the top right of the Keypad. On earlier iOS versions Settings stays a tab and a Voice and AI switch at the top moves between the sides.
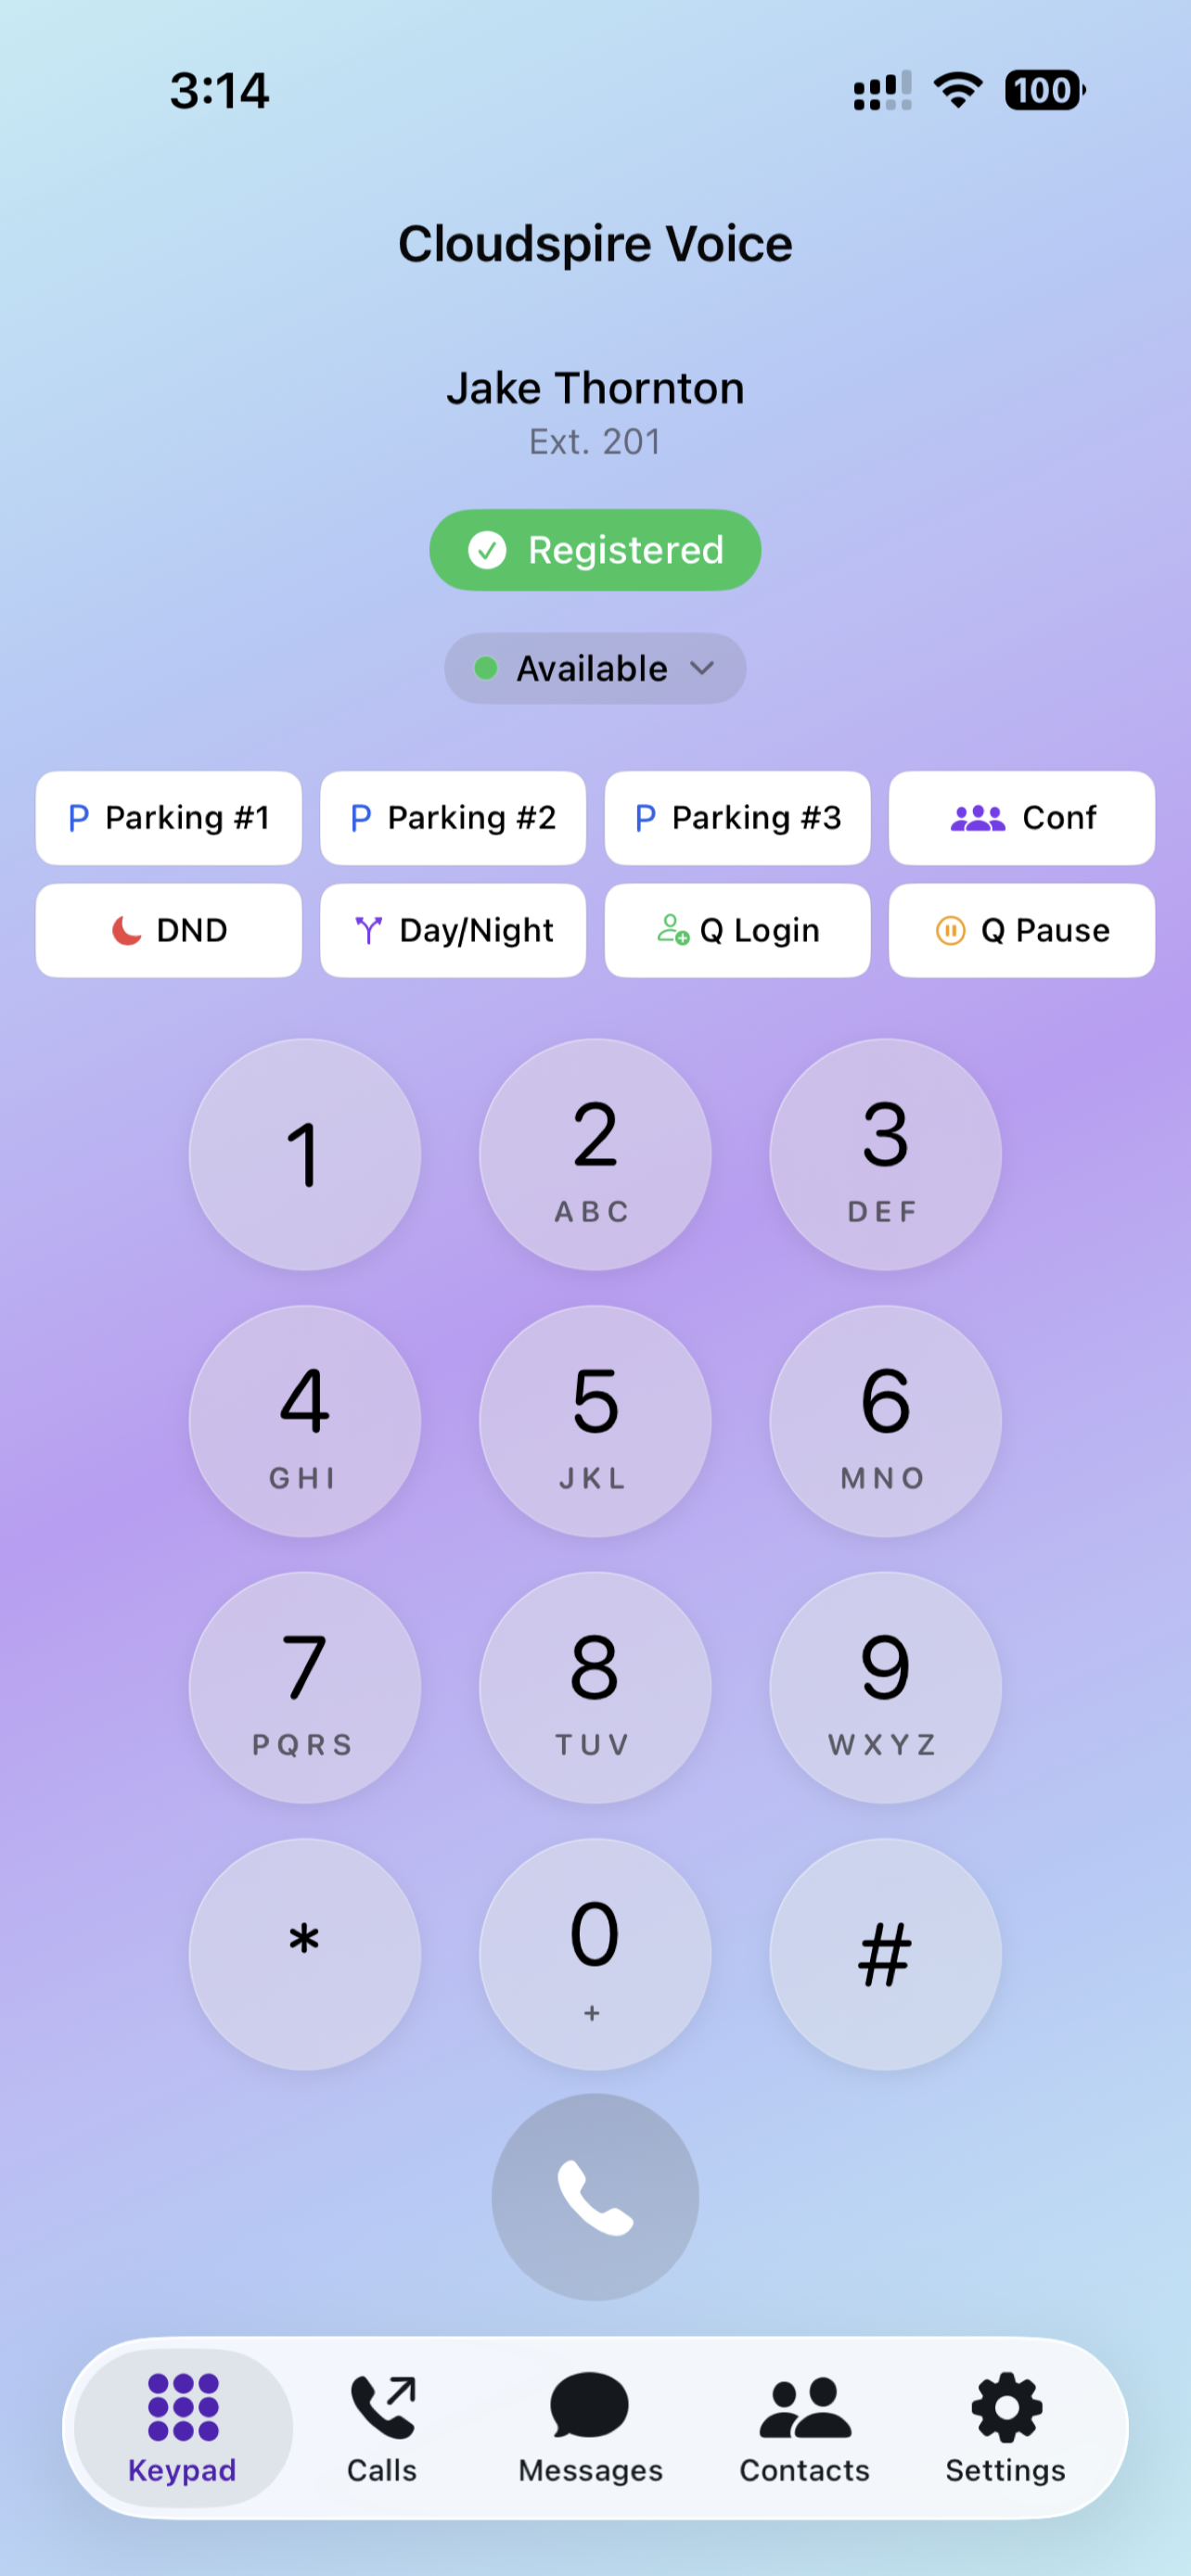
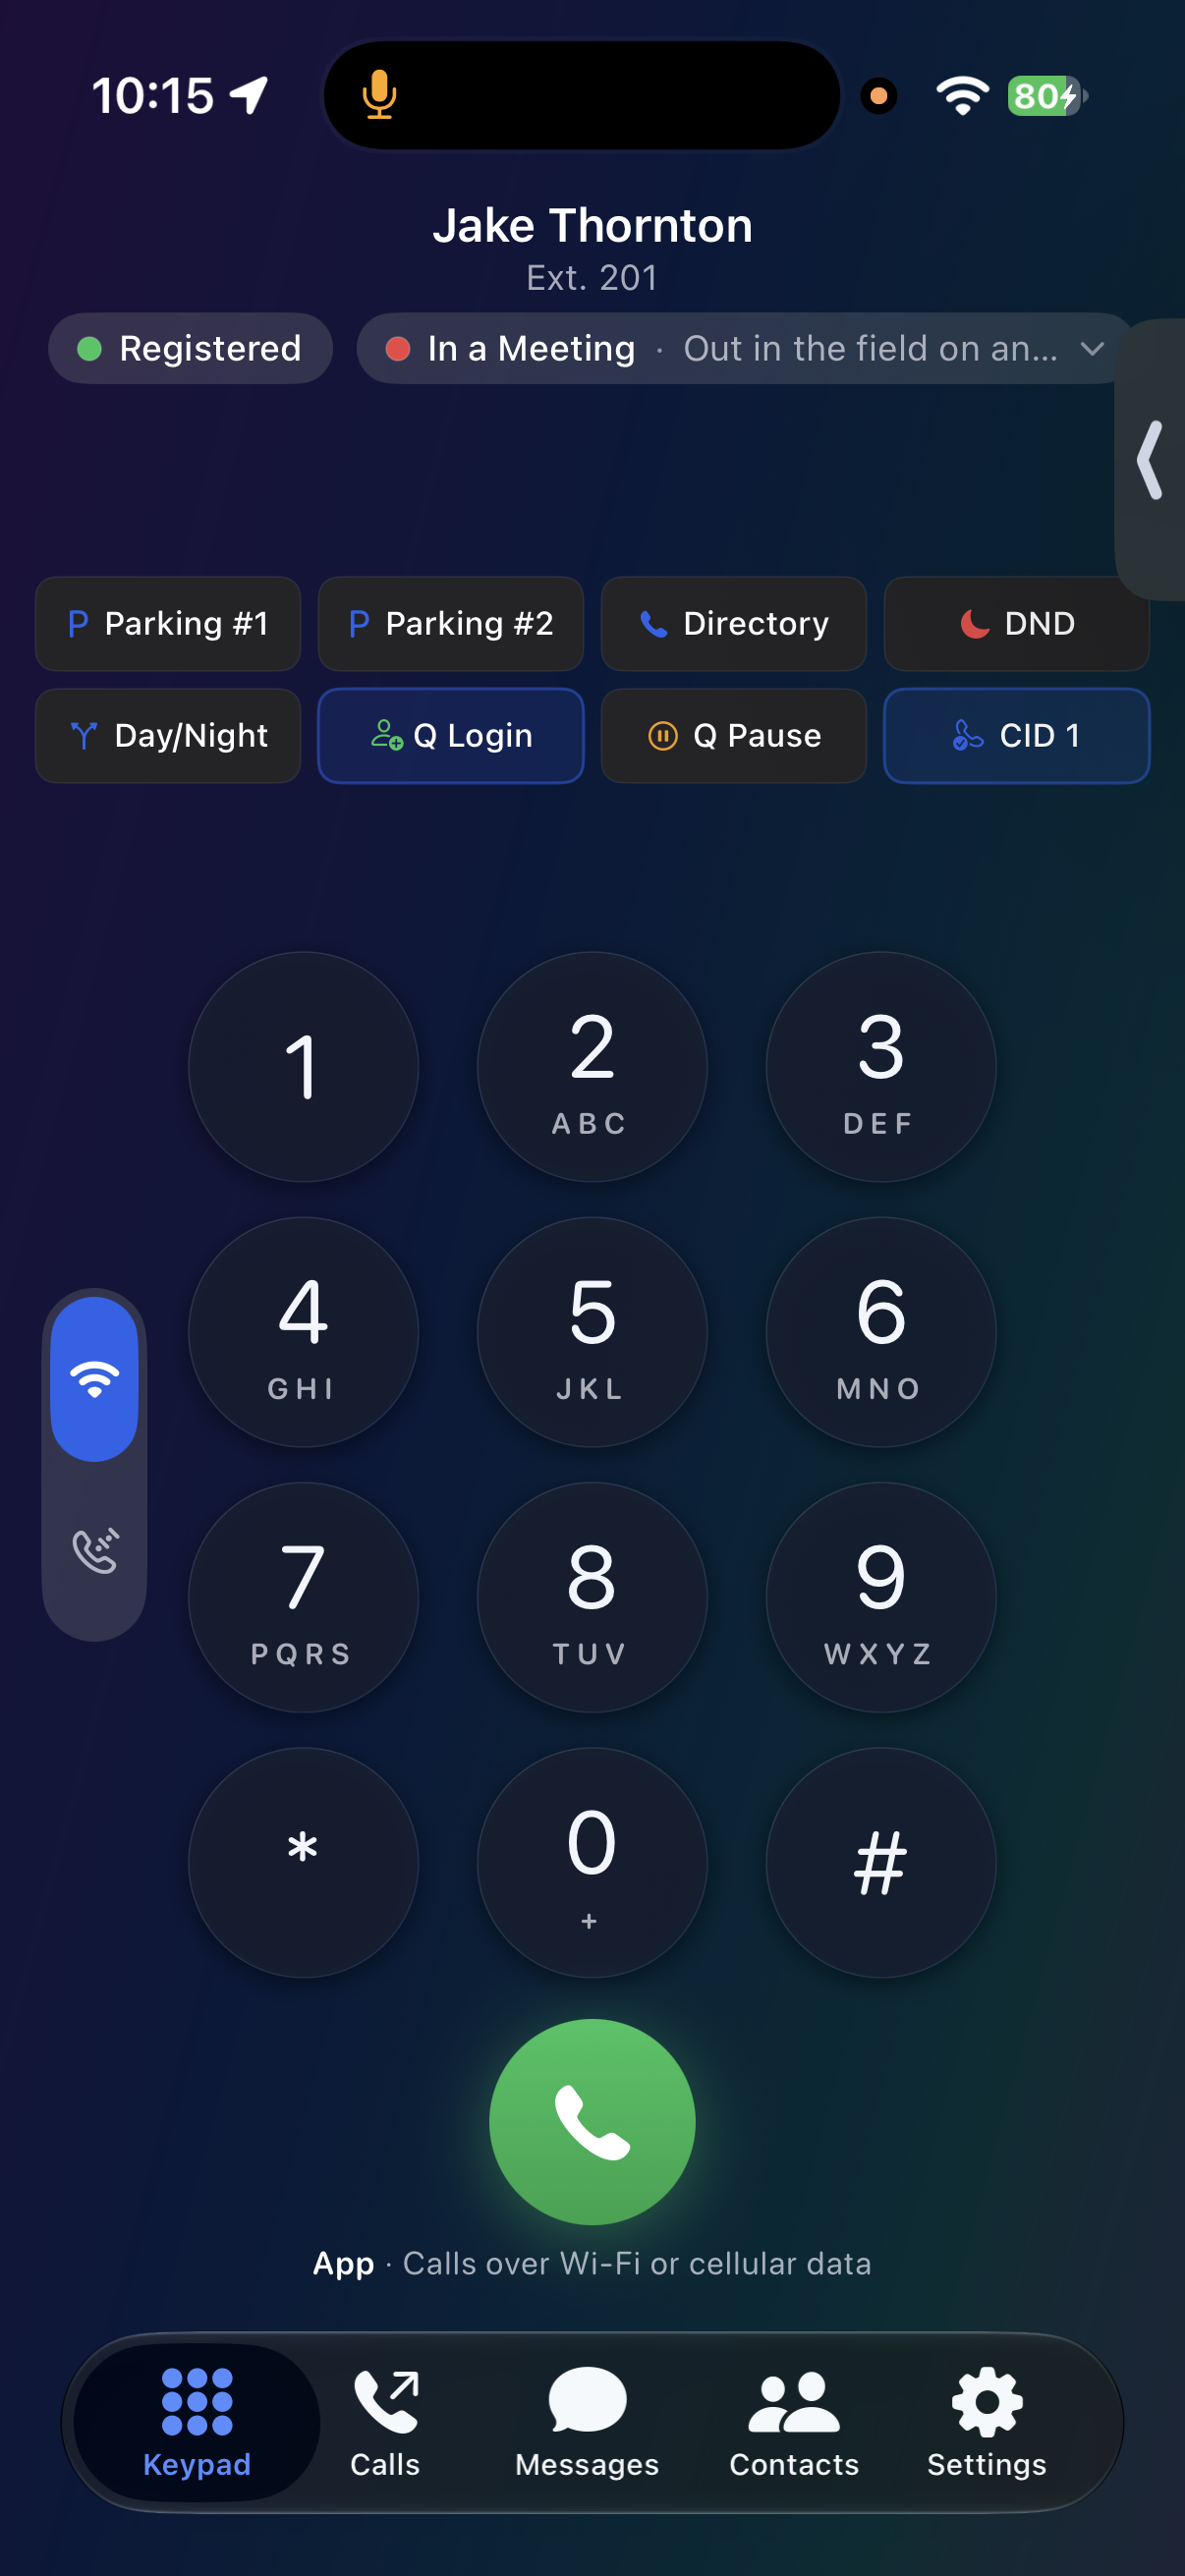
The Keypad tab in light and dark appearance: your name and extension, your connection and status, your BLF quick keys, the App / ClearLine switch beside the dialpad, and the five bottom tabs
Redial on the green call button
When the keypad input is empty, the first tap on the green call button fills in the most recently dialed number from your call history; it does not place the call yet. A second tap places the call. You can also edit the populated number before pressing the second time. Because the redial source is the server-side call log, it works the very first time you open the app on a new device, and it reflects calls placed from your desk phone or browser softphone too. The gesture mirrors the iPhone Phone app.
Predictive Search (T9)
By default, as you type digits on the keypad, a suggestion bar appears above the keys showing matching coworkers, phonebook contacts, and iPhone contacts (old-style phone-keypad letter assignments: 2 for A/B/C, 3 for D/E/F, etc.). If you'd rather have a plain numeric keypad with no suggestions, turn off Predictive Search in Settings → Preferences → Calling. When off, the suggestion bar never appears and your typed digits stay at full size. The toggle does not affect contact search in the SMS compose screen or the transfer-destination picker.
Making & Receiving Calls
Incoming Calls
Incoming calls ring on your iPhone exactly like any other call, even when the app is closed or the phone is locked. You see the caller’s name and photo on the lock screen, and the same Accept / Decline buttons as your regular Phone app.
The app doesn’t need to stay connected in the background to ring; Apple delivers the call to your phone as a notification, so your battery lasts all day. Calls usually reach your phone within a fraction of a second of the caller dialing.
If you’re signed in to both the iOS app and the customer-portal browser softphone, both devices ring at the same time and either can answer; whichever one picks up cancels the ring on the other.
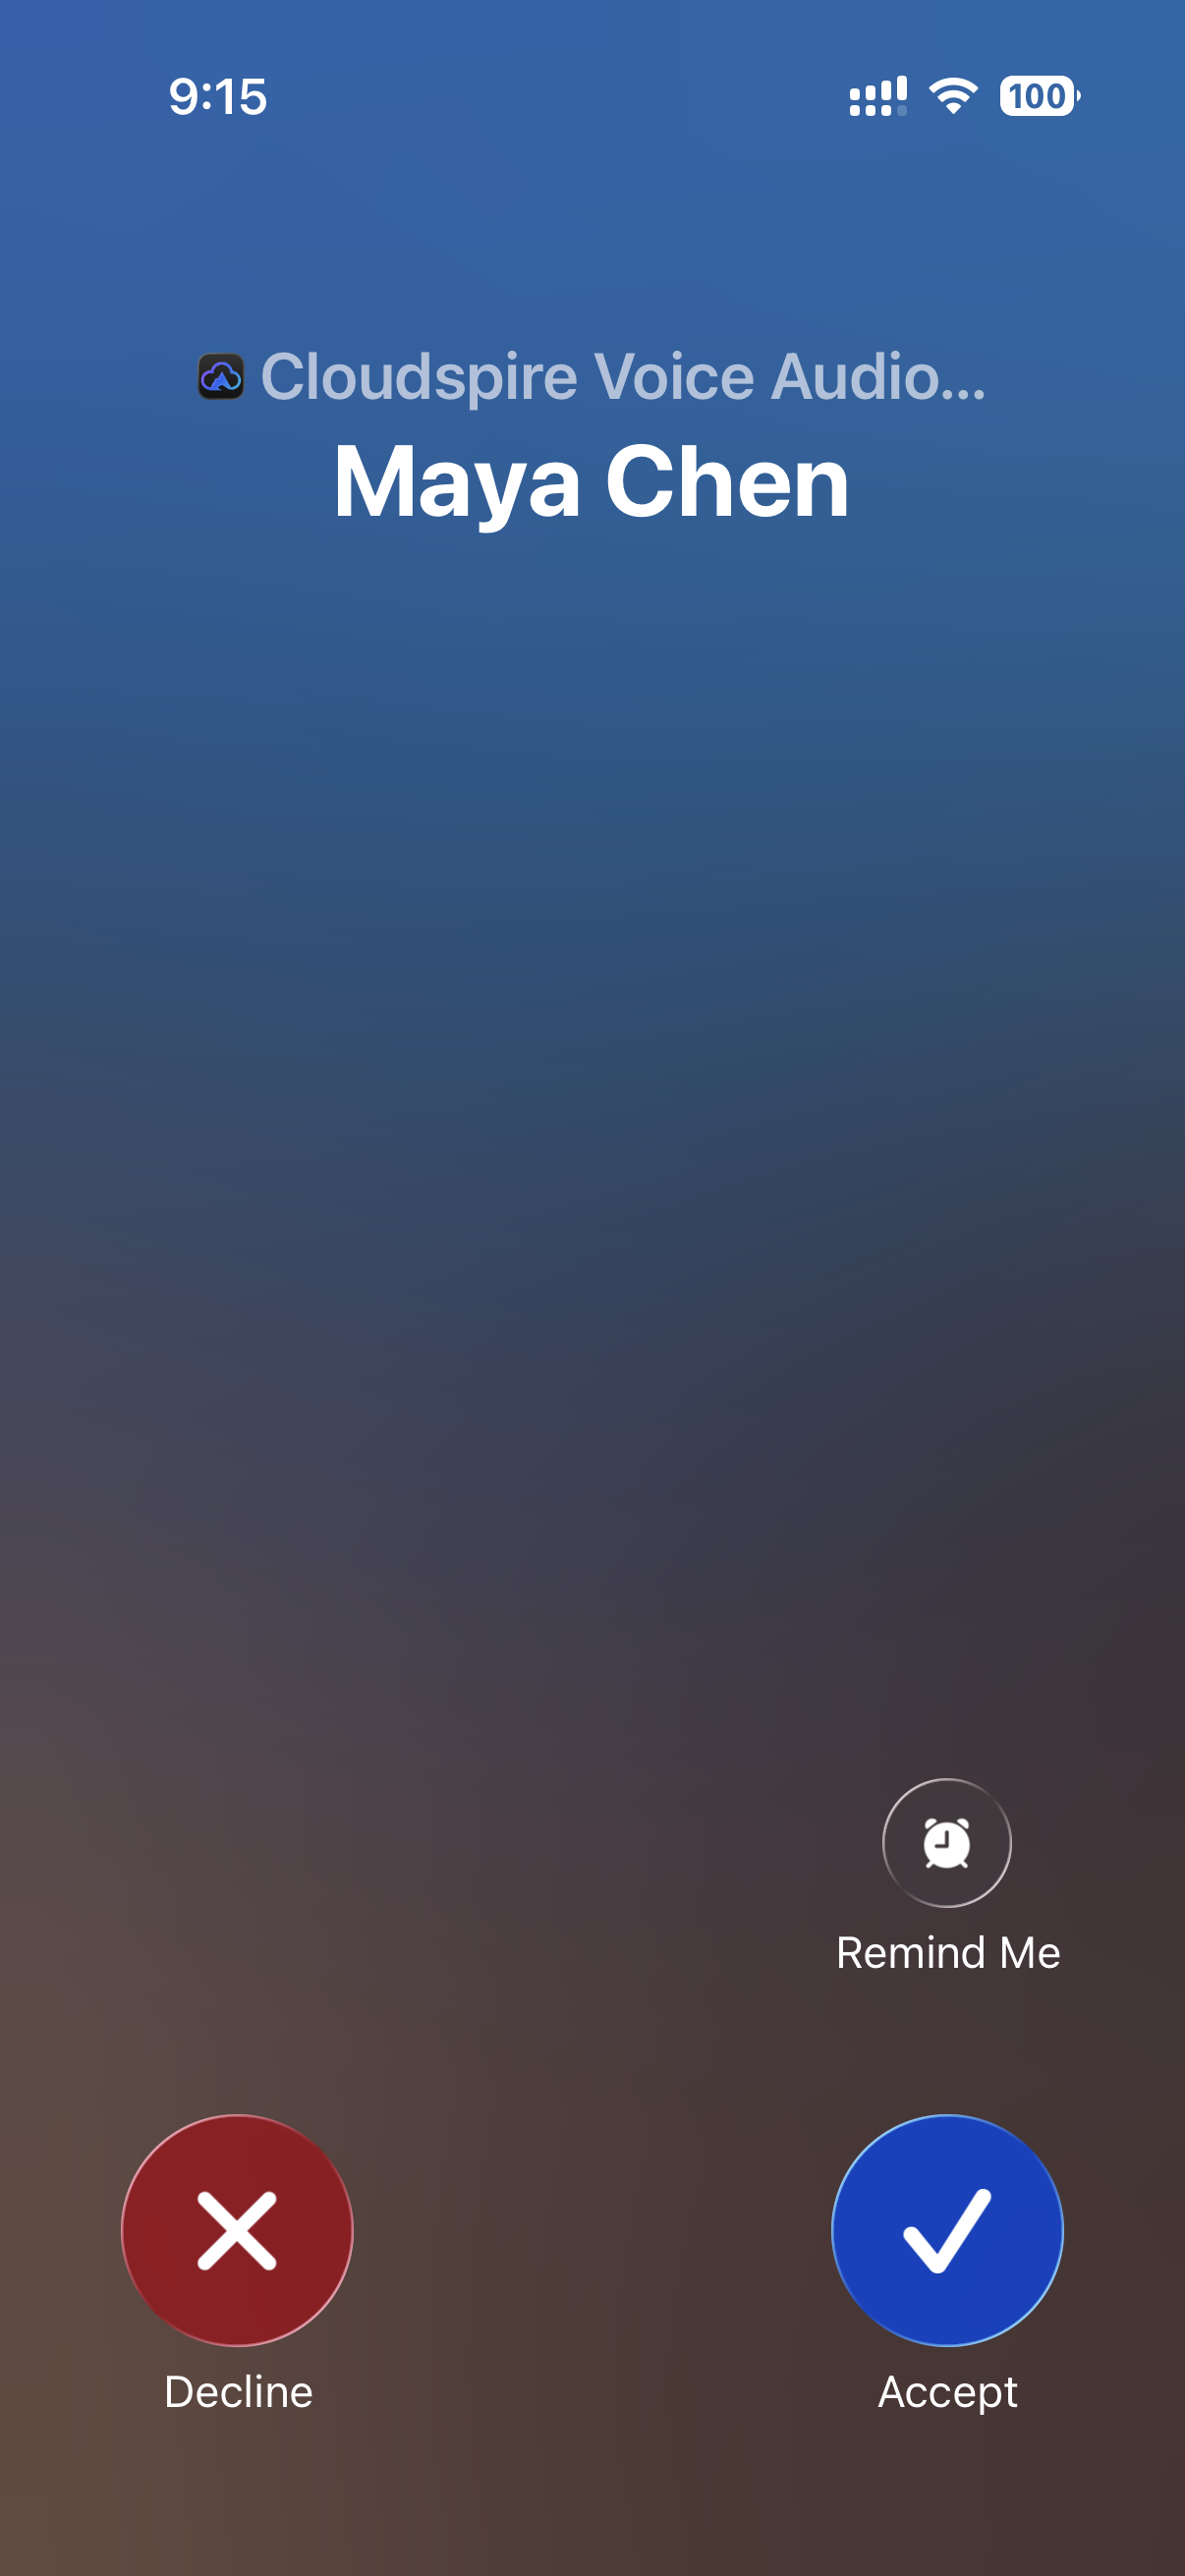
Incoming call on the lock screen: Decline, Accept, and Remind Me, just like a regular iPhone call
Outgoing Calls
Dial from the Keypad tab, tap a name in Contacts or Recent, tap a BLF key, or tap a phone number anywhere in the app. In the latest version of the app, a switch beside the keypad chooses App (default: place the call over the app's WebRTC connection) or ClearLine (Cloudspire ClearLine: the system rings your cell first, the app silently confirms you’re in the calling flow, and the call bridges to the destination through the company trunk with no press-1 step needed in the normal case. When the auto-detect path is in play, the in-flight modal copy switches to "Just answer your cell. We’ll connect you" so you know there’s nothing to press. If the app cannot confirm in time, a fallback prompt asks you to press 1 to connect, and the press is accepted the moment you touch the dial pad. Outbound caller ID is your business number). The mode in use is named under the call button. ClearLine works when it is enabled on your tenant and your extension has a Mobile Number (your administrator sets it, or you add your own; see below). Without it, the switch is shown locked, and tapping it opens adding your own mobile number (when your company allows it) or explains how to get ClearLine. ClearLine is especially useful when WiFi or cellular data is poor but cellular voice still works. ClearLine is also your automatic backup: if an internet call to an outside number can’t connect because of bad Wi-Fi, a weak data signal or a network problem, the app switches it to ClearLine for you. Your cell rings, you answer, and you’re connected to the person you dialed with your business caller ID. In Settings → Preferences, under Cloudspire ClearLine: Backup Calling, Use ClearLine as Backup turns this on or off (it is on by default), and When a Call Can’t Connect chooses Ask First (the default: a one-tap “Use ClearLine” prompt) or Automatic (switch without asking). If your extension doesn’t have ClearLine, a call that can’t connect shows a Couldn’t Connect notice explaining how ClearLine would have helped: Try Again redials, and Add My Number appears when your company lets you add your own mobile number (otherwise ask your administrator). Busy, declined or unanswered calls never switch, and calls to internal extensions stay on the internet. Active-call controls include:
Adding your own ClearLine mobile number: in the latest version of the app, if your company allows it, you can add, change or remove the mobile number ClearLine uses yourself, under ClearLine settings, without asking your administrator. Enter your US or Canadian mobile number and we text a 6-digit code to it; type the code into the app within 10 minutes and ClearLine starts using that number. Your current number keeps working until the new one is confirmed. If the option isn’t there, your company has chosen to keep mobile numbers admin-only, so ask your administrator.
- Mute: one-tap toggle
- Speaker / Bluetooth / Earpiece: send audio to any connected device; Bluetooth and wired headsets are picked up automatically
- Hold: pause the call; the other side hears hold music
- Record: start or stop recording the current call mid-conversation. Only shown when your administrator has granted on-demand recording for your extension. When recording starts, both parties hear whichever cue the tenant policy is set to (a beep, a spoken announcement, or nothing). Stopping is silent. Tapping a second time stops the segment; tapping again starts a new segment in the same call.
- Keypad (touch tones): tap Keypad on the active call screen to enter digits when navigating a phone menu
- Transfer: blind or attended (see next section)
- Hang up
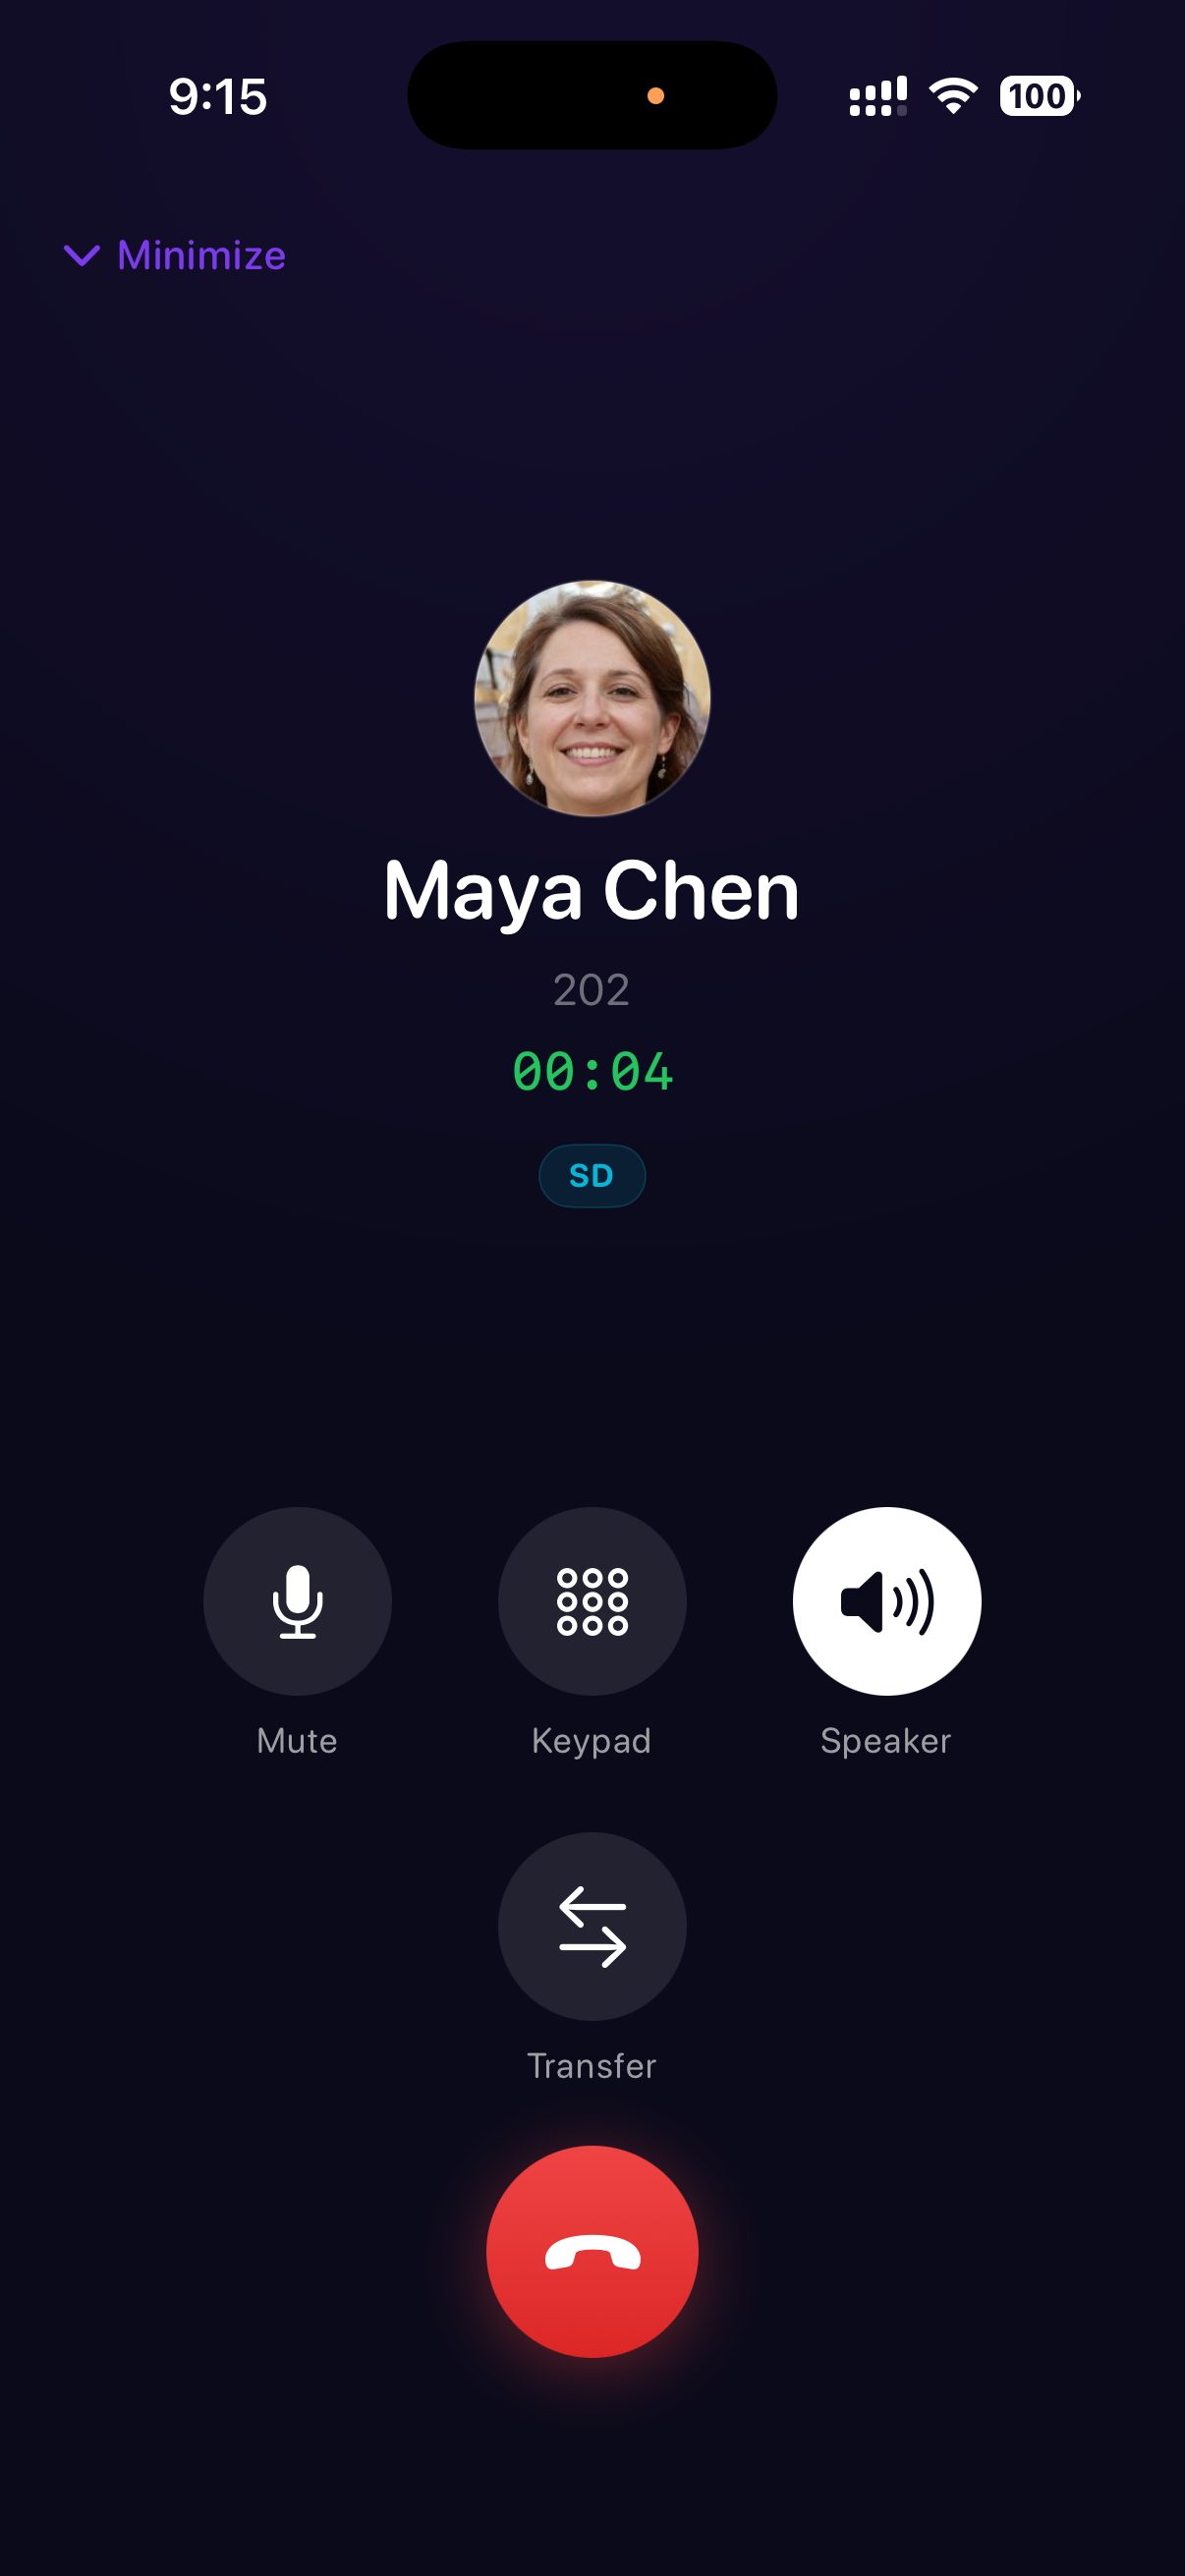
Active-call screen with live call timer, quality indicator, and the main call controls
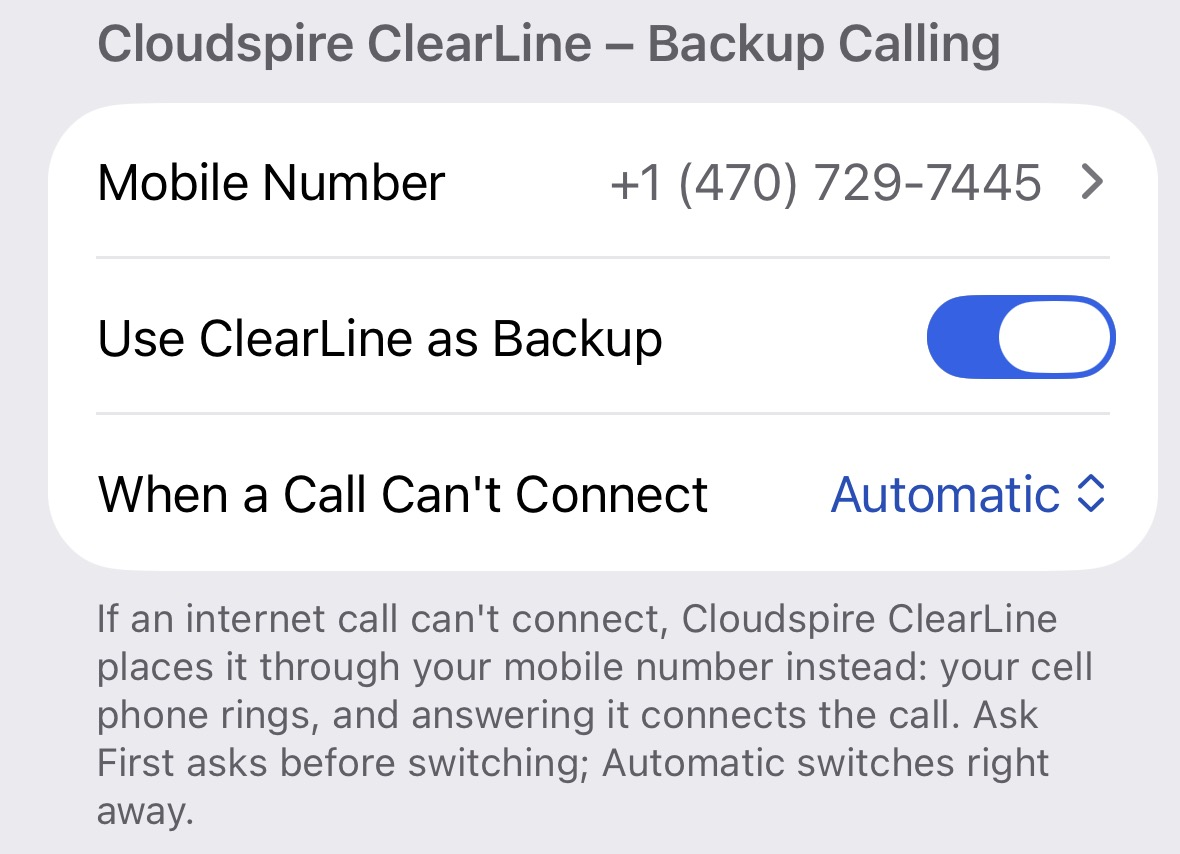
ClearLine backup settings in Settings → Preferences: the mobile number ClearLine rings, the Use ClearLine as Backup switch, and When a Call Can’t Connect (Ask First or Automatic)
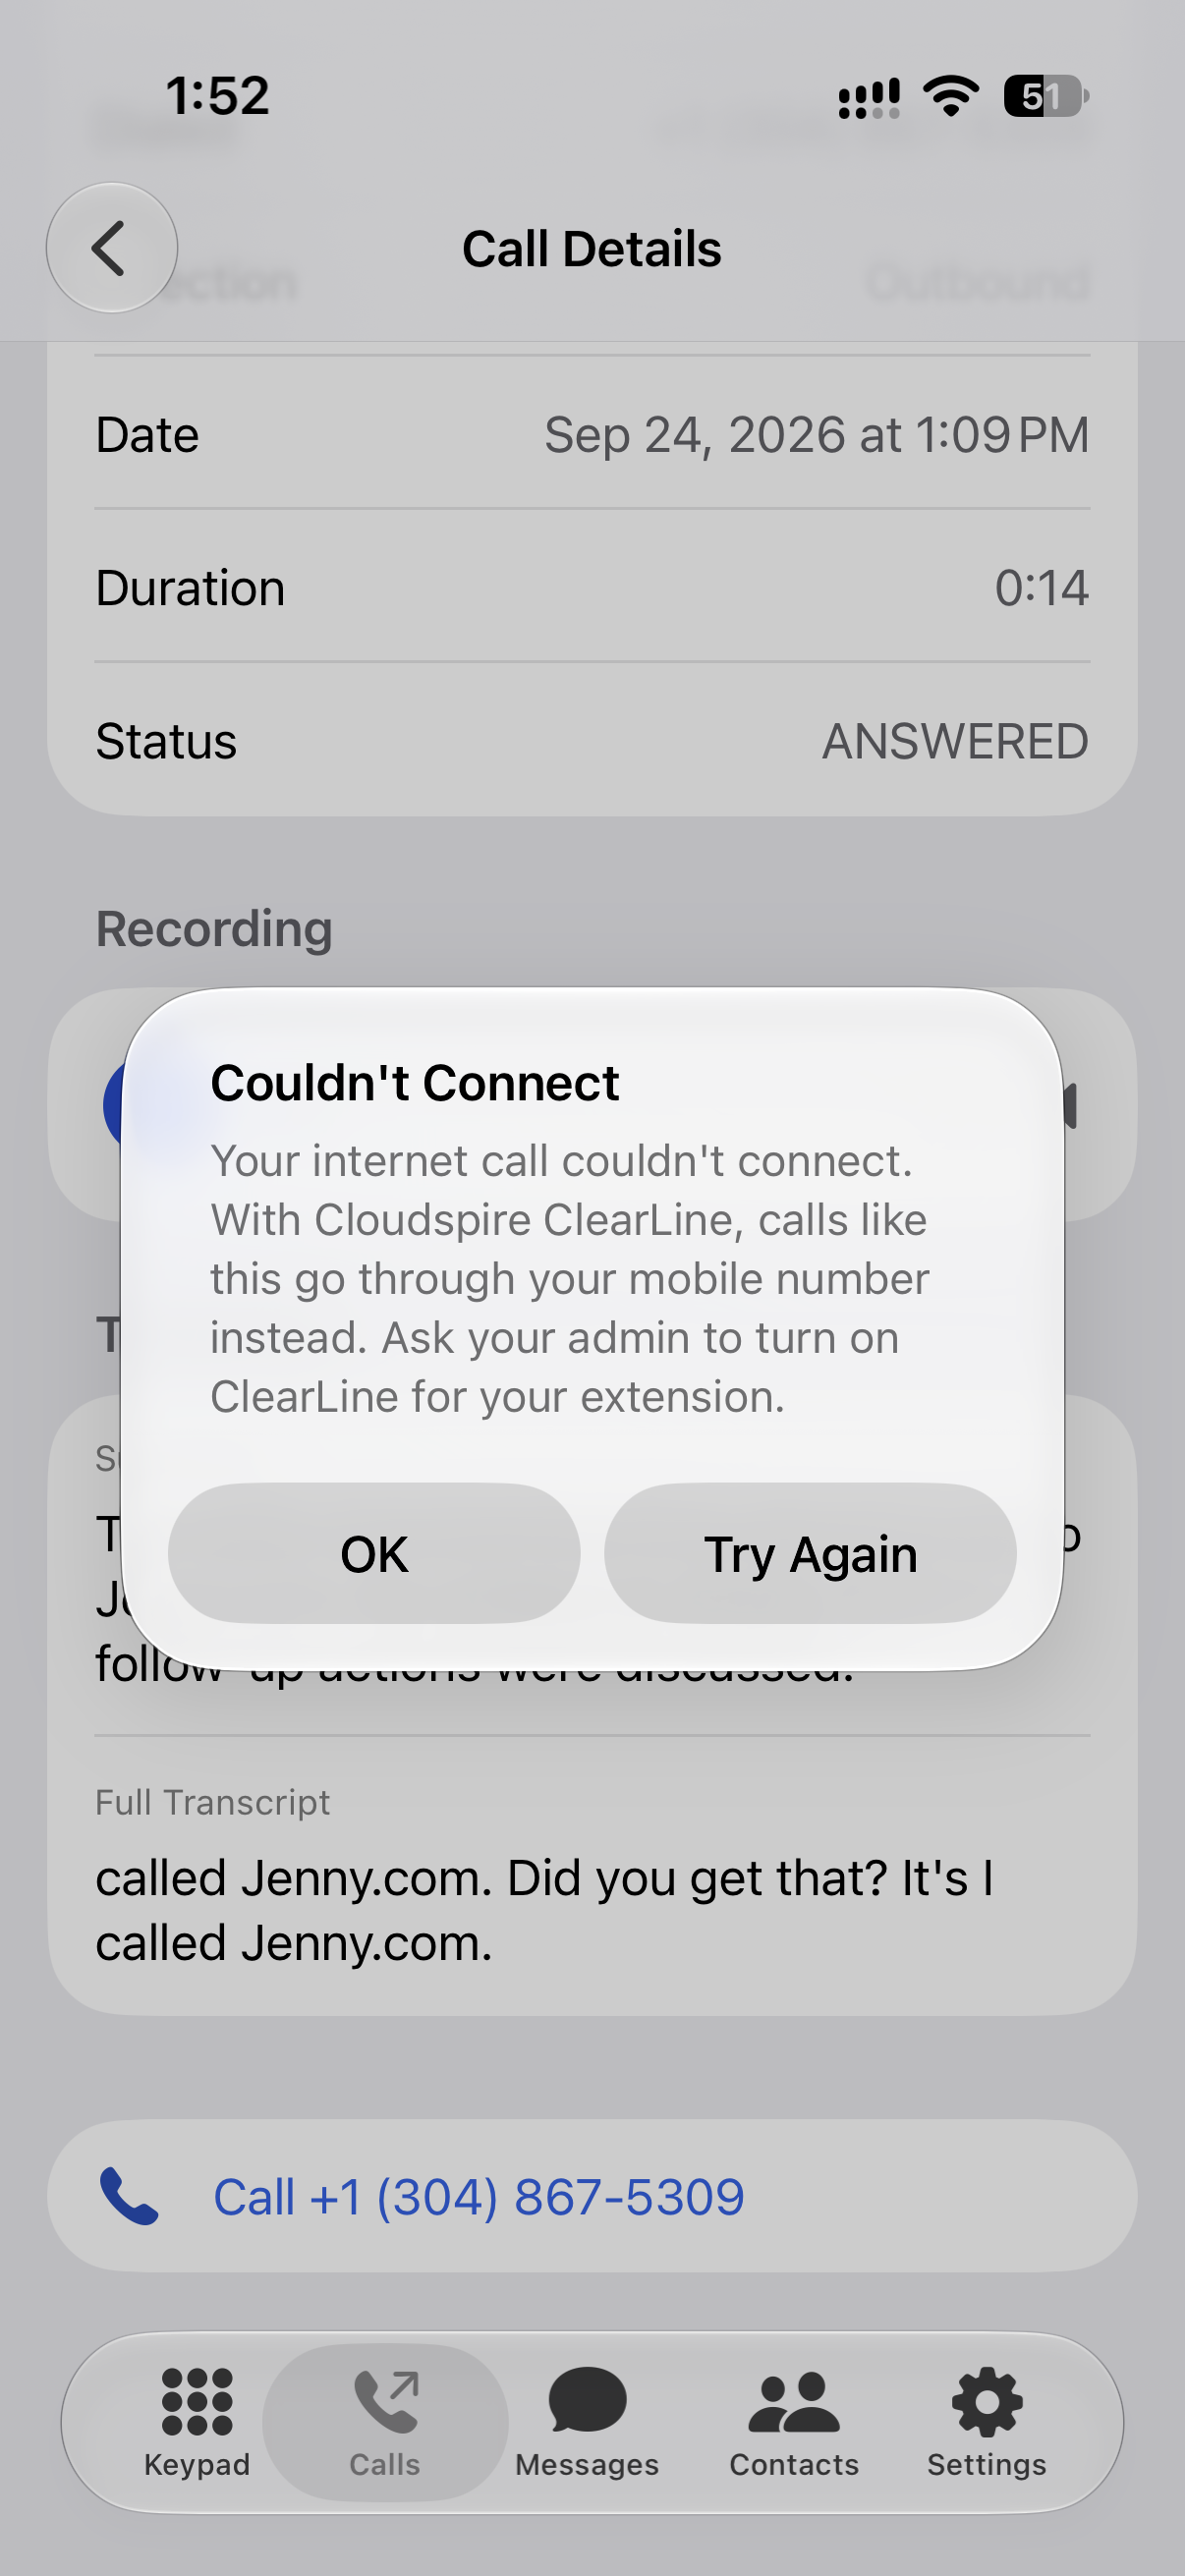
When an internet call can’t connect and your extension doesn’t have ClearLine: the notice explains ClearLine, and Try Again redials
Blind vs Attended Transfer
- Blind transfer: tap Transfer, choose a destination (BLF, Extensions, Phonebook, or manual number), tap it; call is handed off immediately.
- Attended transfer: same flow, but a consultation call is opened in parallel. You can talk to the target first and then Merge to complete the transfer, Swap between the two parties, or hang up the consultation leg and return to the original call.
Tapping a BLF key during an active call initiates a blind transfer to that extension automatically; no need to open the transfer menu first.
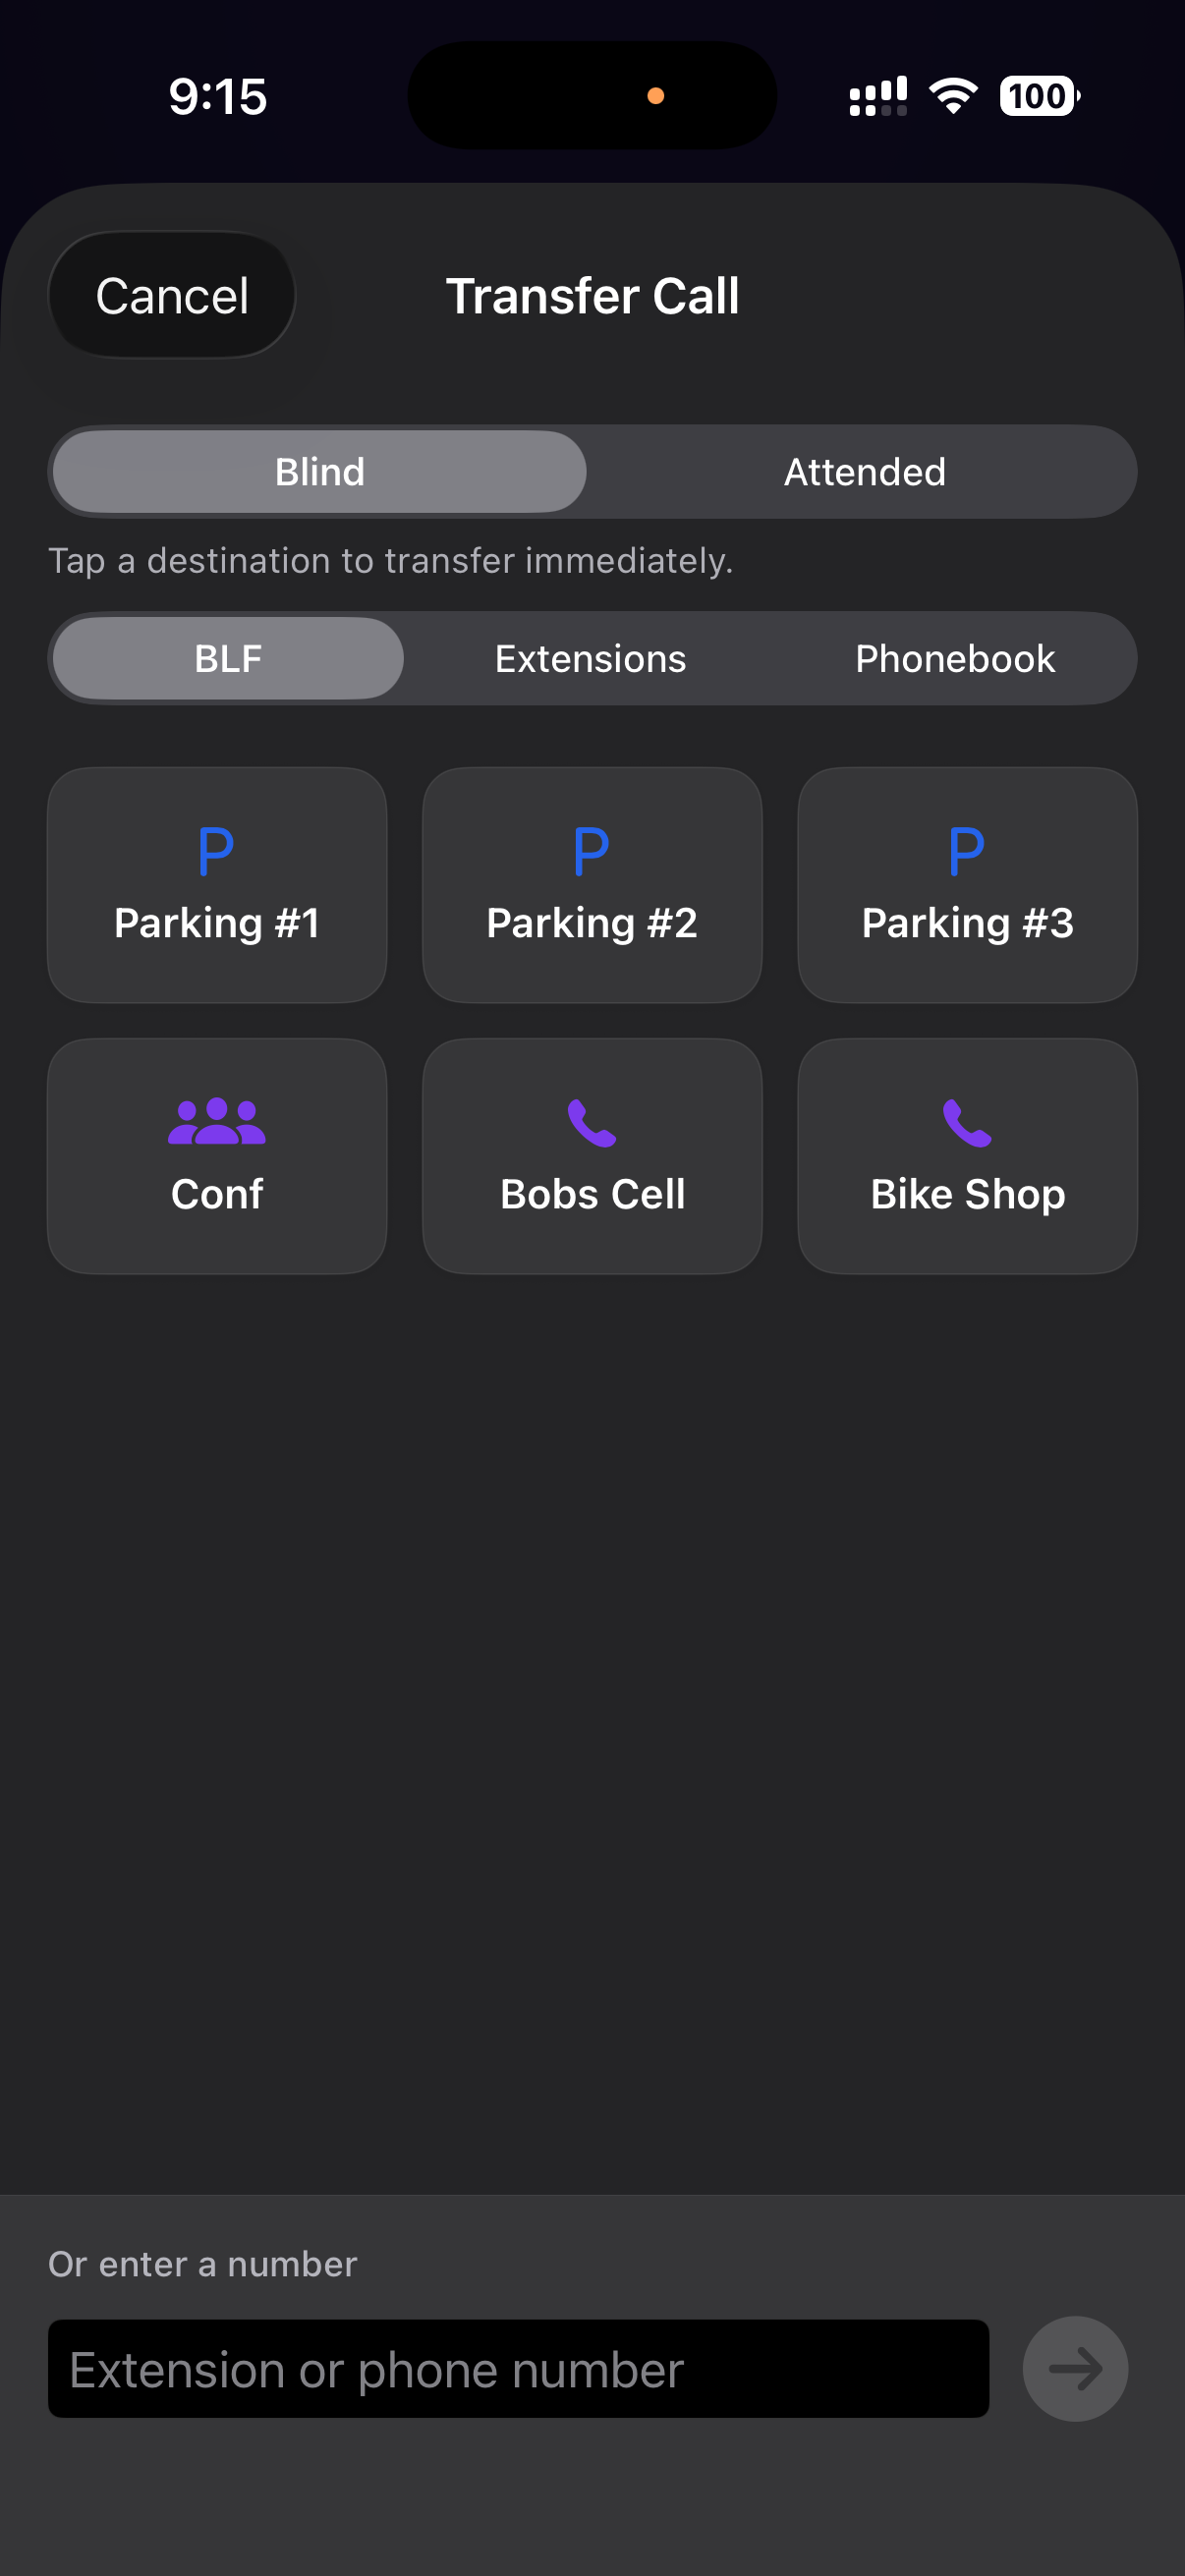
Transfer Call screen: pick Blind or Attended at the top, then tap a BLF destination, an extension, a phonebook contact, or type a number
Recording Calls
The iPhone app supports the platform's full call-recording feature. There are two independent things to know about: full-time recording (your administrator turns it on for inbound calls to a phone number, or for your outbound calls, and the system records every call automatically) and on-demand recording (you press a button mid-call to start or stop). This section is about on-demand, the part you control yourself.
Prerequisites
Two things must be true before on-demand recording works for you. Both are admin-controlled:
- Your tenant administrator must have call recording enabled for your tenant overall (master switch).
- Your tenant administrator must have Allow on-demand recording turned on for your specific extension.
If both are on, the Record button appears on your active-call screen. If either is off, the button is hidden entirely; you won't see a grayed-out button or an error message. Ask your administrator to enable it if you need the feature.
How to start and stop a recording
Three ways, all of which write to the same recording file and produce the same audit-log entry:
- The Record button on the in-call screen: tap it to start; tap again to stop. This is the same button as on the customer-portal browser softphone; behavior is identical.
- The
*1DTMF code from the in-call Keypad: tap Keypad on the active-call screen and dial*1. First press starts; second press stops. Useful when the Record button isn't easily reachable, or for muscle-memory users coming from a desk phone. - The
*1DTMF code from a desk phone on the same extension: if you're on a call answered on a different device that's logged in as the same extension, pressing*1on that device toggles recording for the whole call. The iPhone's Record button reflects the change within a second.
The audible cue
Whenever recording starts (whether full-time or on-demand) the system can play a short cue into the bridge so both parties hear it. Three policies, set by your administrator at the tenant level:
- None: silent start. Default for new tenants.
- Beep: one short tone. Conservative posture for two-party-consent jurisdictions (California, Florida, Illinois, Maryland, Massachusetts, Montana, Nevada, New Hampshire, Pennsylvania, Washington in the US, plus most of Canada and the European Union).
- Announcement: a short voice prompt explicitly stating that the call is being recorded.
Stopping is always silent; no cue plays when you tap Stop. The cue plays each time recording starts, including every restart in a multi-segment call.
Multi-segment recording in one call
You can stop and restart recording multiple times in the same call. Each on/off cycle creates its own recording file: the first segment carries the call’s own name, and each later segment adds a sequence number to it. Note that the in-app player plays the first segment of a call; if you need every segment, ask your administrator.
What the call covers
Press Record while you're bridged in a normal conversation with another person, and the recording captures both sides of the conversation from the moment you press it. Recording attaches to your call leg specifically, so:
- Hold doesn't stop recording; the channel is still up; the recording continues, capturing the silence (or hold music heard locally) for the duration of the hold.
- Transfer ends the recording. Blind or attended, your call leg ends at the transfer, and the recording finalizes at that moment. If the transfer recipient also has on-demand enabled, they can press Record themselves to start a fresh one.
- Park-and-retrieve continues recording on whichever channel stays alive across the parking step.
If you routinely transfer calls and need uninterrupted coverage, ask your administrator to turn on full-time inbound recording for the relevant DID, or full-time outbound for your extension; on-demand is for situations where a normal call unexpectedly turns into something worth capturing.
When the button doesn't do anything
The Record button is hidden, and pressing *1 on the keypad returns silently or plays a short error tone, in these situations:
- Tenant master switch is off, or your extension's Allow on-demand recording flag is off.
- You're not in a bridged call, for example, you're listening to an IVR menu, waiting in a queue, leaving a voicemail message, or talking to a Cloudspire AI agent. On-demand recording requires you to be in a person-to-person bridge.
- The call is to your own conference room or a parked-call slot; these are not human-to-human bridges in the sense the on-demand feature requires.
Where recordings live and how to listen back
A recording becomes playable 10 minutes after the call started, once it has synced to Cloudspire's secure cloud storage. Open the call in Calls → Recent and tap the row to open Call Details; until the recording is ready you'll see a dimmed clock icon, and once it is ready an inline player appears. The same recording is also available on the Call History tab of the customer portal in a desktop browser. Recordings are kept for the tenant's configured retention period (typically 30-90 days, set by your administrator).
Compliance reminder
Recording laws vary by jurisdiction. In two-party-consent regions, every party on the call must be aware that the call is being recorded. If your tenant's administrator has set the recording start notification to None and you're in a two-party-consent jurisdiction, you are responsible for verbally informing the other party that you're recording before pressing the button. Cloudspire Voice does not provide legal advice; check with your administrator or legal department about your local rules.
Parking
Blind-transfer to 700 to park the call in the next available orbit (701-720). Anyone with a parking BLF key can pick it up, or dial the orbit number directly.
Conferencing
The iPhone app turns any active 2-party call into a multi-party conference using your personal conference room. The room's address is feature code *38 followed by your extension, for example, if your extension is 201, your room is *38201. The room is created automatically the first time you use it (there is nothing to set up in advance), and it tears itself down automatically the moment the last participant has left.
Two buttons trigger conferencing on the iPhone, and they live in different places. The iPhone's conference controls are deliberately compact and work differently from the browser softphone, so it is worth knowing which button does what before you start.
- The Conference button on the in-call screen (the second row of call controls, with the three-people icon, between Transfer and the Audio route picker). One tap, no picker. Use it when you're already on a call and want to flip that 2-party call into your conference room.
- The Merge button that appears during an attended transfer's consultation step. Use it when you want to start a 3-way conference from scratch (you + person A + person B) in a single sequence, without ever leaving the call.
The iPhone app does not have an “Add Participant” button, an in-call phonebook overlay, or a keypad for placing a second outbound call from inside an active call. To add another person to a conference that's already running, you hang up your own leg, dial the new person from the Keypad tab, and press Conference on that new call. The steps are spelled out below.
Path 1: One-tap Conference button (from any active 2-party call)
- While on an active call, tap the Conference button on the in-call screen.
- The other party is sent into your personal conference room first, and your iPhone re-dials the room automatically. After about a second, you and they are both in the room and can talk normally.
- The header at the top of the call screen now reads Conference instead of the original caller's name. To add a third person, follow Path 3 below.
If the active call can't be conferenced, for example, the other end is voicemail (*97), a parked call slot, or an IVR menu, the button still tries, the system rejects it cleanly, your original call stays connected, and a brief toast slides down from the top of the screen explaining why. Nothing is dropped.
The Conference button is hidden in two cases: while you're already on a call to your own conference room (you can't add yourself to your own room), and during an attended transfer's consultation step (where Merge takes its place; see Path 2).
Path 2: Merge to Conference (from an attended transfer)
When you want to land all three parties in the room at once, use the attended-transfer flow:
- While on a call with person A, tap Transfer and pick person B from BLF / Extensions / Phonebook, or type B's number directly. Choose Attended at the top of the Transfer screen.
- The app dials B in parallel; A is on hold while you talk to B.
- When B answers, instead of tapping Transfer (which would complete a regular transfer and drop you out), tap Merge.
- All three parties (you, A, and B) end up in your conference room together.
Path 3: Adding another participant to a running conference
Once you're in the conference room, the iPhone's in-call controls are intentionally minimal: there is no in-call dialpad for placing a new outbound call, and no in-call phonebook. To bring another person in, follow this sequence:
- Tap the red Hang up button. This drops your leg only; everyone else stays in the room and continues talking. (See “Hang Up vs ending the room” just below.)
- You're now back at the Keypad tab. A Join Conference pill appears just above the dialpad with the live participant count, confirming that the room is still running.
- Dial the new person normally: type a number on the keypad, tap a BLF key, or tap a name in Contacts.
- When they answer, tap the Conference button on the in-call screen. They're sent to your room, and your iPhone re-joins automatically.
- Repeat to add additional participants. The room holds up to 10.
This is the canonical iPhone-app pattern for building a multi-party call. The same person can step out and rejoin as many times as needed simply by tapping Join Conference on the dialpad pill.
Hang Up vs ending the room
The red Hang up button on the iPhone always disconnects your own iPhone leg only. The conference room itself stays alive as long as anyone else is still connected to it, including outside callers, desk phones, and other softphones. There is no “end the conference for everyone” button on the iPhone, by design: a participant can't unilaterally kick the rest of the room. The room ends automatically the moment the last participant leaves.
If you've hung up but want to listen back in, tap the Join Conference pill on the dialpad; it re-dials the room and shows the current participant count alongside the label.
Personal conference room (*38): dial-in and drop-in
You can also use your room without pressing the Conference or Merge buttons:
- Dial
*38on the Keypad to join your own room directly. Useful when you want to set up an open meeting room and have others dial in to it on their own. - Blind-transfer any active call to
*38(tap Transfer, type*38, choose Blind) to drop that call into your room without joining yourself. Repeat for each call you want to drop in, then dial*38directly when you're ready to join. - Sending a call to someone else’s room: check the device first. A colleague using the mobile app or the browser softphone can blind-transfer a call to
*38followed by your extension to drop it into your room, for example transfer-to-*38201lands the call in extension 201's room. From a desk phone this does not work: a desk phone reads*38as “my own room” and ignores the extension typed after it, so a colleague transferring to*38201from their desk phone drops the call into their room instead of yours. When in doubt, have them transfer the call to you and drop it in yourself.
If your administrator has programmed a Conference BLF key on your desk phone, that key lights up whenever your room has anyone in it, and pressing the key from the desk phone joins (or rejoins) the room without having to dial the feature code by hand.
Presence & BLF
Your presence pill sits on the Keypad tab just under your name. Tap it to open the picker:
- Status: Available, Away, In a Meeting, Do Not Disturb
- Custom message (optional, up to 100 characters)
- Auto-clear: 30 minutes, 1 hour, 2 hours, 4 hours, End of Day, or Don’t Clear: your status flips back to Available automatically when the timer elapses
Presence updates arrive by silent push rather than polling, so your app refreshes on its own without you opening anything. To protect your battery, those pushes are grouped; when a coworker changes their status, expect your app to catch up within about 30 seconds rather than instantly. If you need presence to move the moment it changes, the browser softphone in the customer portal updates faster.
The BLF grid below the dialpad (configurable to 1, 2, or 3 rows of 4 keys) shows real-time state for the extensions, parking slots, and feature codes your administrator has assigned. Tap a BLF key to dial it, or tap it during an active call to transfer.
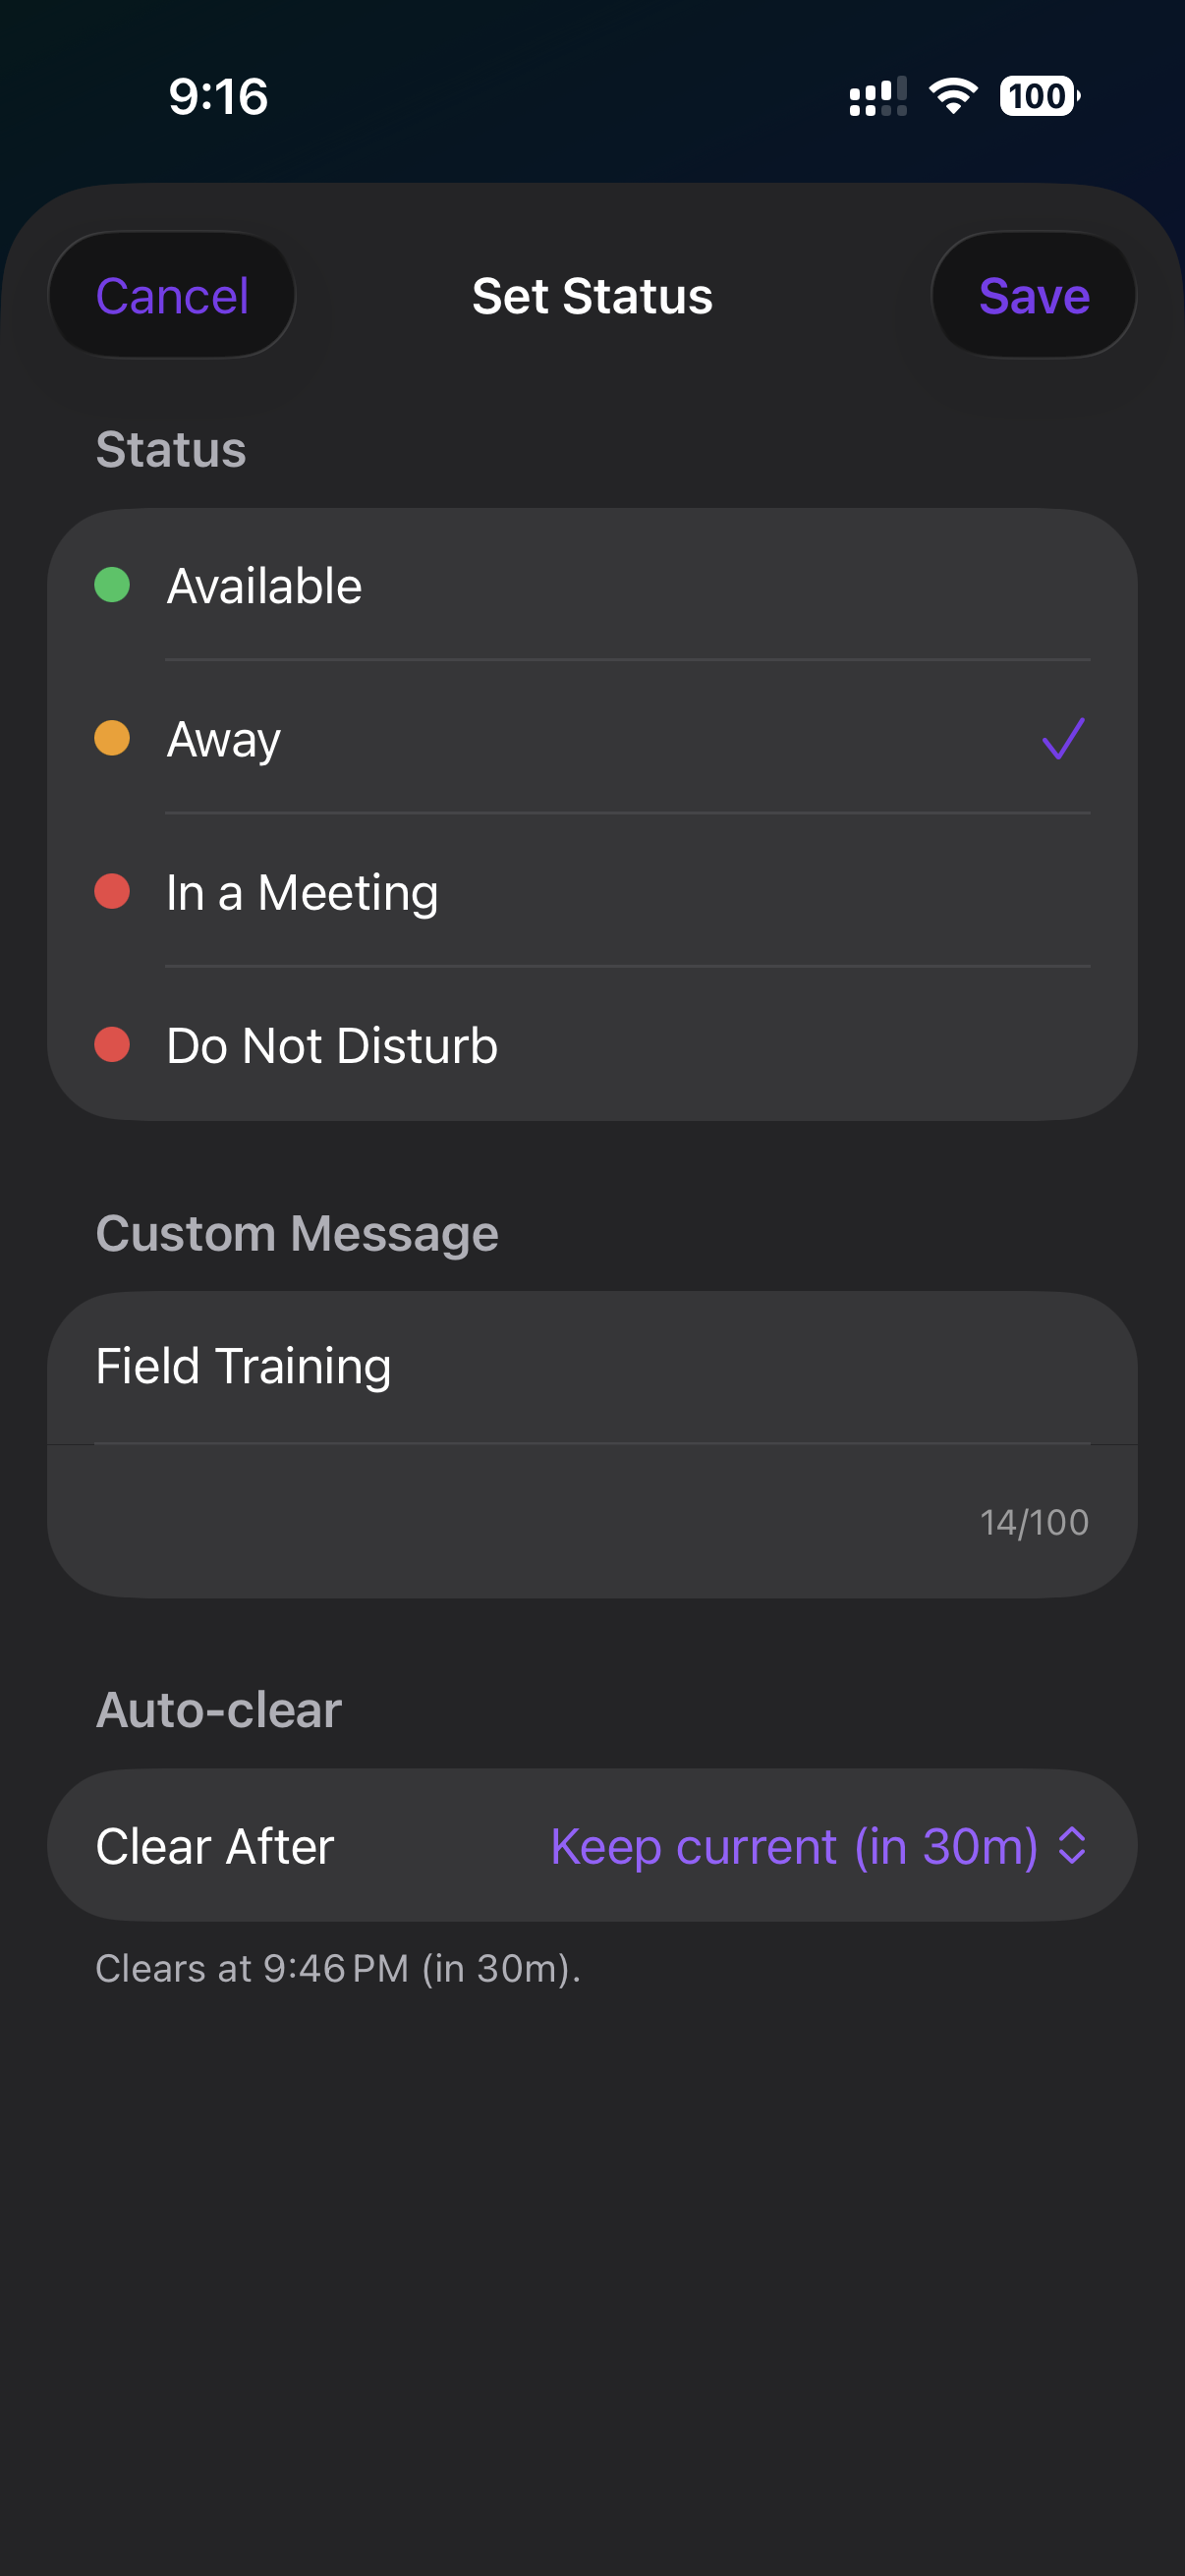
The Set Status picker: status, optional custom message, and an auto-clear timer
Call History
The Calls tab has a segmented switch at the top: Recent on the left, Voicemail on the right. Recent shows every inbound and outbound call for your extension with the caller’s name or number, a relative timestamp, and the talk time. Missed calls are red. Swipe a row left to delete, long-press to copy the number.
Calls you place show up too. Recent lists the calls you make (outbound external calls and calls to other extensions) each with the correct direction, not just the calls made to you. Inbound phone calls are labeled as Incoming with the number that was dialed, even when they arrive through Cloudspire’s edge network. Diagnostic self-test calls (the *600 through *604 codes, such as the echo test and the music-on-hold test) are excluded so they don’t clutter the list, as are calls the system places on your behalf.
Caller name on inbound rows. When an inbound call is from someone not in your iPhone contacts, the call-history row still shows a name when Cloudspire’s server-side CNAM lookup resolves one (e.g. "Frederic Davis"). This applies to the Recent list, the Missed list, the Call Detail screen, and the in-app caller-name search. On outbound rows the name shown is the destination contact’s name rather than a CNAM lookup.
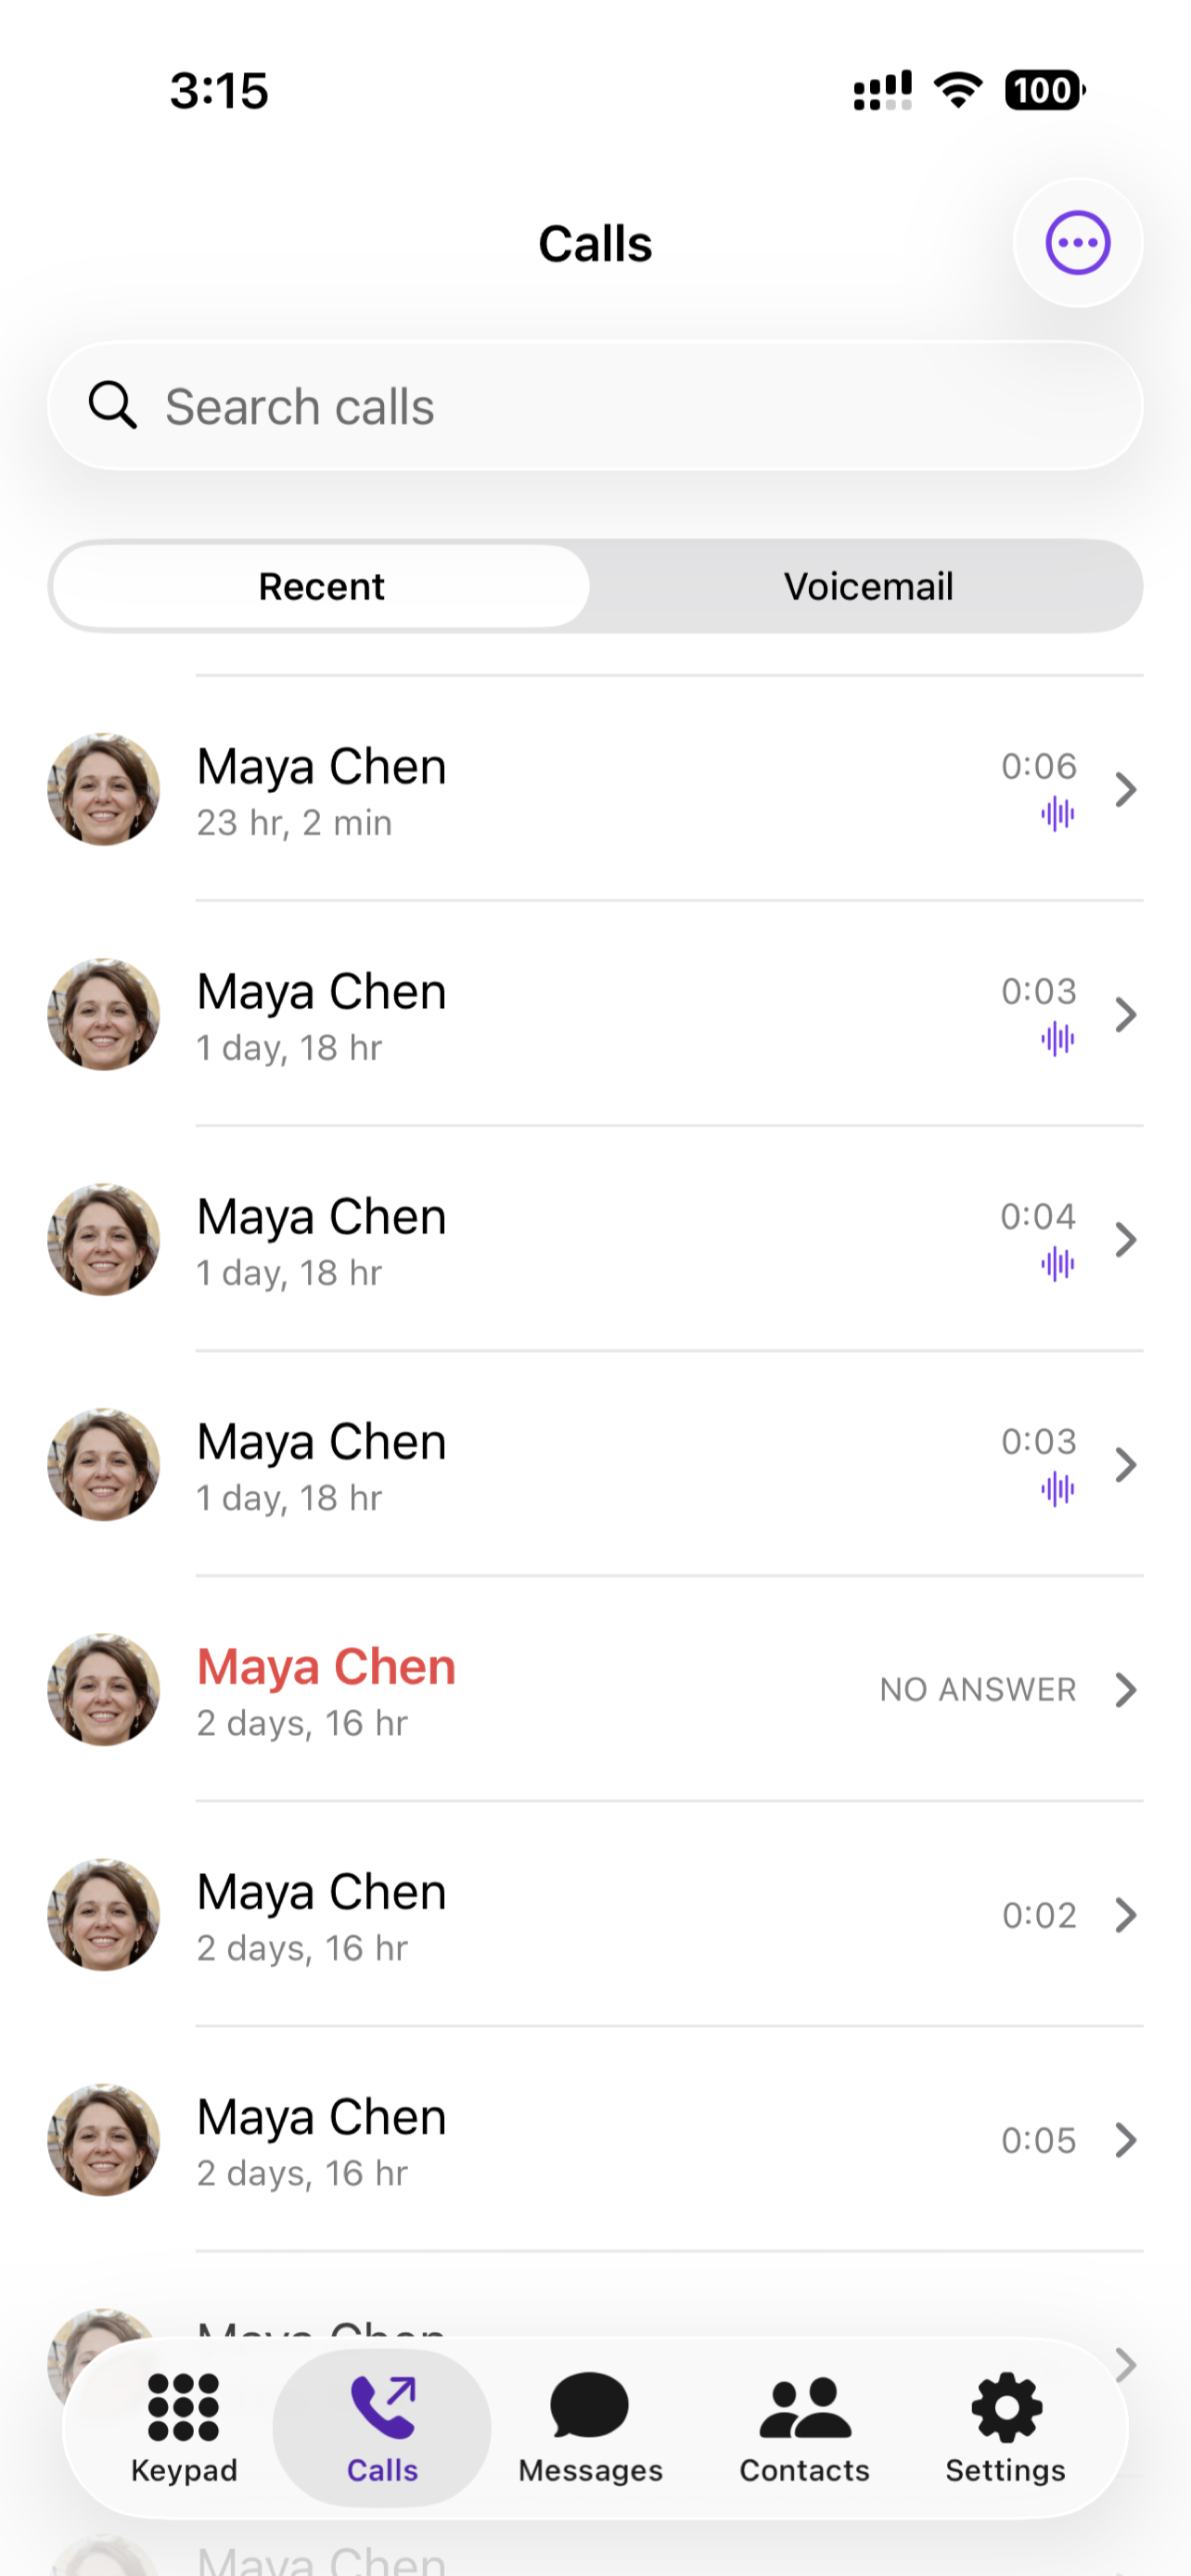
Recent call history with caller names and talk time
Tap any call to open the Call Details screen. For answered calls, this shows duration, status, an inline recording player (when recording is enabled), and (if AI transcription is turned on for your extension) an AI summary of the conversation plus the full transcript you can scroll through and copy from.
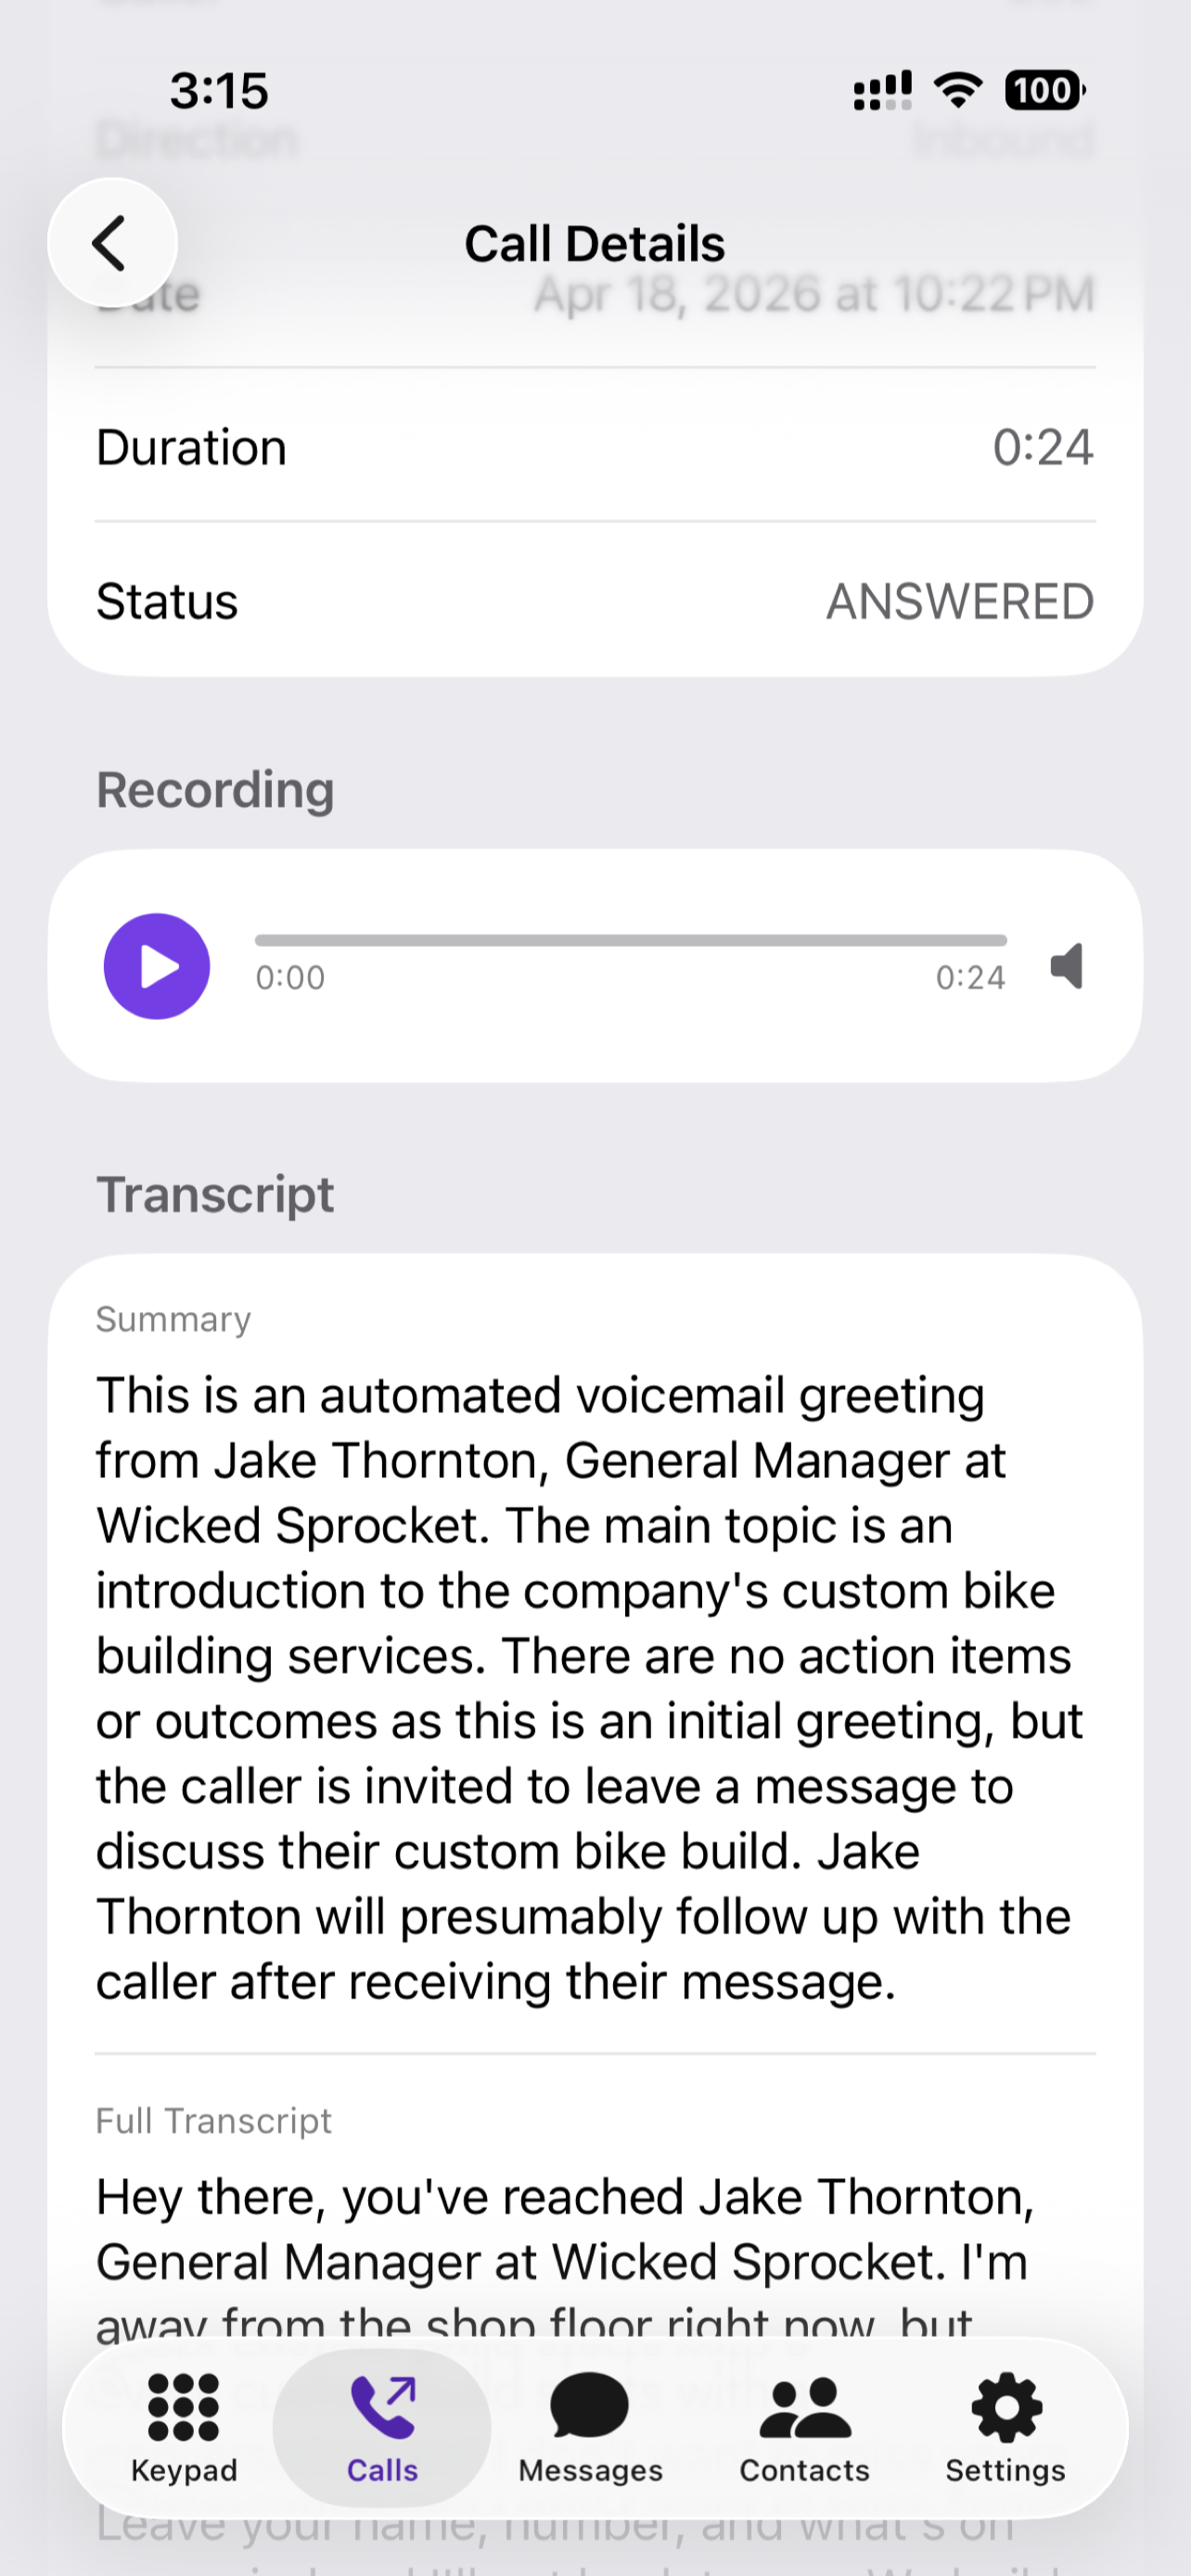
Call Details: recording player, AI summary, and full transcript for an answered call
Voicemail
The Voicemail list (under the Voicemail segment of the Calls tab) shows each message with the caller’s name/number, timestamp, duration, and an unread indicator. Tap a row to open the message; controls include:
- Play / Pause with a scrubber
- Transcript: if transcription is enabled on your extension, the full text appears inline and is selectable (tap-and-hold to copy)
- Call back: one-tap return-call to the sender
- Delete
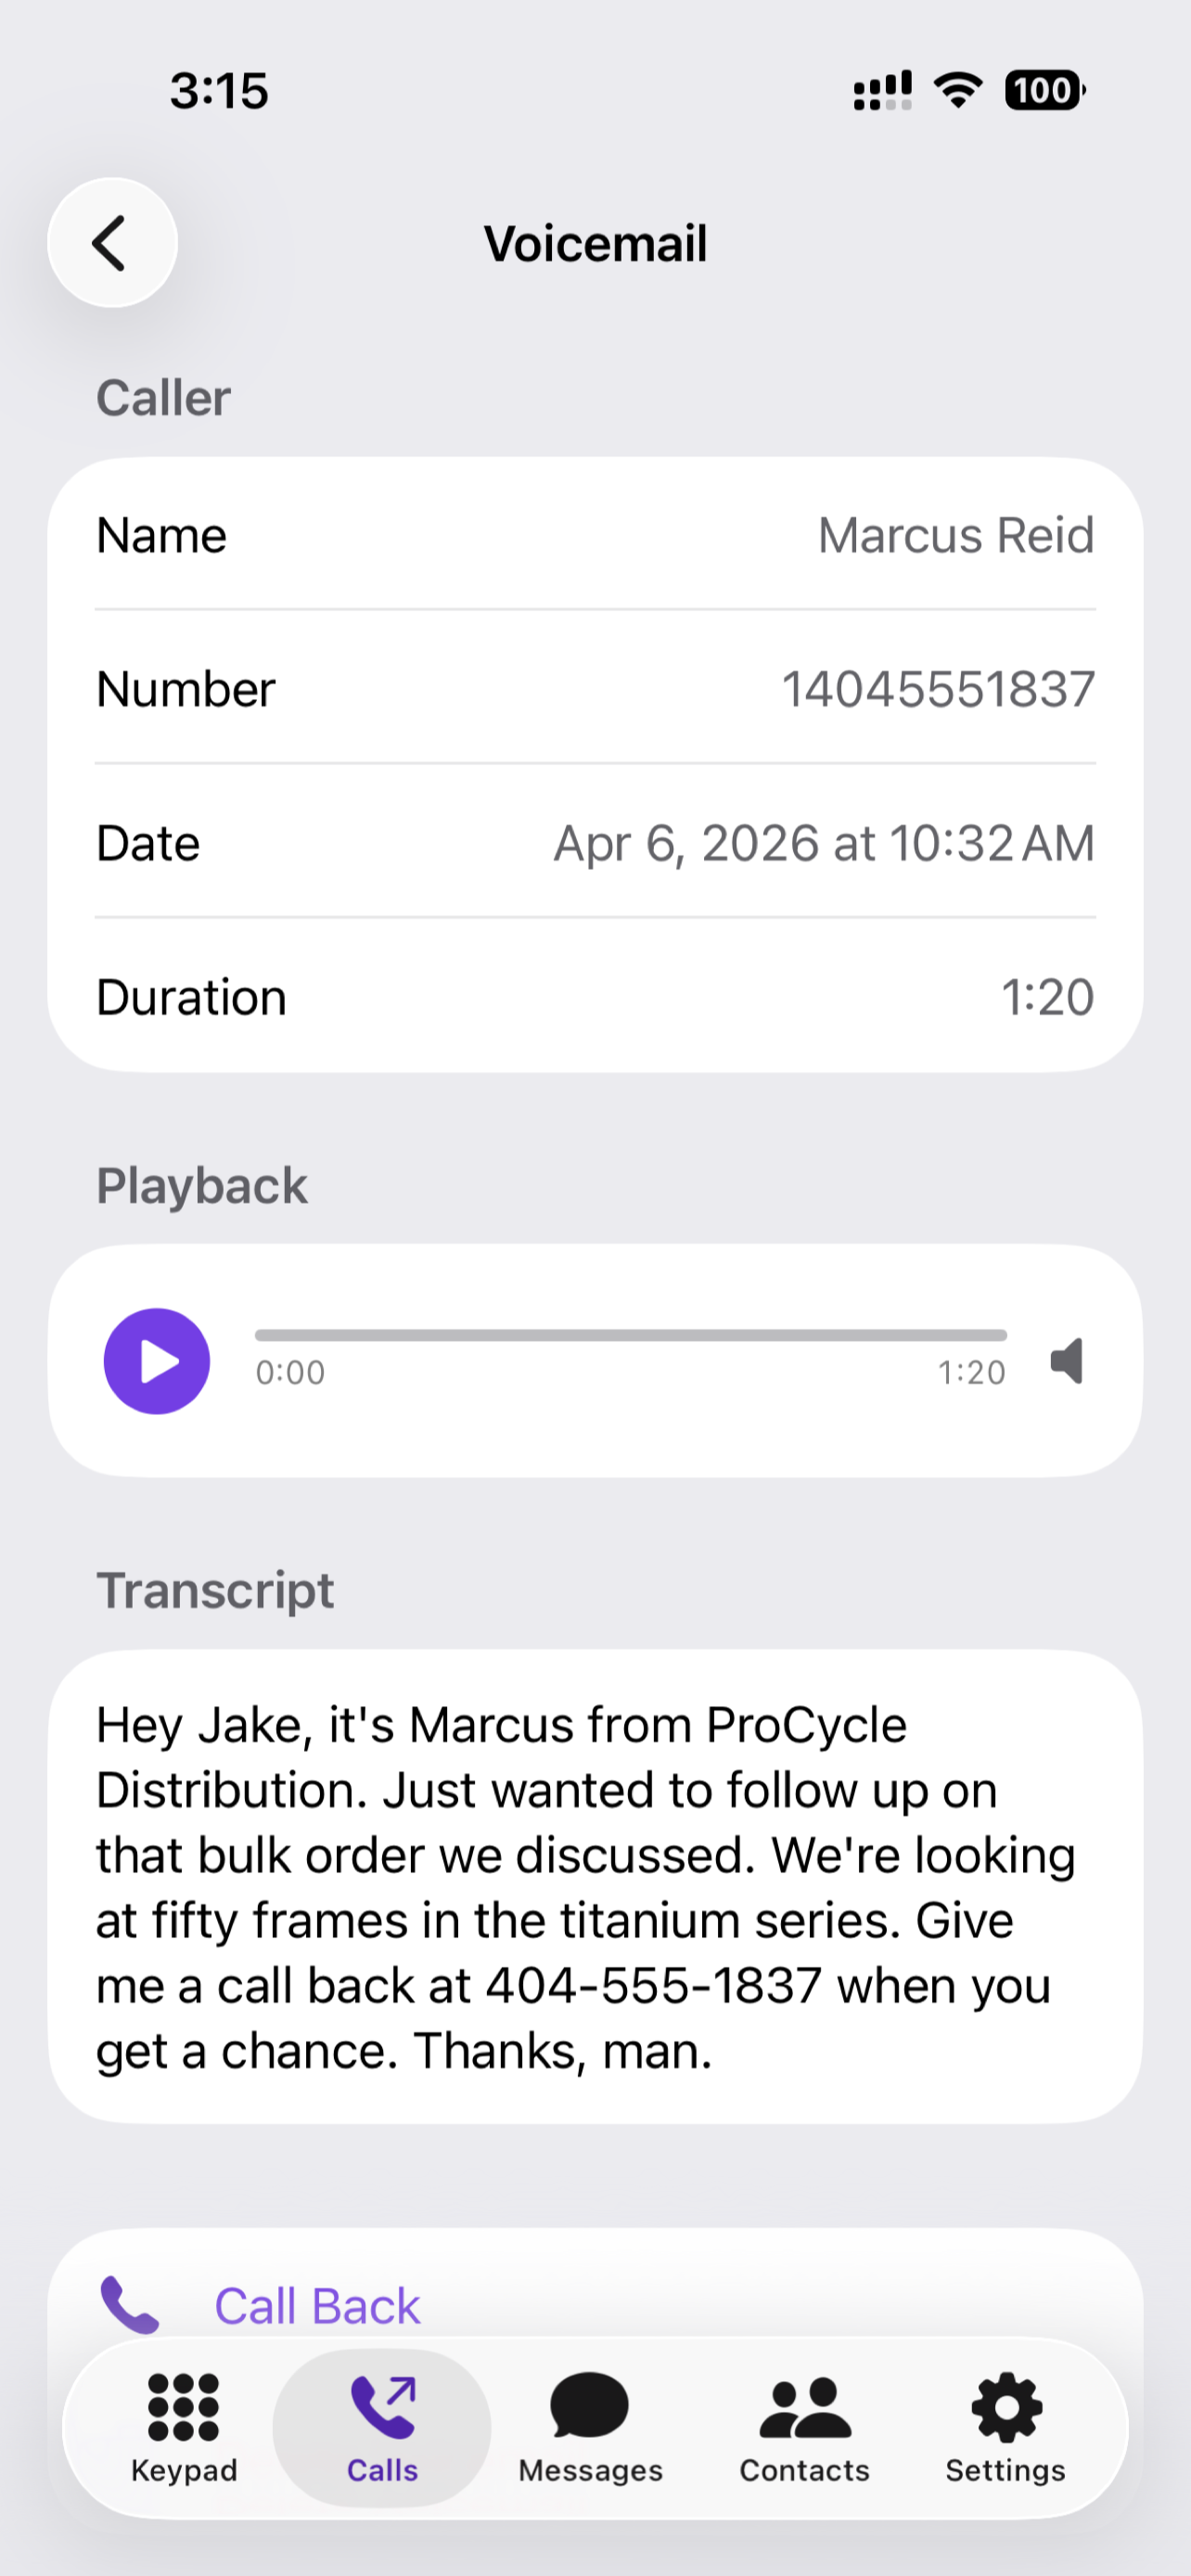
A voicemail message with caller info, playback, and an inline transcript
Messages
The Messages tab unifies SMS/MMS (from your business number) and internal team chat in one inbox. Features:
- Chat-style bubble layout that makes it easy to see what you sent vs. what you received
- Typing indicators when a coworker is typing in an internal chat or team group conversation (outside senders don’t broadcast typing)
- Read receipts on internal messages
- Picture messages: photos download and show inline in the conversation, including in the notification preview
- Notifications for new messages, with the sender’s name shown right in the alert
About short codes (5-6 digit numbers like bank and airline alerts): you can receive messages from these numbers, but you can’t reply; the phone industry does not allow replies from a regular business number to a short code. The app shows a clear error if you try.
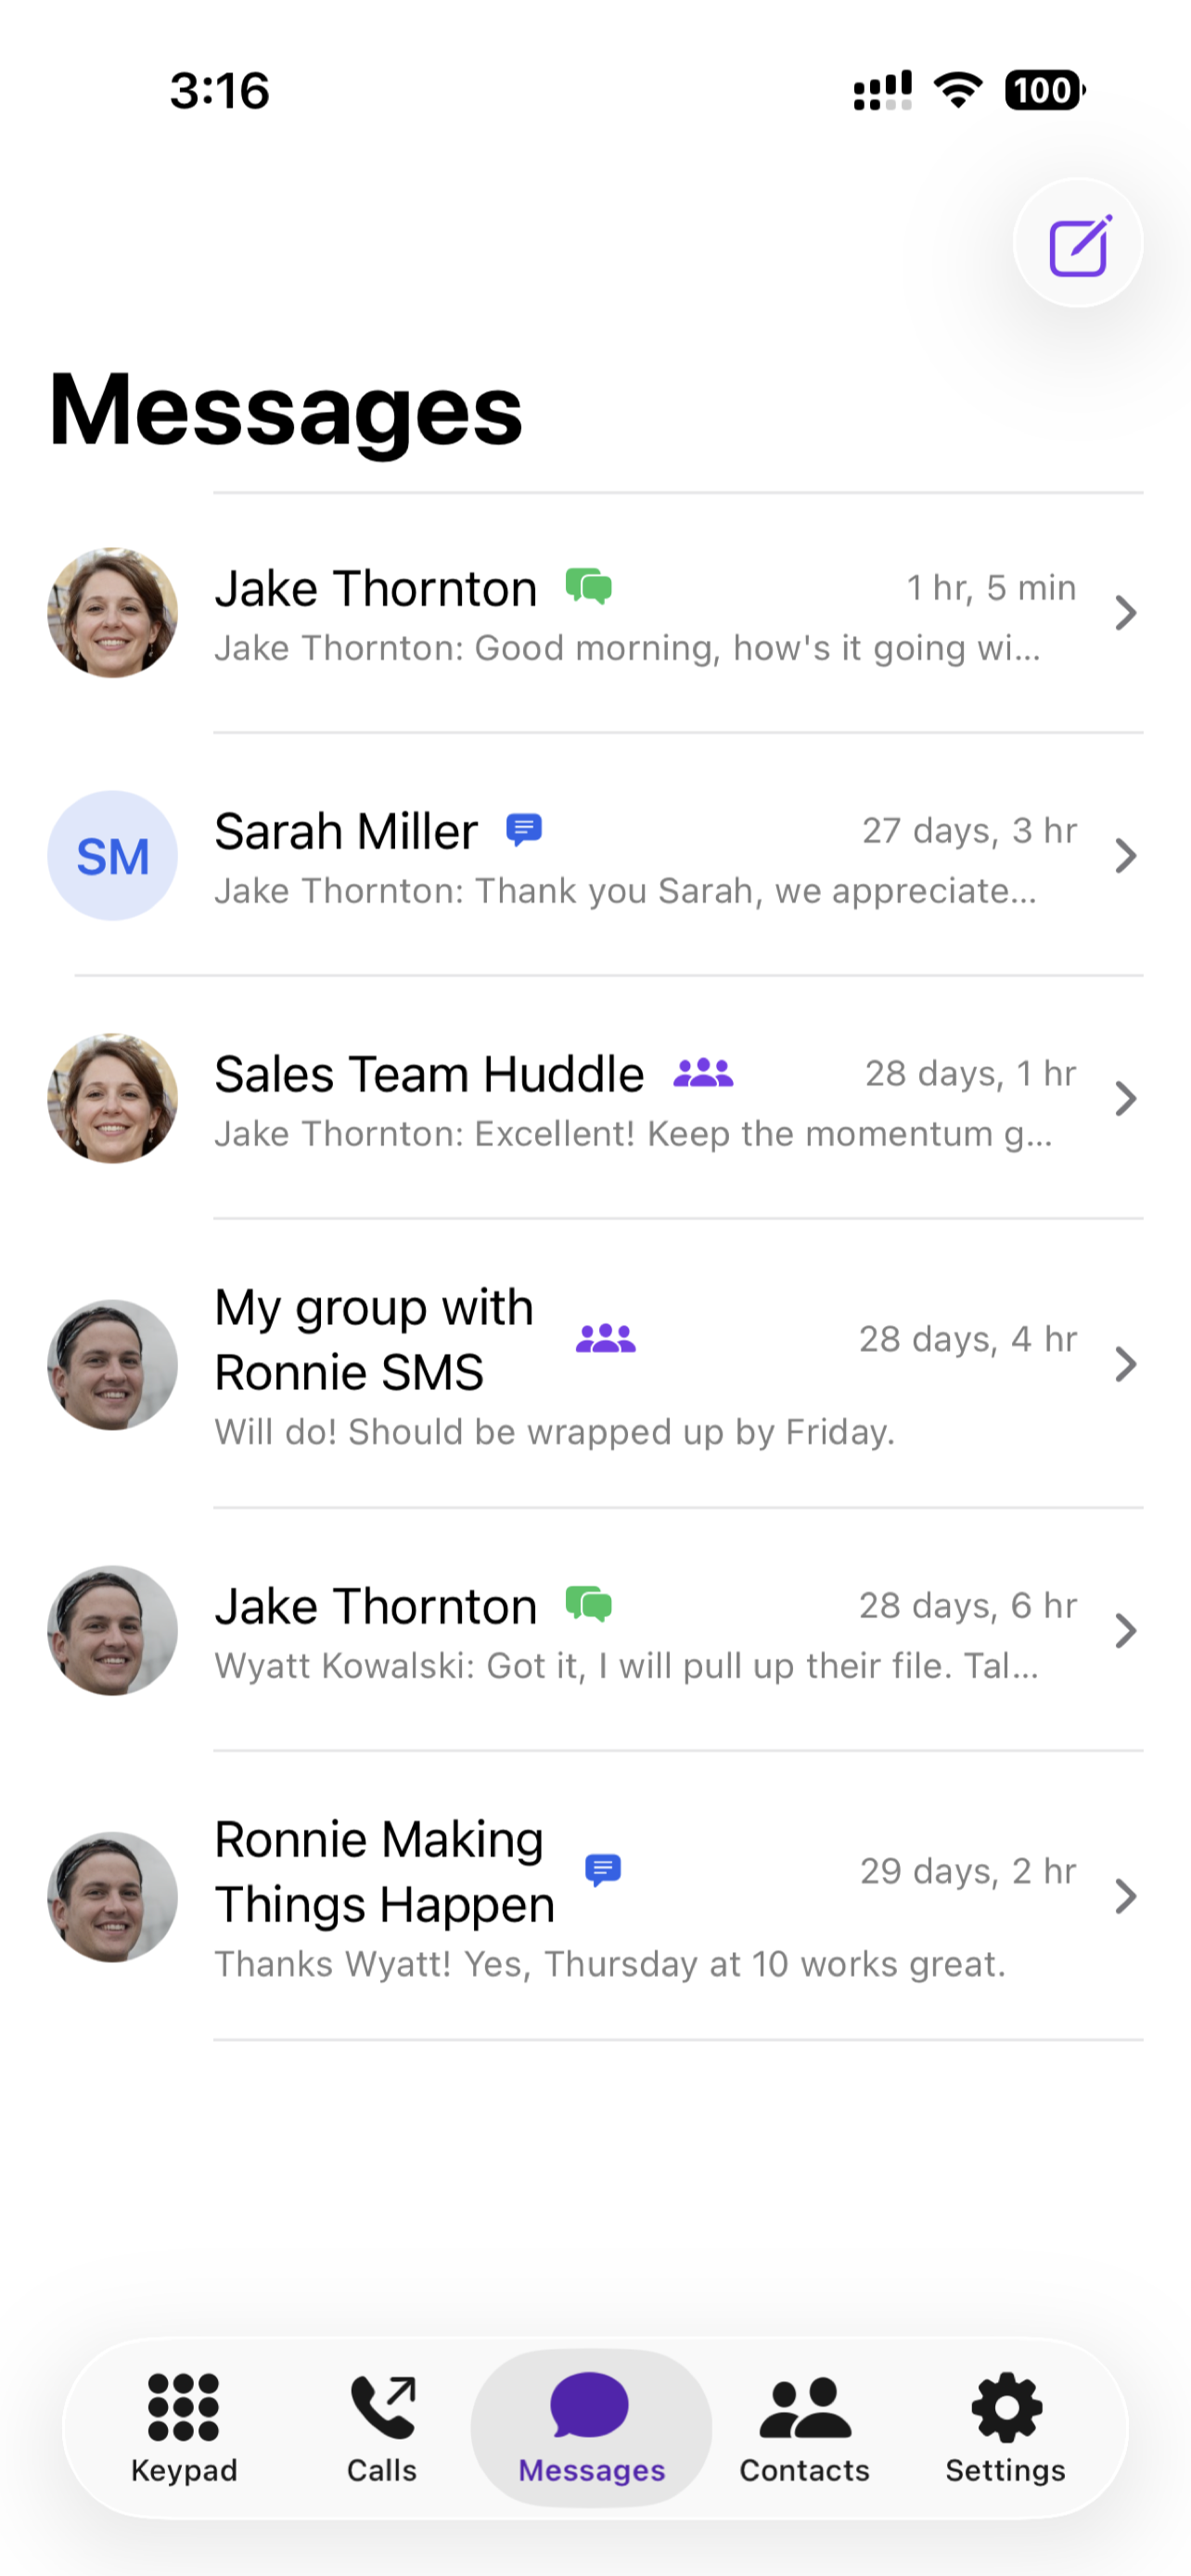
Combined inbox for outside texts and internal team chat
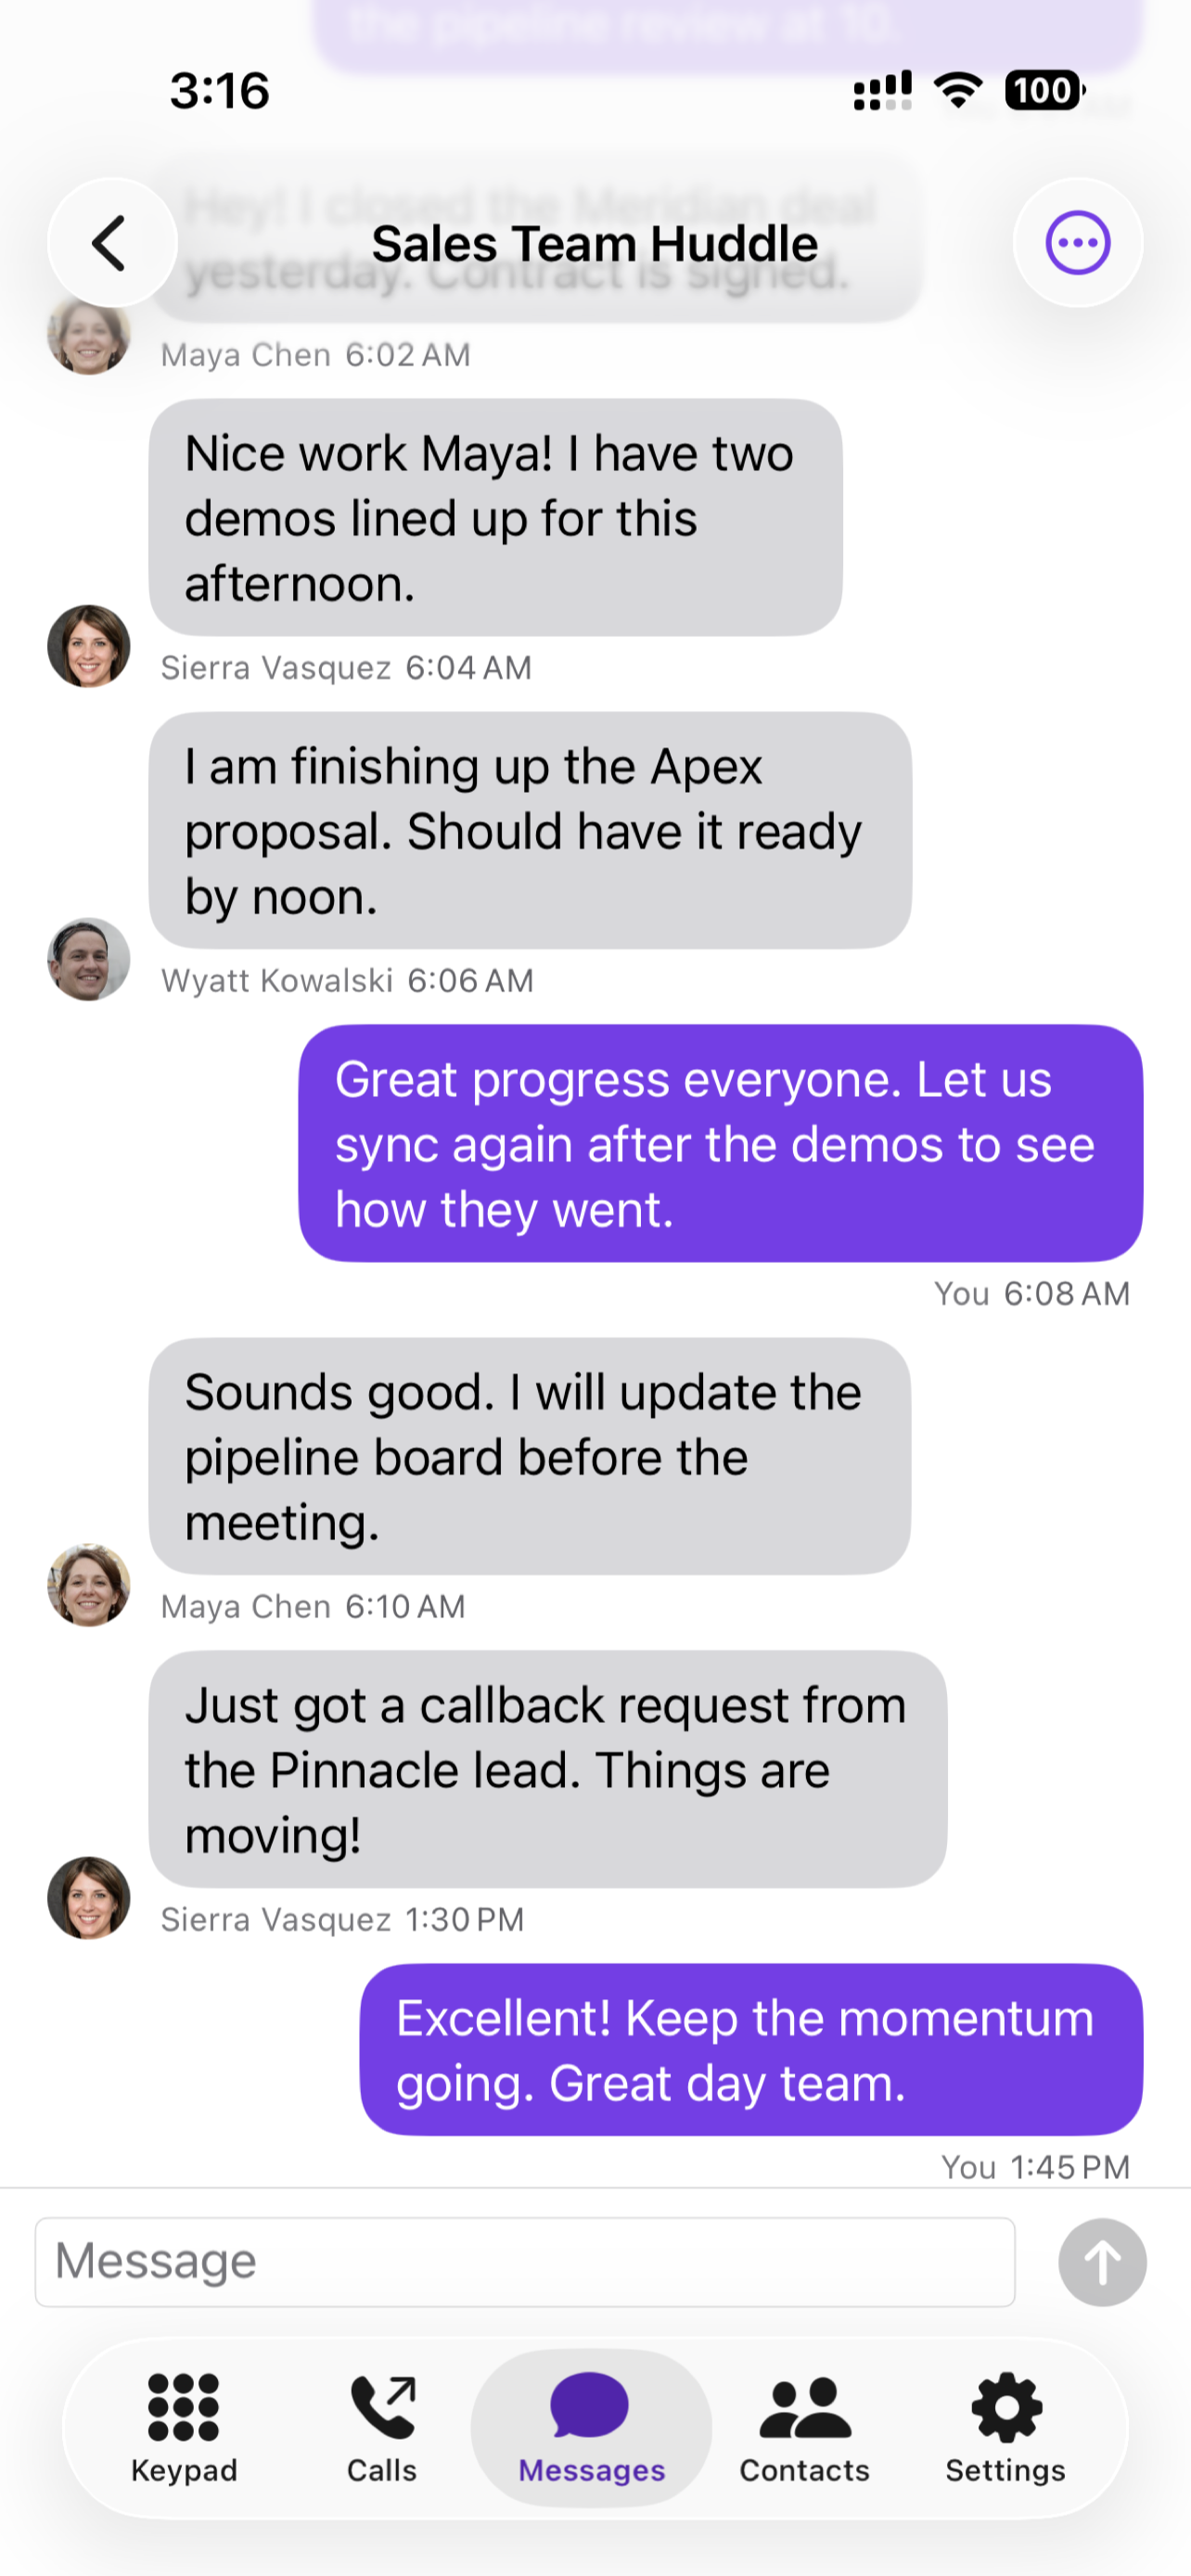
A team group chat with sent/received bubbles
Contacts
The Contacts tab has three sources in one, all searchable:
- Extensions: internal users in your tenant with live presence dots
- Phonebook: shared contact directories assigned to your extension, including automatically built caller-name databases and anything synced in from your CRM
- iPhone: your device contacts (requires Contacts permission, which the app requests on first access)
Tap a contact to see details and call buttons for every number on the record. The search on the Keypad tab (type a name using the dialpad) searches all three sources at once, so you can dial by name without switching tabs.
One-tap Call or Message from any contact row
Every row in the Contacts tab carries two action icons next to the contact name:
- Green phone icon: place a call.
- Purple speech-bubble icon: start a message. For an internal extension this opens a new Direct chat in the Messages tab. For an outside contact this opens a New SMS to that contact’s number (or, if the contact has multiple numbers, a quick picker first). You don’t have to type any digits.
After you hit Send on a brand-new conversation, the app automatically switches to the Messages tab and opens the conversation that was just created, so you can keep typing without having to switch tabs and hunt for the fresh thread. The icons also carry explicit VoiceOver labels ("Call" and "Message") so users navigating with VoiceOver hear the action verb instead of the raw SF Symbol name.
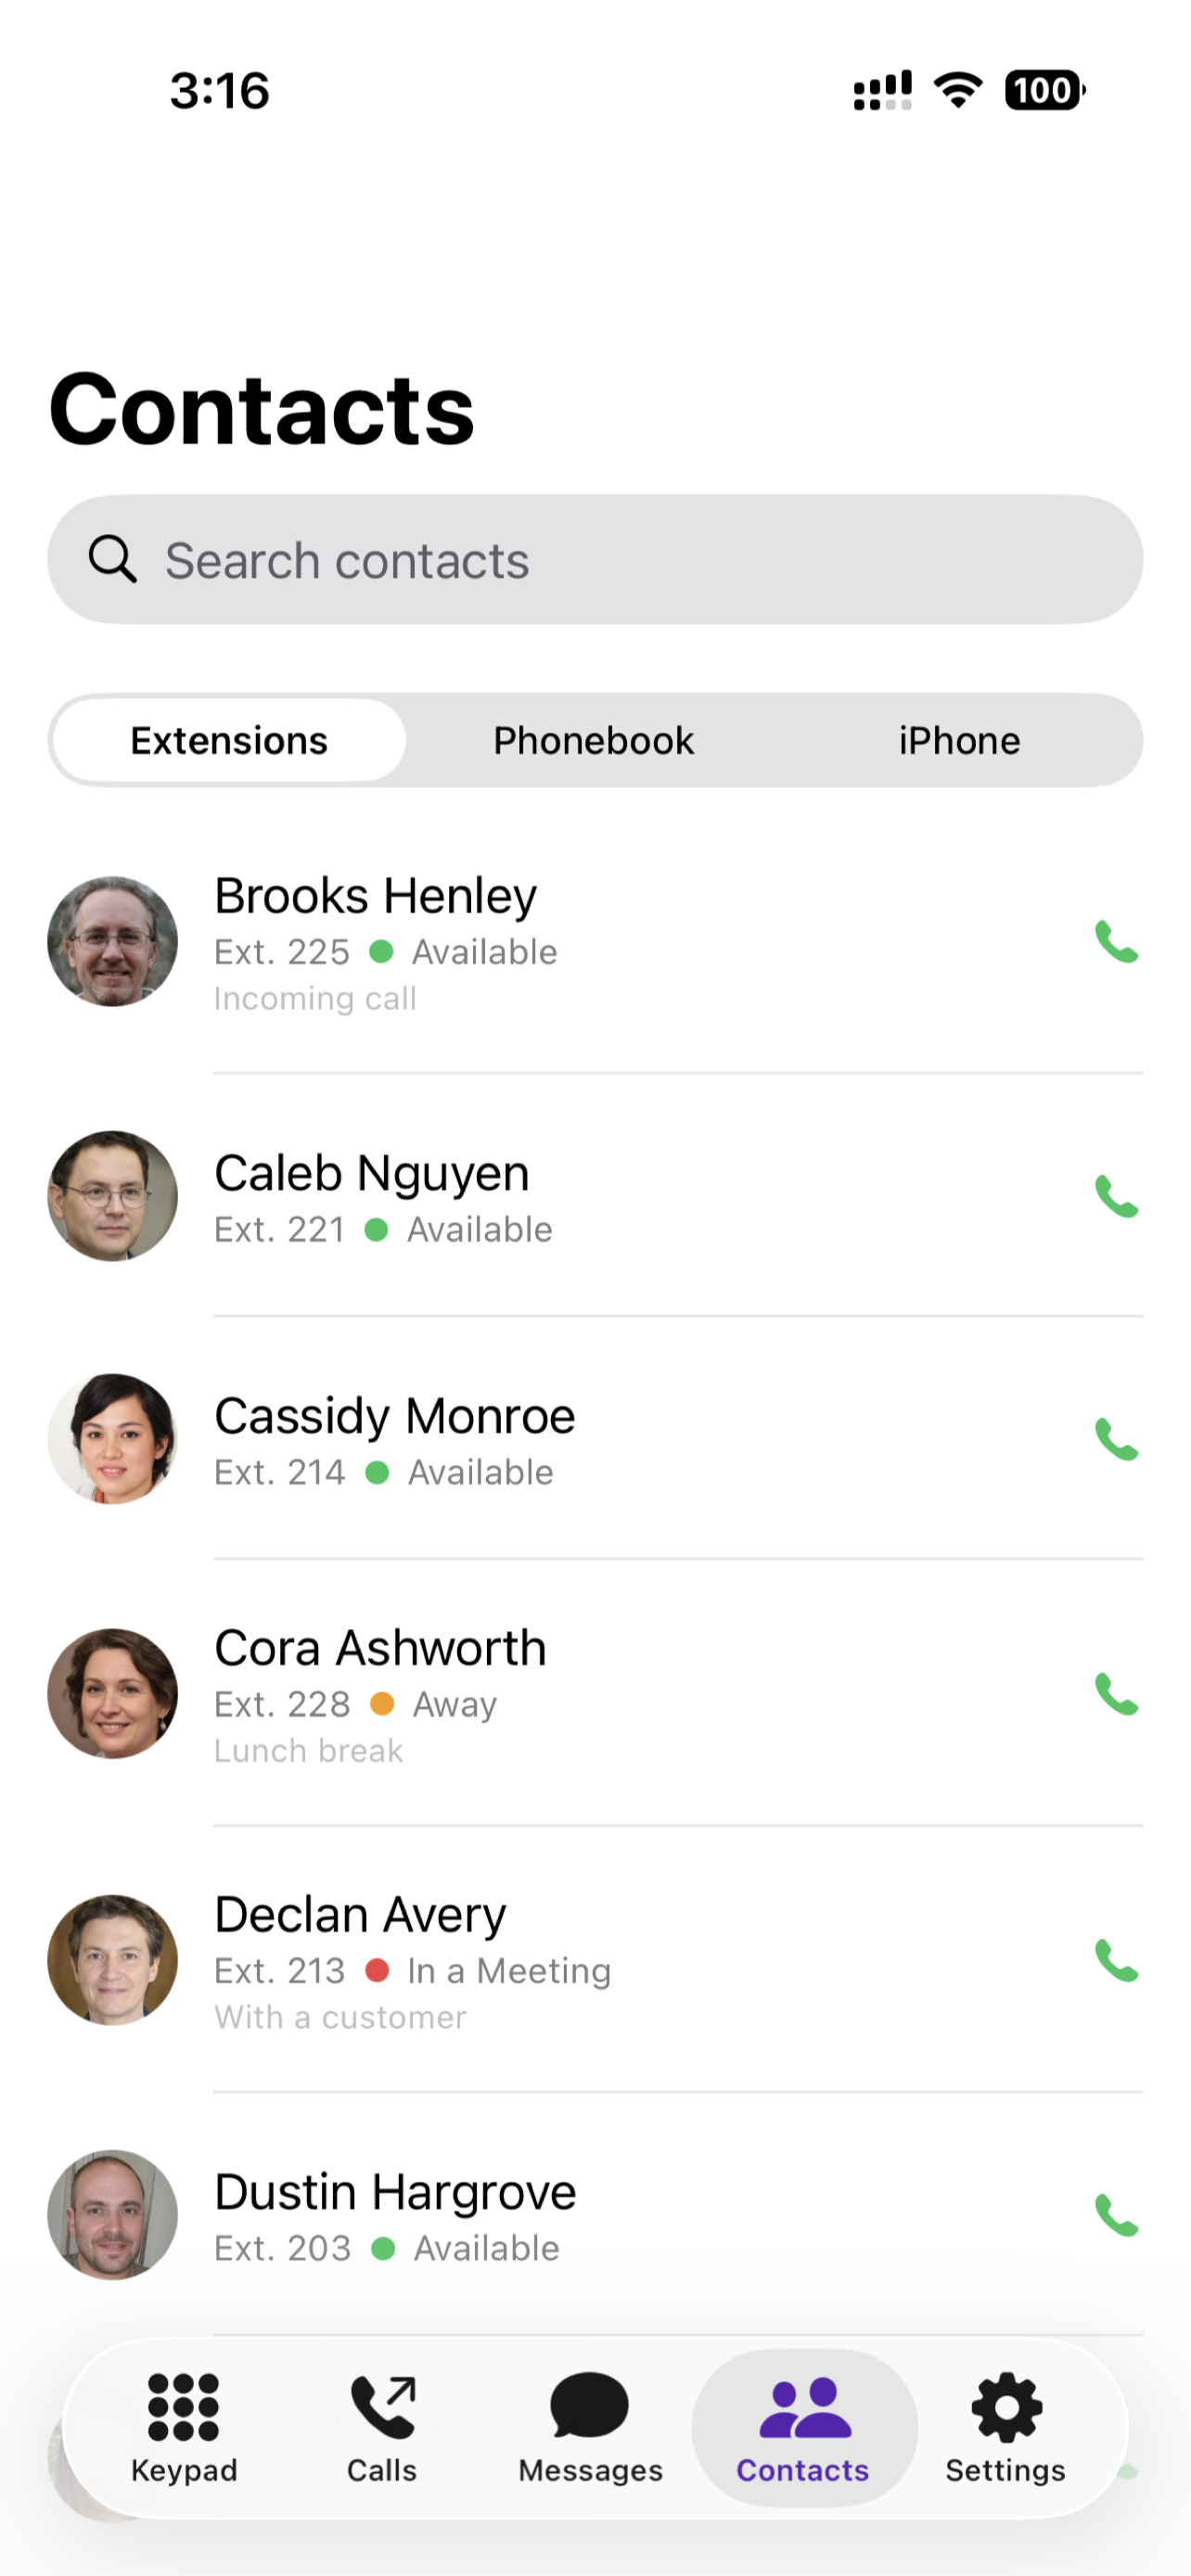
The Extensions directory on the Contacts tab: each coworker’s current availability appears next to their name
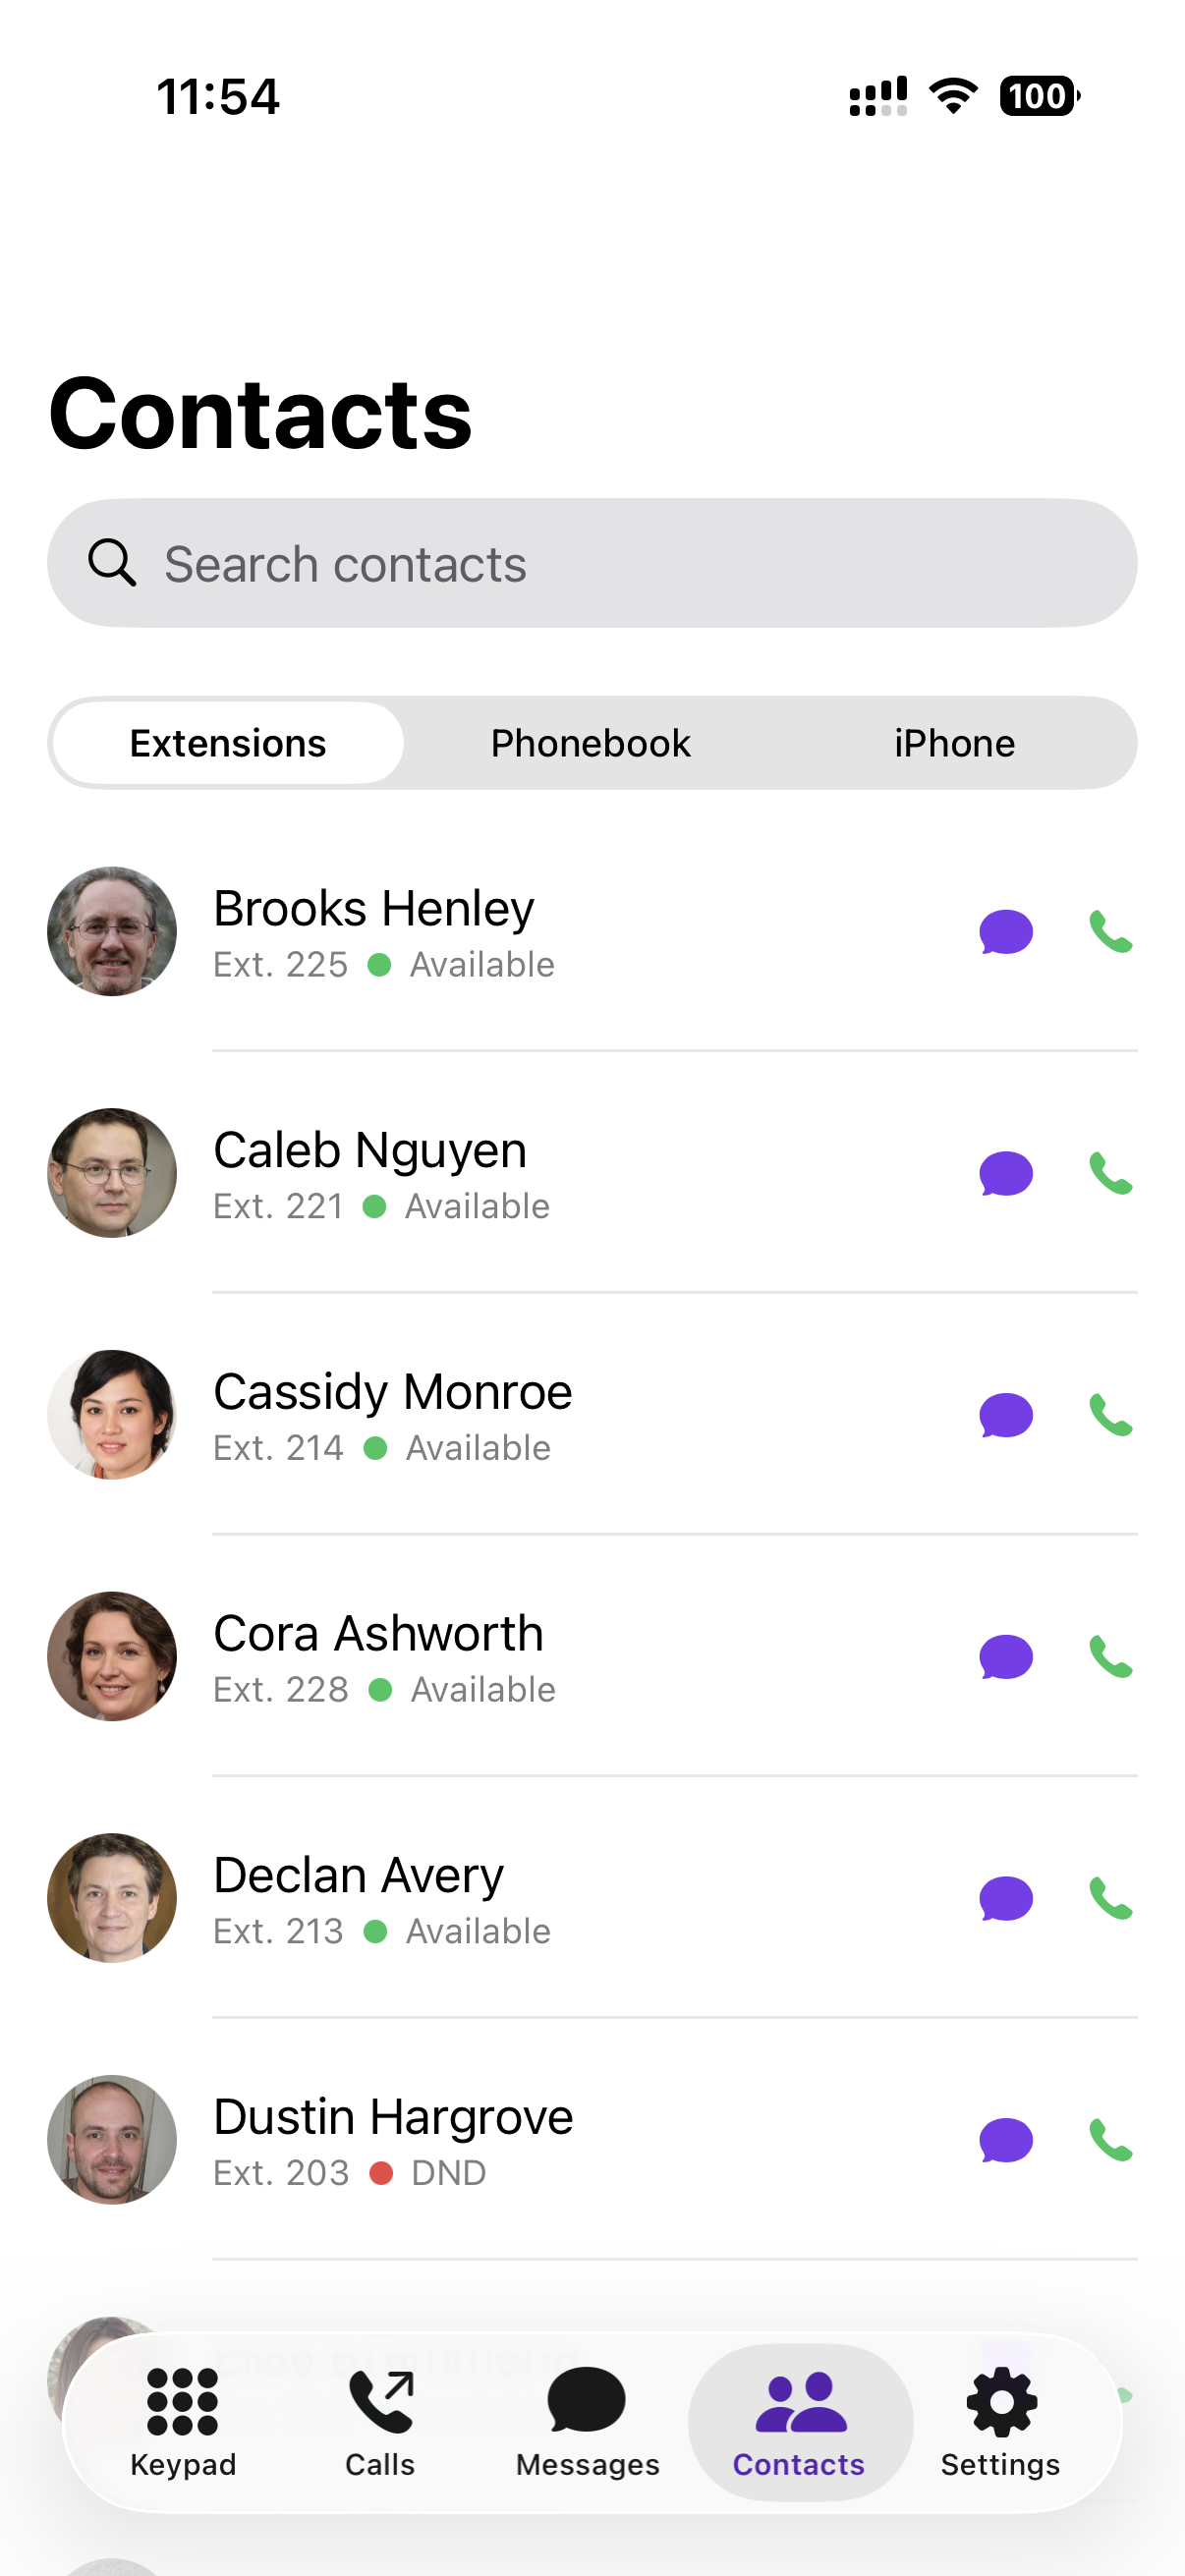
Each Contacts row has both icons (green Call and purple Message) so you can start an SMS or internal chat without leaving the Contacts tab
Starting a new SMS from the Messages tab
You can also compose a new message from the Messages tab. Tap the pencil/compose icon in the top-right. The New SMS screen has a phone-number field and, just below it, a Choose from Contacts button that opens a name-searchable picker covering both your Cloudspire phonebooks and your iPhone contacts. Tap a contact to drop their number into the field; tap a contact who has multiple numbers to pick which one. Same auto-navigation to the new thread on Send.
Settings & Preferences
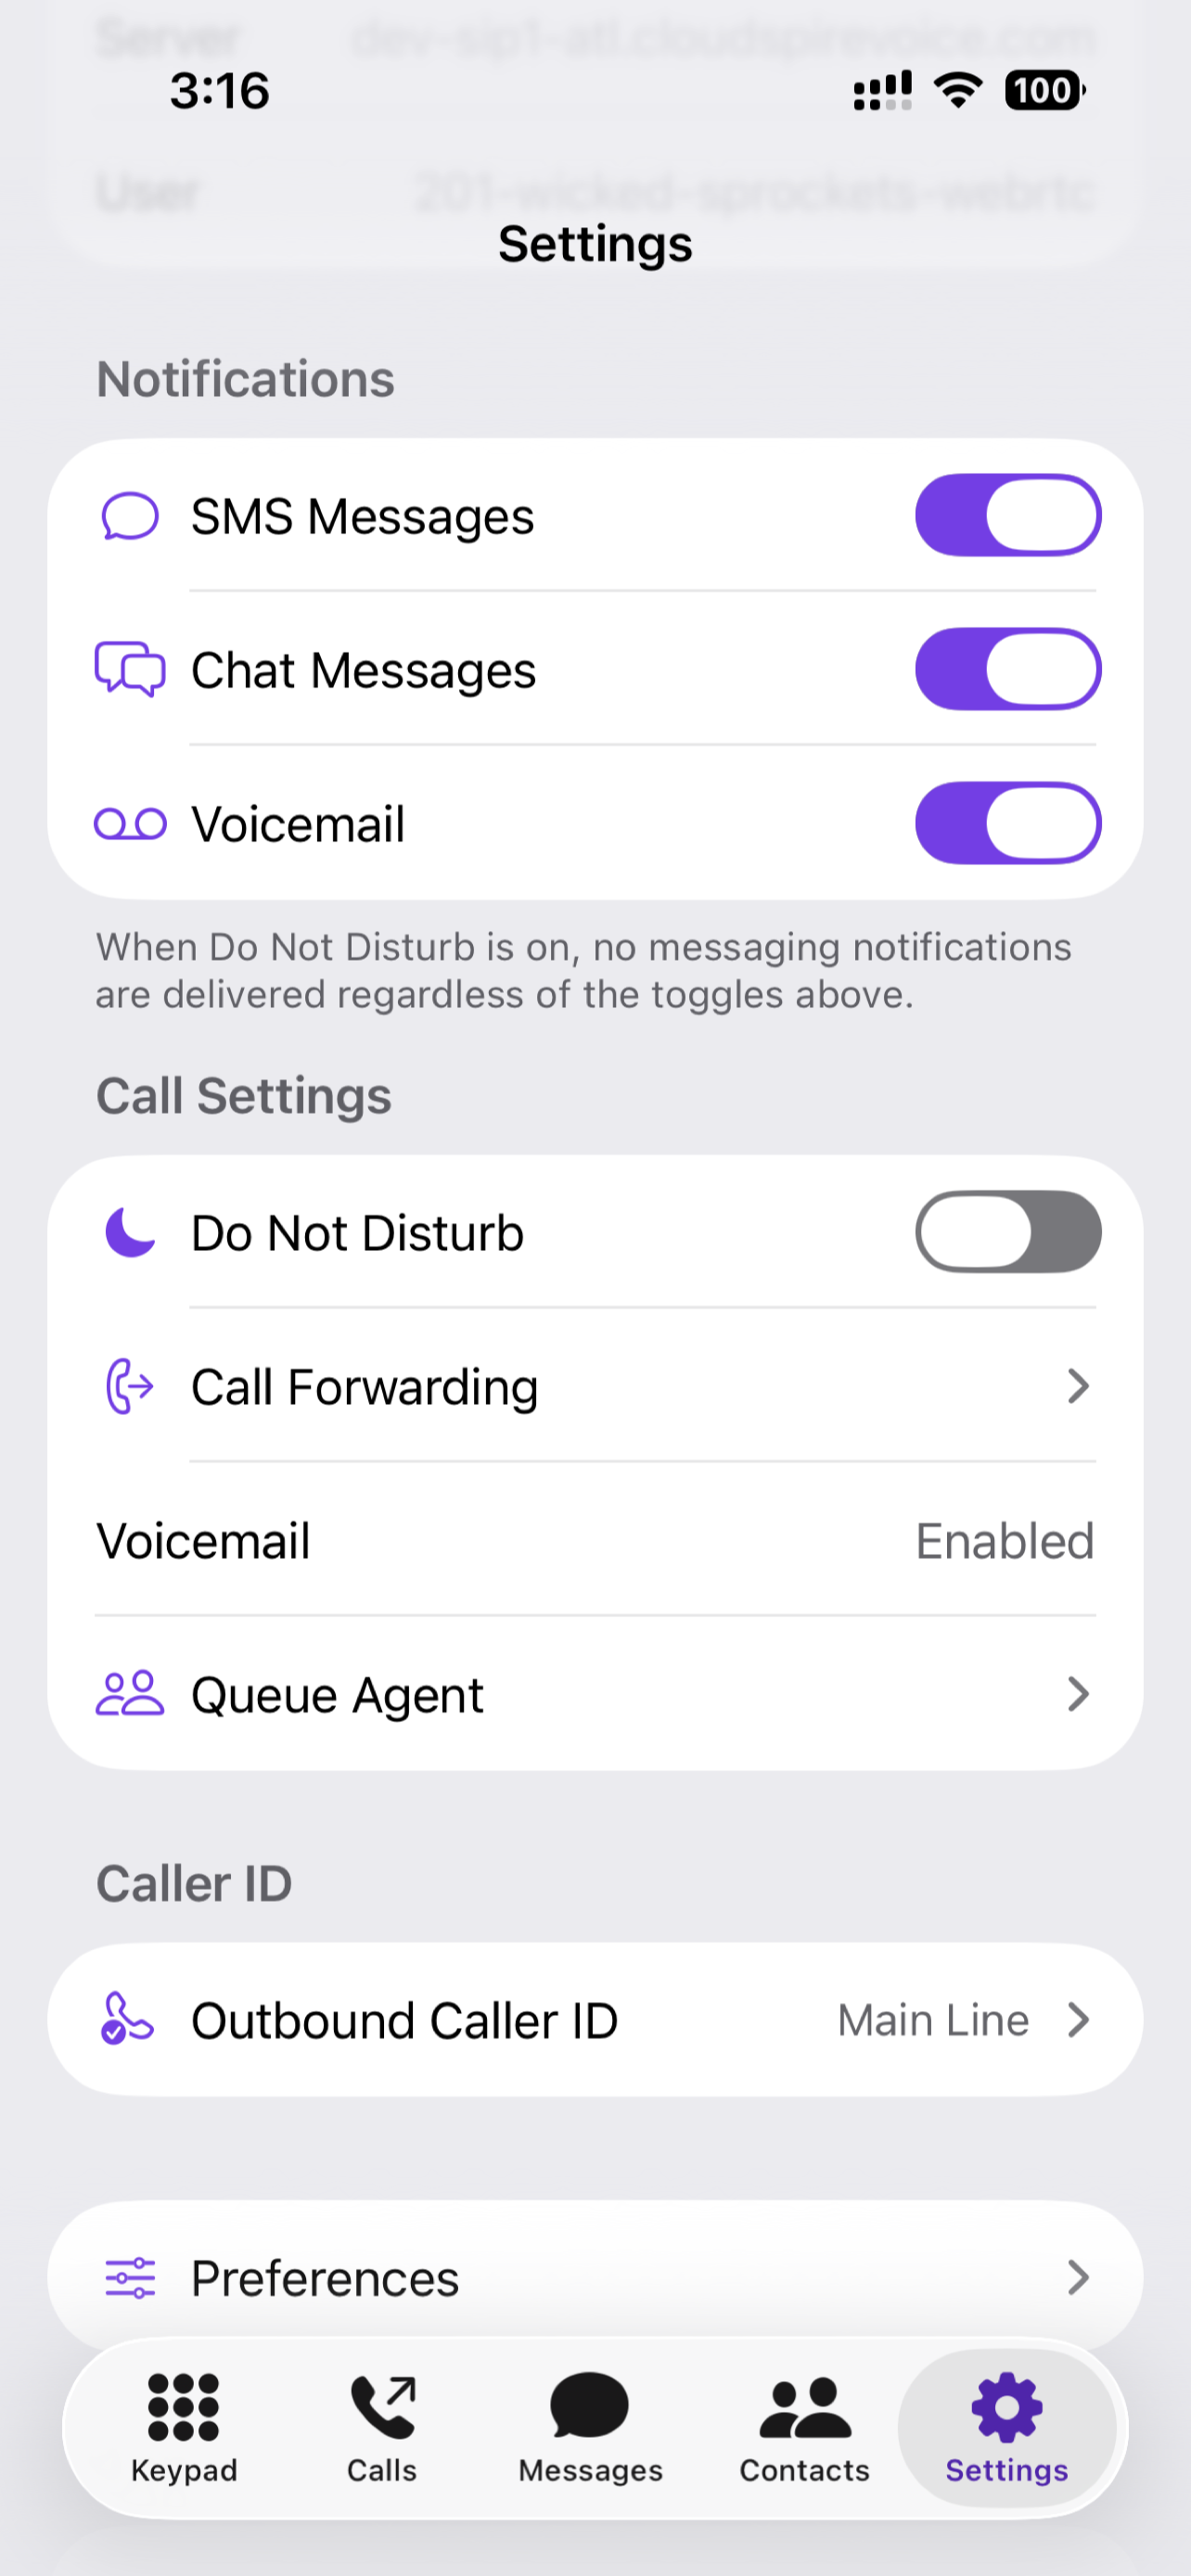
The main Settings screen: Notifications, Call Settings, Caller ID, and a link to Preferences
Account
Read-only display of your name, extension, and tenant.
Connection Status
Shows whether the app is currently connected to the phone system (Registered / Connecting / Registering / Failed / Idle) along with the server and account the app is using. Helpful when reporting a call issue; take a screenshot of this row when you contact support.
Notifications
- SMS Messages: toggle per-app
- Chat Messages: toggle per-app
- Voicemail: toggle per-app
When Do Not Disturb is on (under Call Settings), messaging notifications are suppressed regardless of these toggles.
Call Settings
- Do Not Disturb: incoming calls go straight to voicemail. This is system-wide DND: toggling it here syncs instantly to every device on your extension (desk phone, browser softphone, mobile app, BLF keys) and flips your presence to Do Not Disturb company-wide. Do not confuse this with the DND button on the desk phone itself; that physical button only silences the local ringer on that one phone and is invisible to the phone system, so callers still ring your other devices.
- Call Forwarding: four rules (Unconditional, Busy, No Answer, Offline); each has an enable toggle and destination field. The destination must be an external phone number of 10 to 15 digits; an internal extension is rejected. To send calls to a colleague's extension, use a transfer or ask your administrator about your call-flow options.
- Voicemail: shows whether voicemail is enabled on your extension.
- Queue Agent: if you’re a queue agent, tap to see per-queue login/logout, pause, and reason codes.
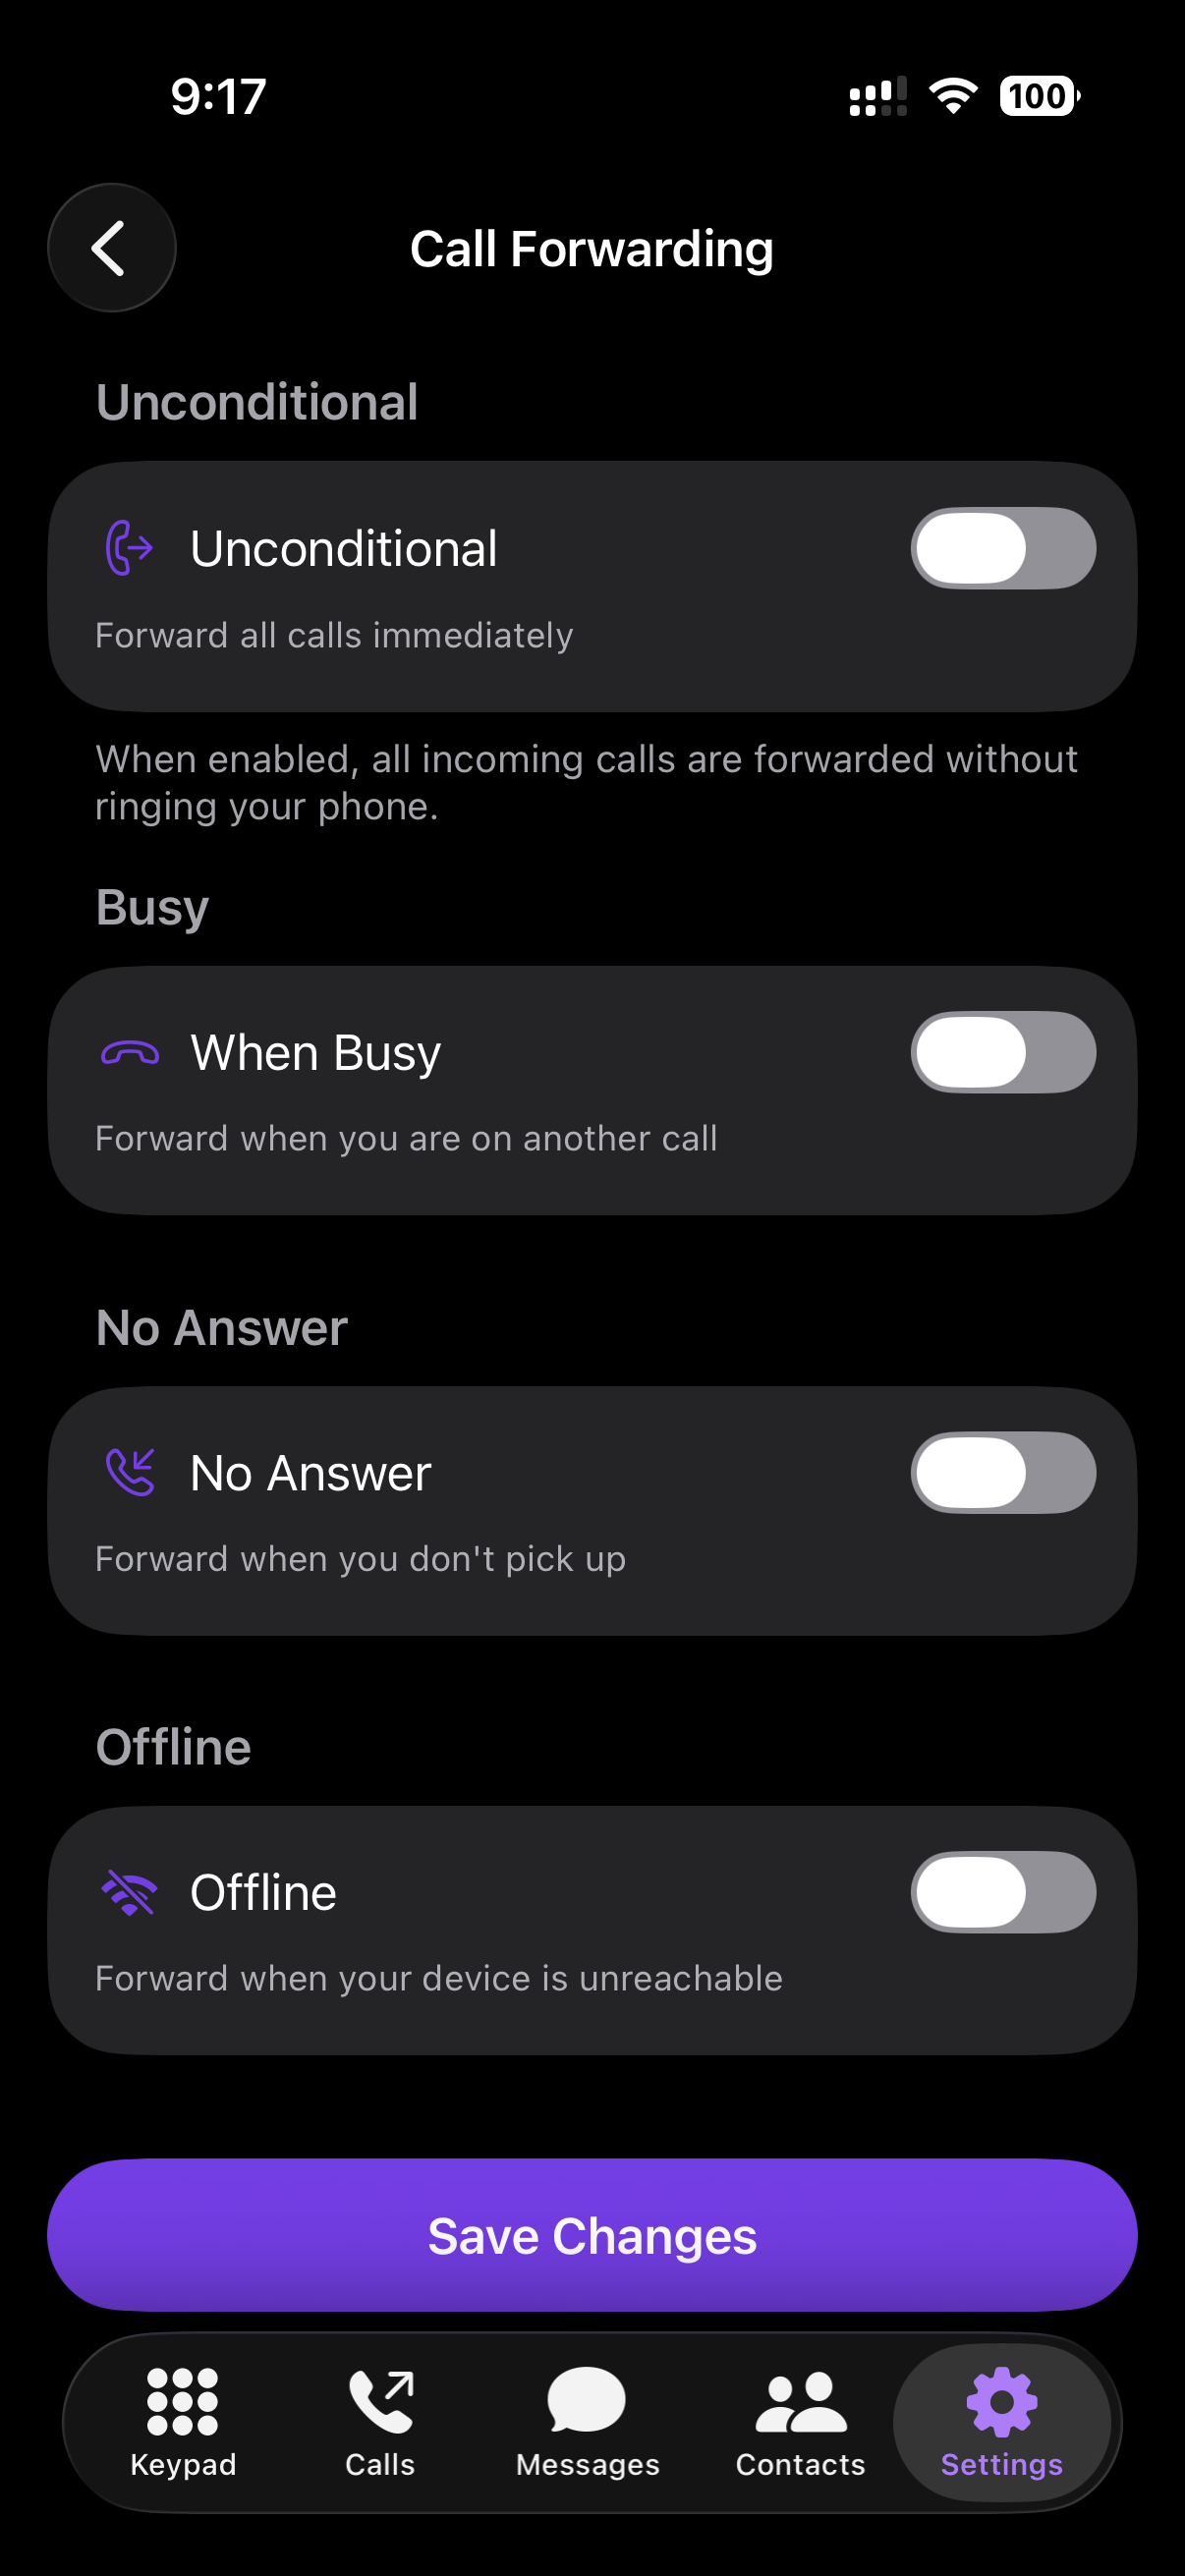
Call Forwarding: four independent rules: Unconditional (always forward), Busy, No Answer, and Offline
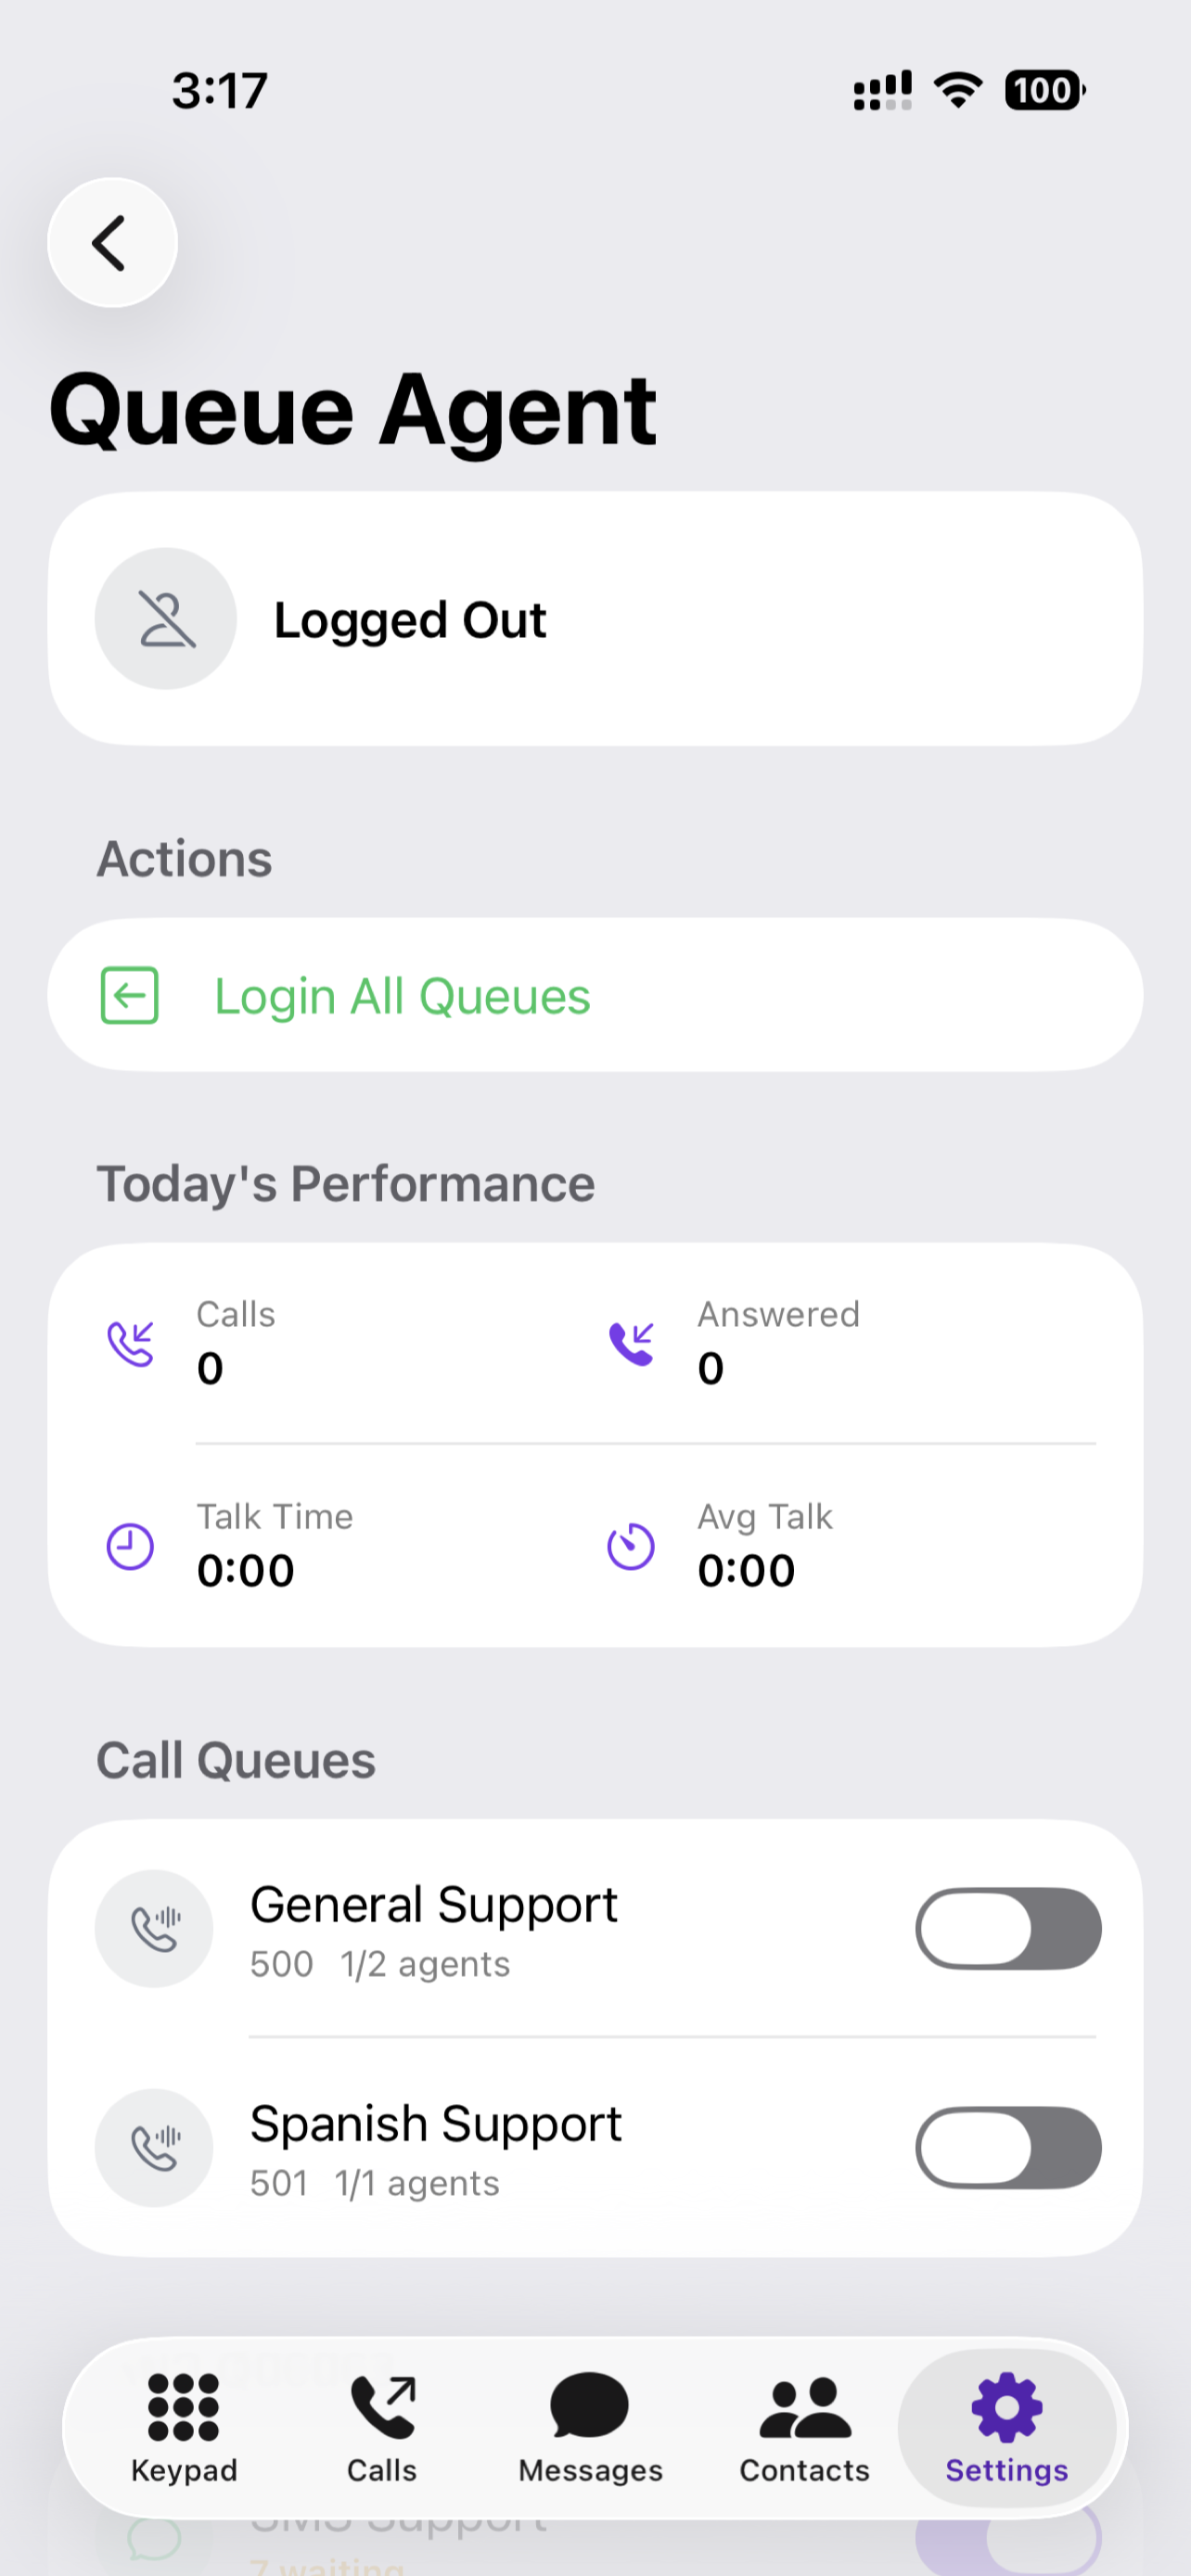
Queue Agent screen: login/logout, today’s performance totals, and per-queue toggles
Caller ID
If your extension has more than one outbound caller-ID choice, tap to pick which phone number other people see when you call them. The active choice applies to your desk phone and browser softphone too.
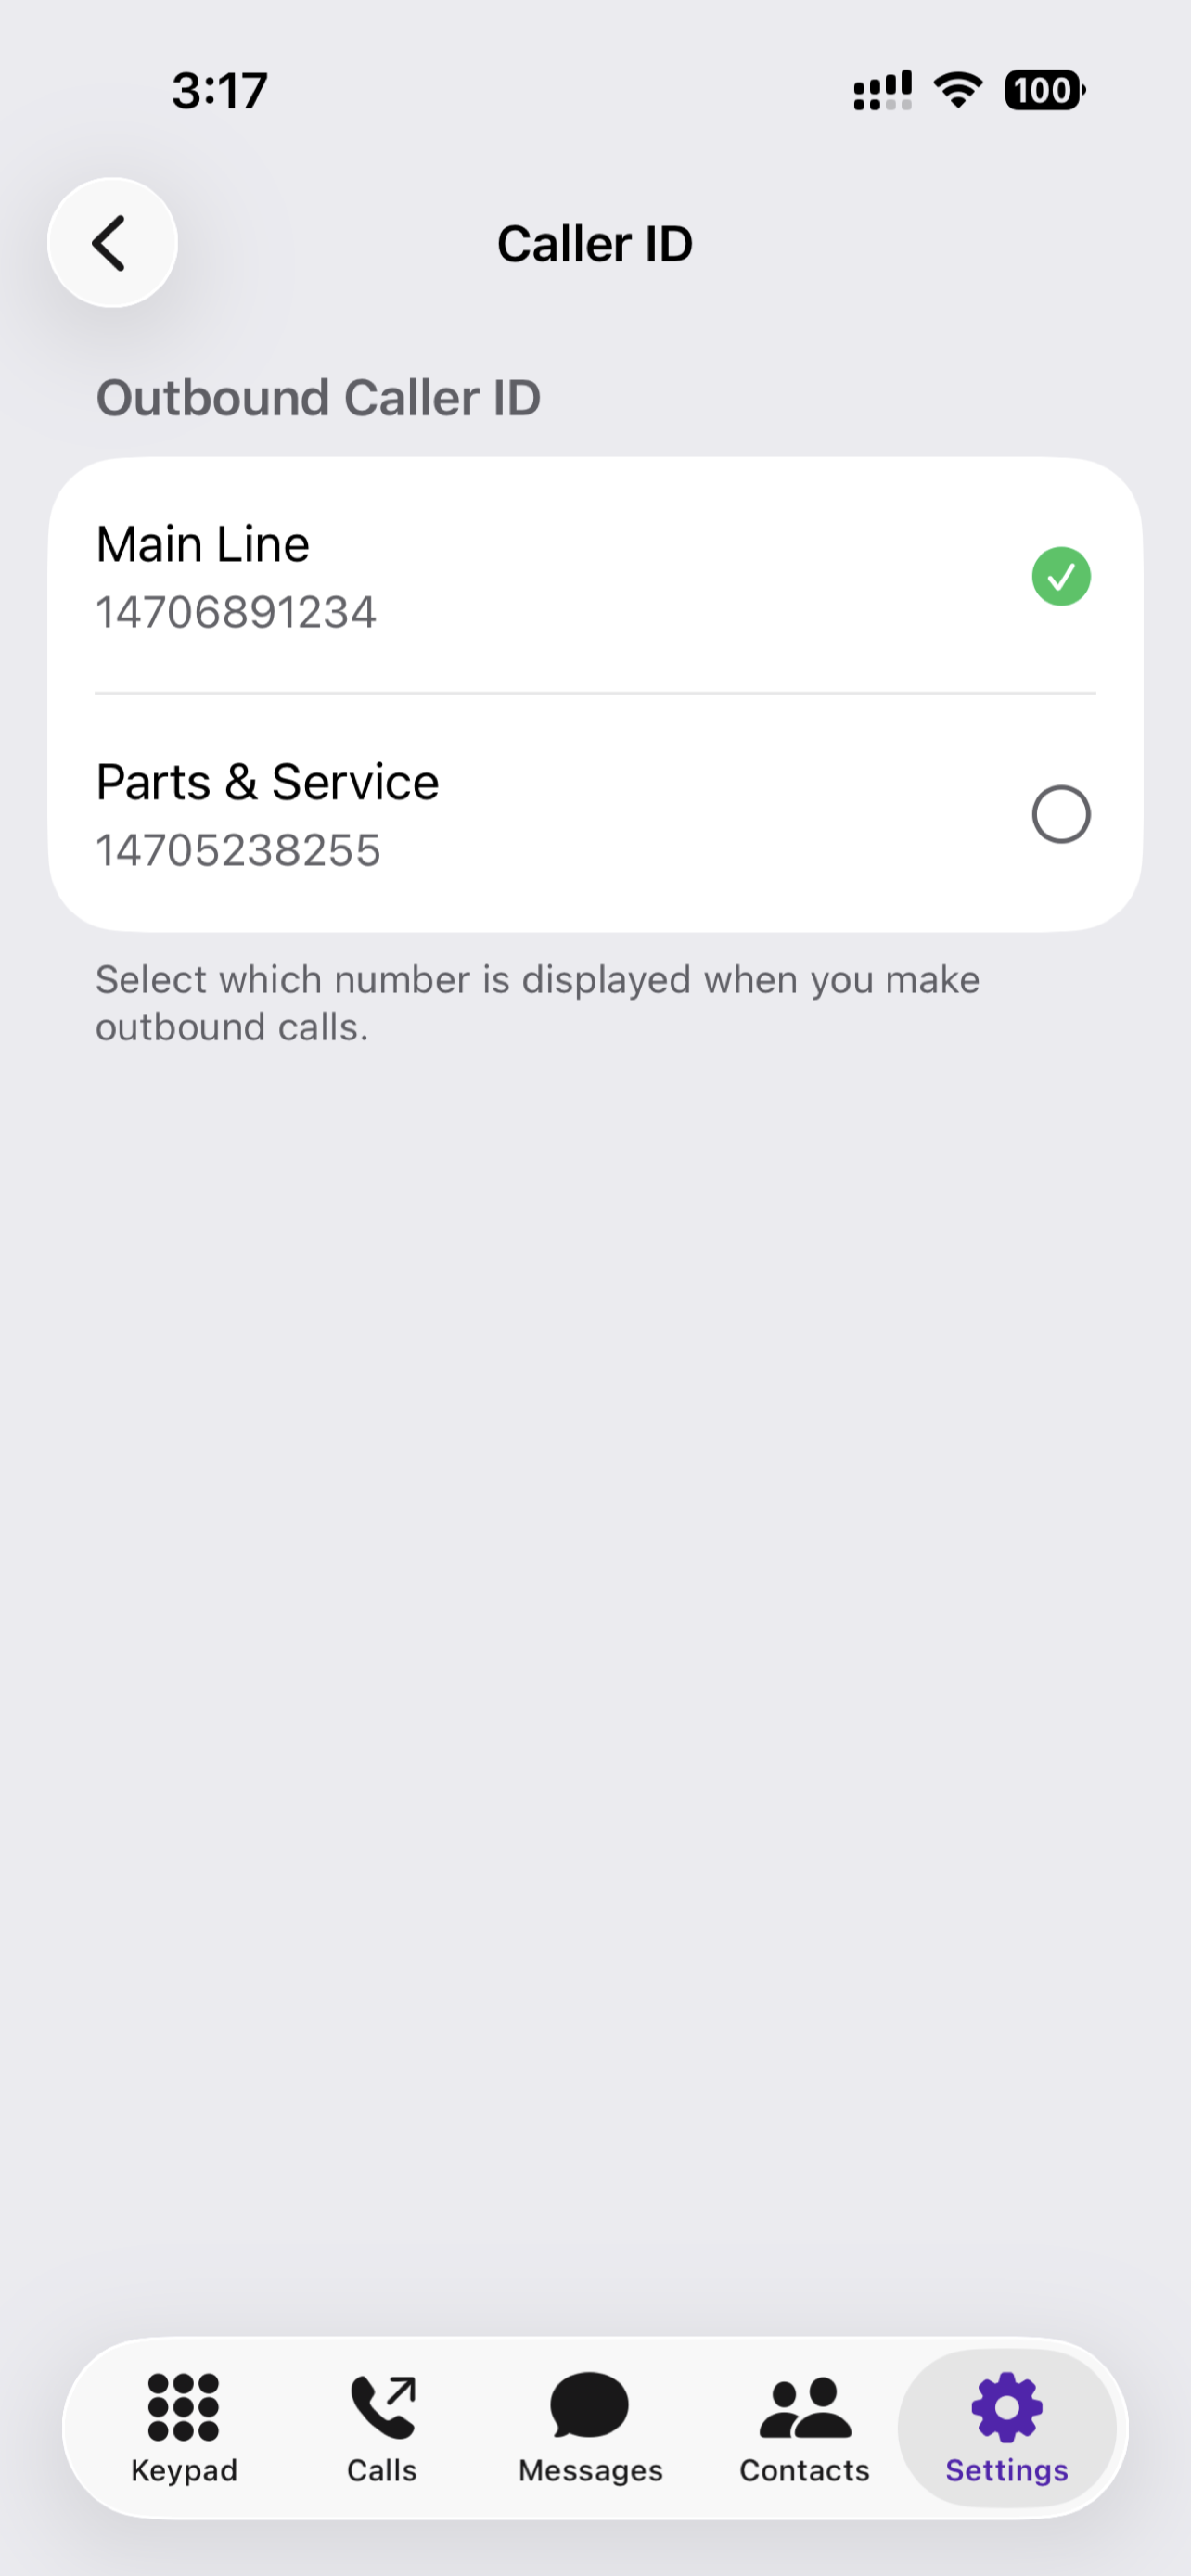
Pick which of your outbound numbers shows on outgoing calls
Preferences
| Setting | What it does |
|---|---|
| Theme | System / Light / Dark |
| Dialpad Background | Solid or Gradient |
| BLF Active Color | Choose the highlight color for “in use” BLF keys (6 colors available) |
| Show BLF Keys | Hide or show the BLF grid below the dialpad |
| BLF Rows | 1, 2, or 3 rows (up to 12 keys total) |
| Ringtone | Pick from system ringtones or a bundled default |
| Call Quality | HD (best), SD (conserves data), or Dynamic (recommended: the app picks automatically based on how strong your connection is). |
| Connection Mode | How the app routes audio between your phone and the Cloudspire server. Relay Only (default) routes every call through Cloudspire’s media server, so calls survive switching between Wi-Fi and cellular mid-call. Allow Direct tries a direct connection first for slightly lower latency, then falls back to relay if direct fails; trade-off is that a direct call drops audio when the network changes. Setting applies to the next call placed. |
| Predictive Search (T9) | When on (default), typing digits on the keypad shows matching contacts and extensions above the keys as you type. Turn off for a plain numeric keypad with no suggestions. |
| Call Time Display | Show call-log timestamps as relative ("3h ago") or absolute ("Tue 2:14 PM"). |
| Voicemail Time Display | Same choice for voicemail timestamps. |
| Keypad Tones | Play touch-tones when you tap the dialpad |
| Vibrate on Ring | Also vibrate the phone on incoming calls |
| Auto-Answer | Off, 3s, 5s, or 10s delay before auto-answering incoming calls (handy for intercom or kiosk use) |
| Keep Screen On | Prevent the screen from locking while the app is open |
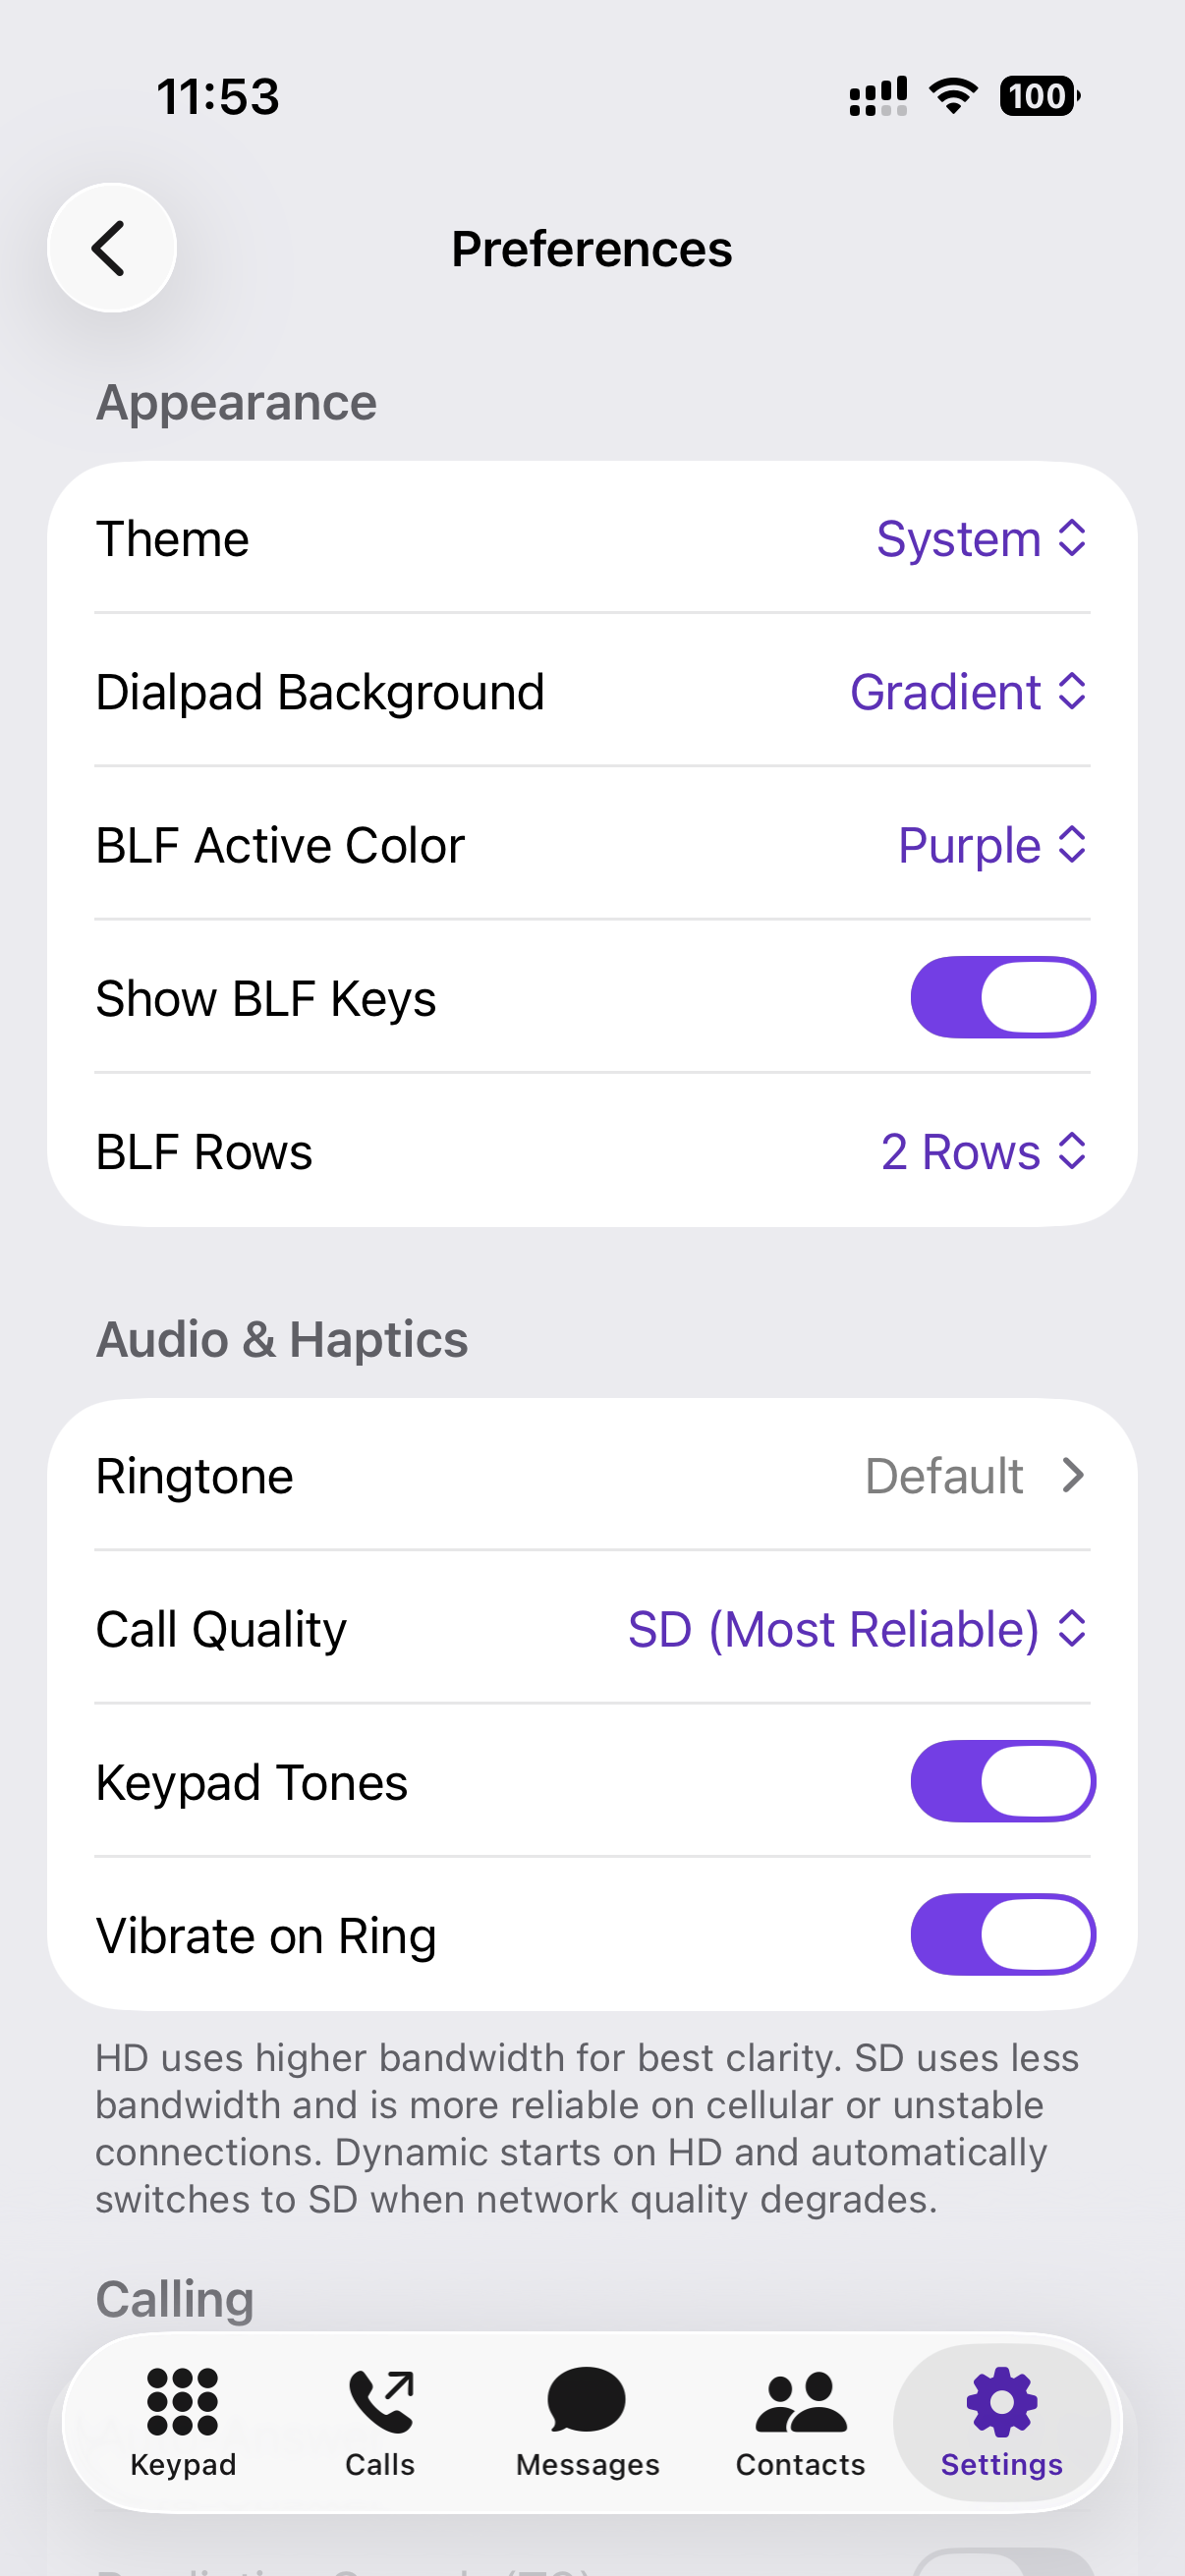
Preferences (top half): Appearance, Audio & Haptics, and Call Quality
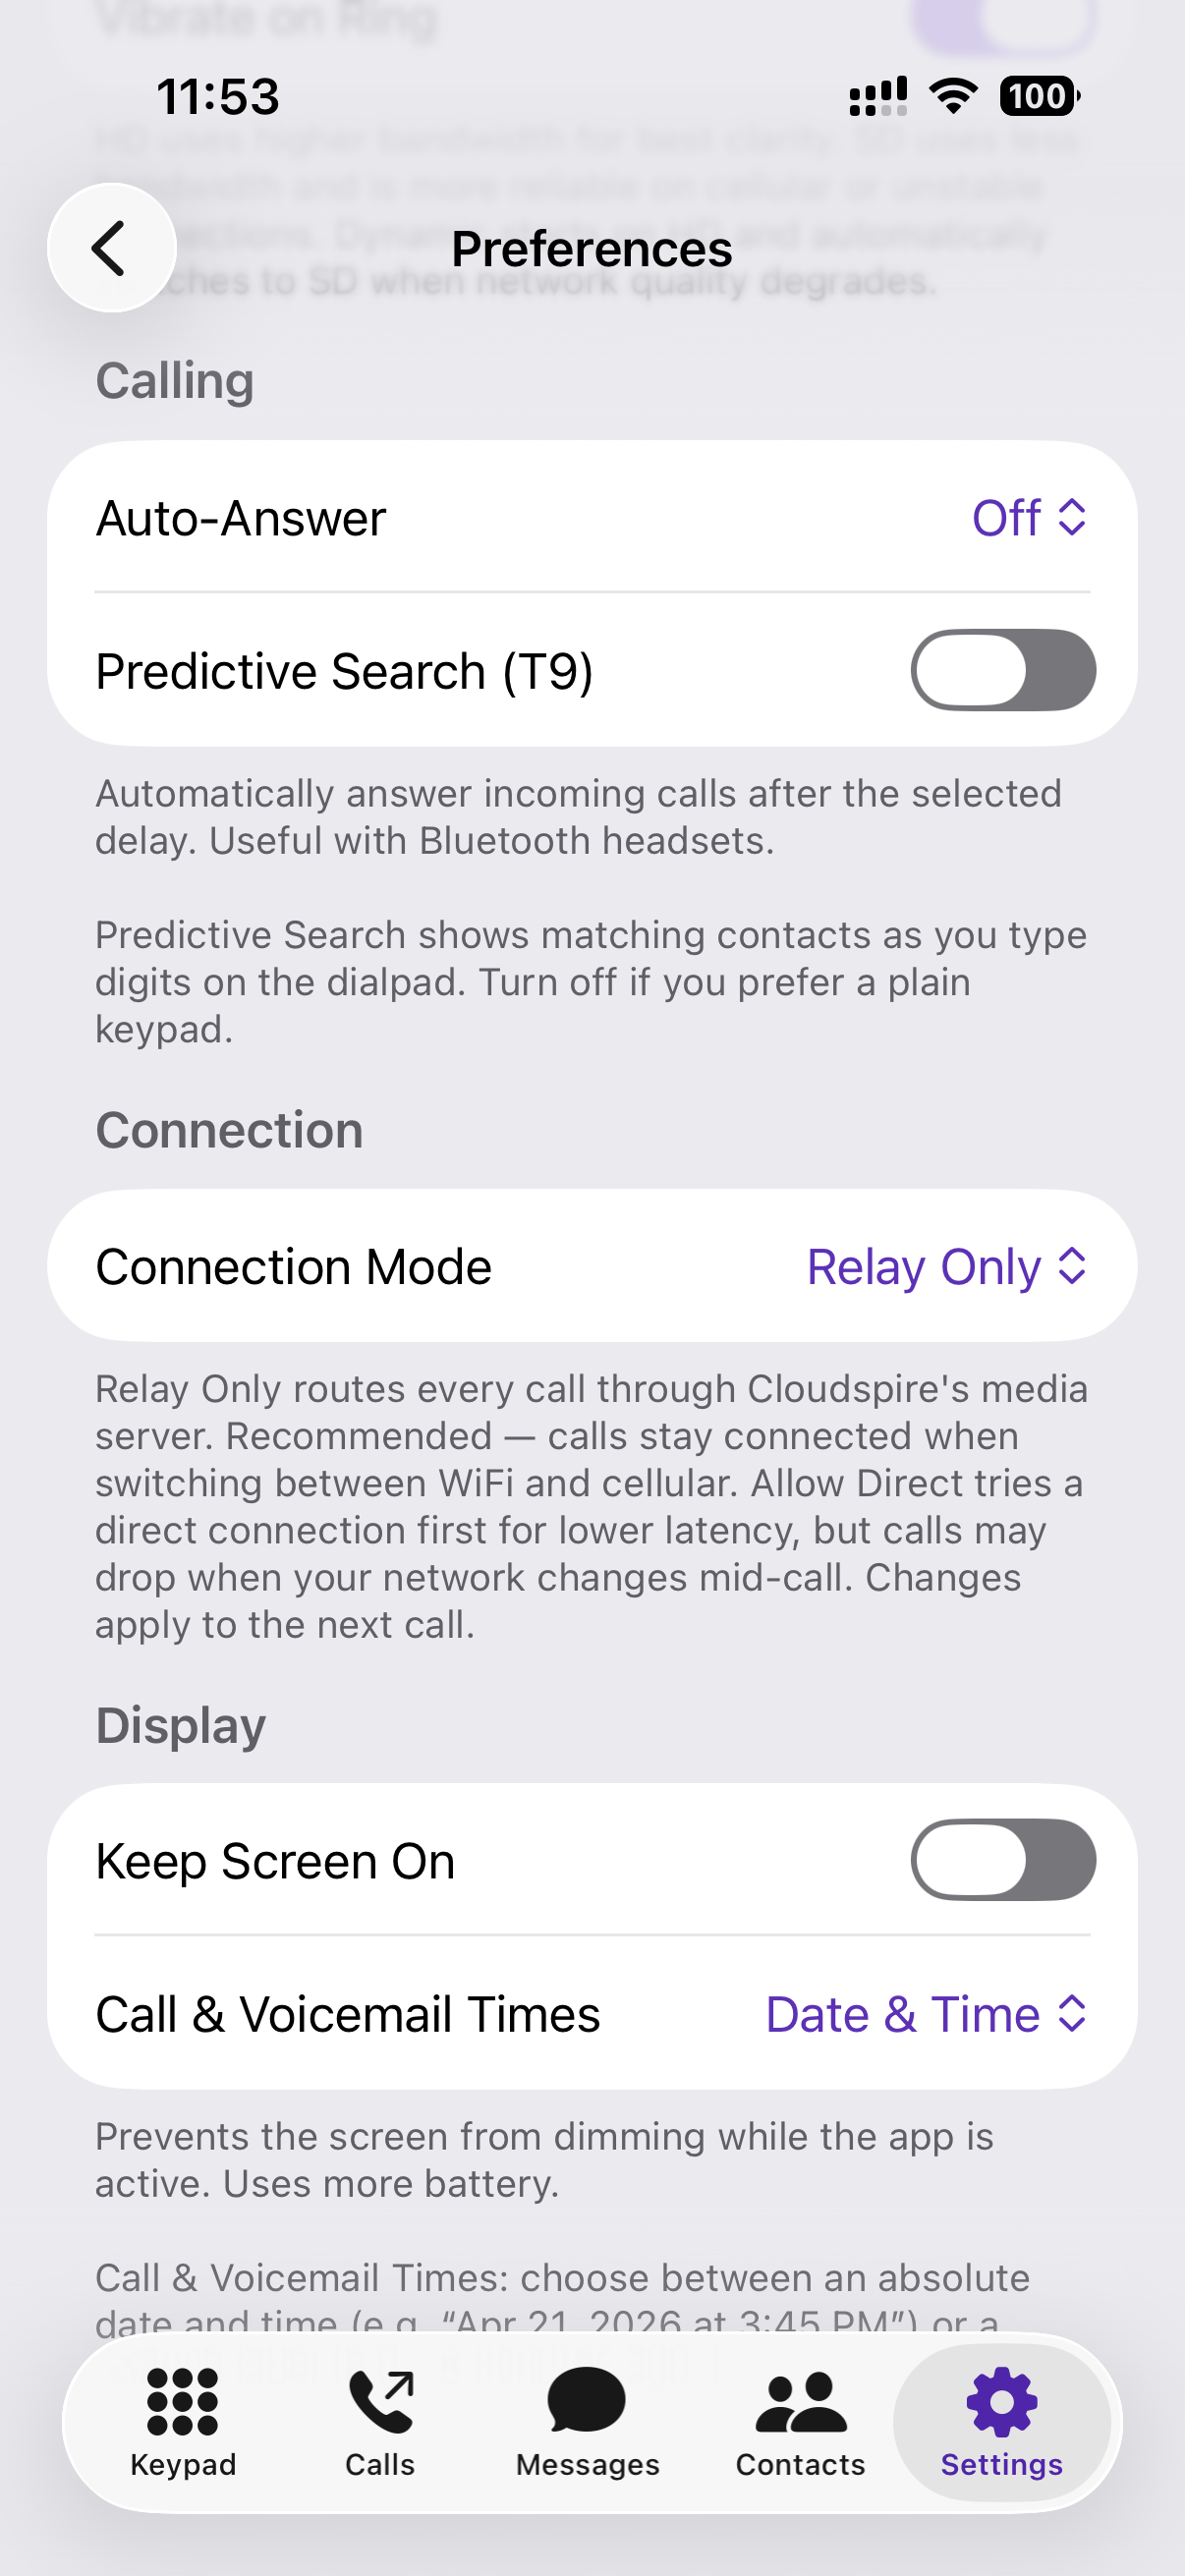
Preferences (bottom half, after scrolling): Connection Mode, Predictive Search (T9), and Call / Voicemail Time Display
Call Path chip
During an active call, a small chip appears below the call timer on the in-call screen showing how the current call is connected, for example Cellular · Relayed, WiFi · Direct, or WiFi · Relayed. The chip debounces brief renegotiations during cellular handoffs by about six seconds so it doesn’t flicker. Useful when troubleshooting a quality issue mid-call; tells you (and support) immediately whether the call is going direct or relayed and which underlying network it landed on.
Stats For Nerds overlay
Tap the Call Path chip to reveal a live statistics overlay that stays up for the entire call. Shows round-trip time, jitter, packet-loss rate, and the relay port the call landed on (3478 (UDP) for the normal relay vs 443 (TLS) for the corporate-friendly TLS-on-443 path). Useful for diagnostics; you can read the values off to support, or screenshot the overlay and AirDrop it.
App
Version and build number. Tap About to reach Privacy Policy, Terms of Service, an emergency-calling notice, and copyright.
Troubleshooting
Voice Quality Check
On-demand network probe at Settings → Troubleshooting → Voice Quality Check. Tap to run a 30-second test against your home voice server at the same packet rate as a real call. The probe captures both steady-state quality and the brief dropouts that mid-call audio glitches come from. Result is a green / yellow / red verdict alongside:
- Round-trip time (ms): how long a packet takes to reach the server and come back.
- Jitter (ms): how variable that round-trip is from packet to packet.
- Packet loss (%): how many packets disappeared.
- Dropout windows: count of brief audio-silence windows the probe saw.
- Network tested: e.g.
Cellular · 5Gwith a Roaming or Low Data badge if iOS flagged it. - Recommendation: a tailored sentence comparing your current preferences against what would work best on the network you just tested.
Useful before a critical call ("am I going to get clean audio off this hotspot?") and useful for support handoff ("run a Voice Quality Check and tell me what color it came back"). Results are also written into the Call Flow Log so a single AirDrop captures the probe alongside the recent call signal.
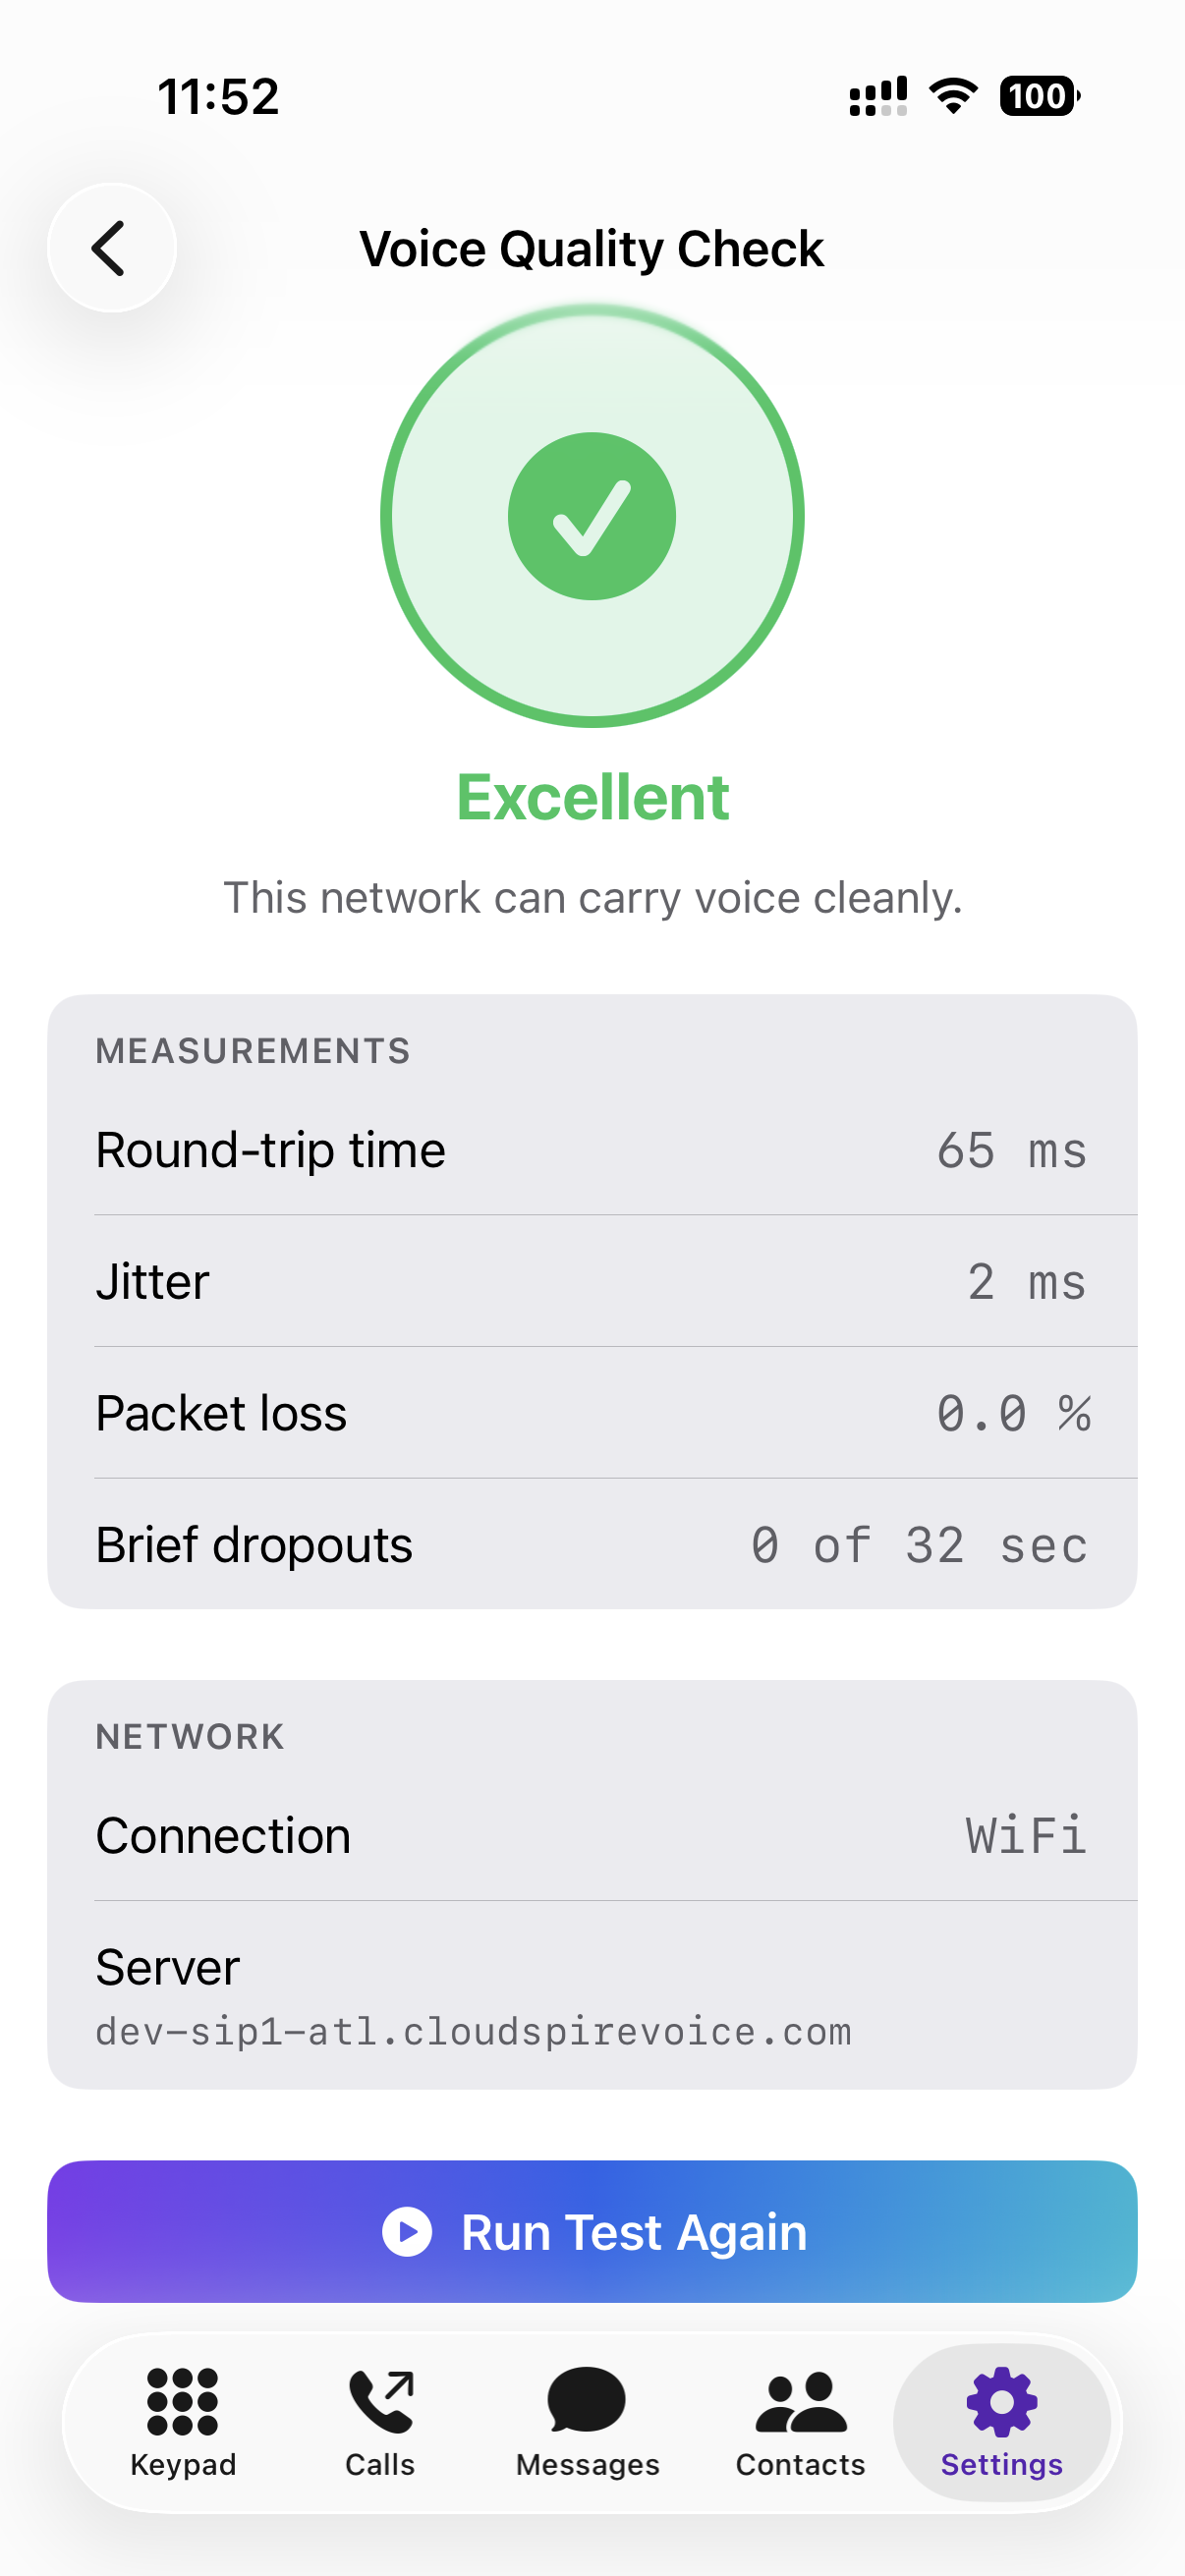
A Voice Quality Check result: verdict color, the four metric numbers underneath, the network the test ran on, and a tailored recommendation
Call Flow Logging
- Call Flow Logging: turn on to record detailed technical info about your calls into a local file on the phone. Off by default; turn it on only when support asks you to. WebRTC framework log lines (TLS, certificate verification, TURN allocation) are appended to the same file when this is on.
- Send Logs to Cloudspire: in the latest version of the app, turn this on (with Call Flow Logging on) and your call log is sent to Cloudspire automatically after each call, then removed from your phone once it is received, so support can find and fix call problems without you sending anything. The first time you turn it on, the app asks for your agreement: the log includes phone numbers, contact names and network details from your calls, never passwords. It is off unless you turn it on, and you can turn it off anytime.
- Call Flow Logs: a viewer for the most recent entries (with Send Logs to Cloudspire on, it shows the logs not yet sent). You can AirDrop or email the file to support when reporting a call-quality or notification issue.
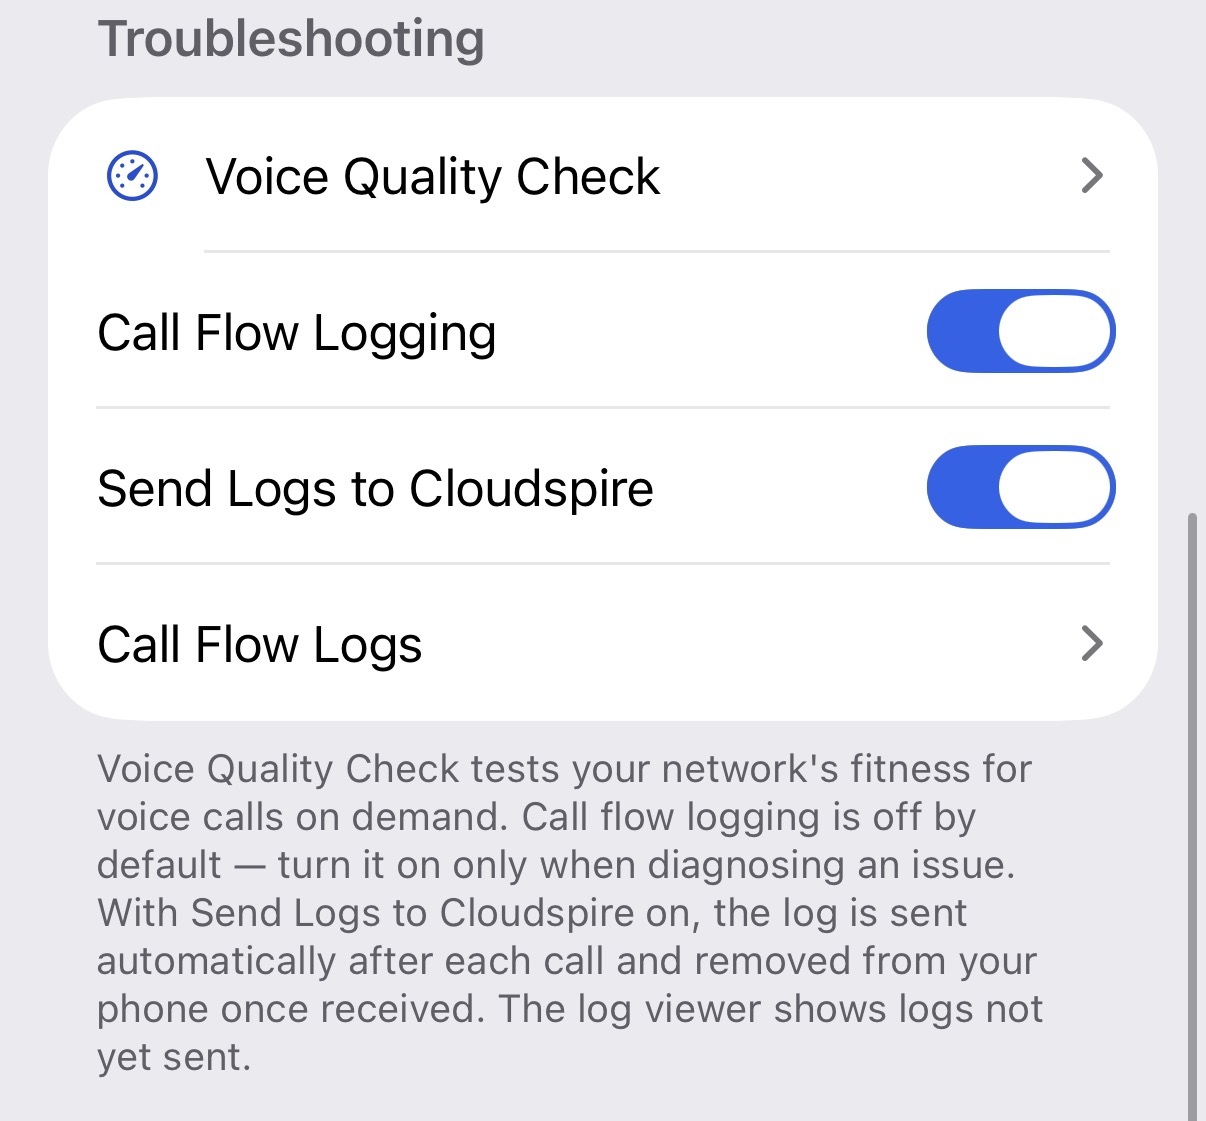
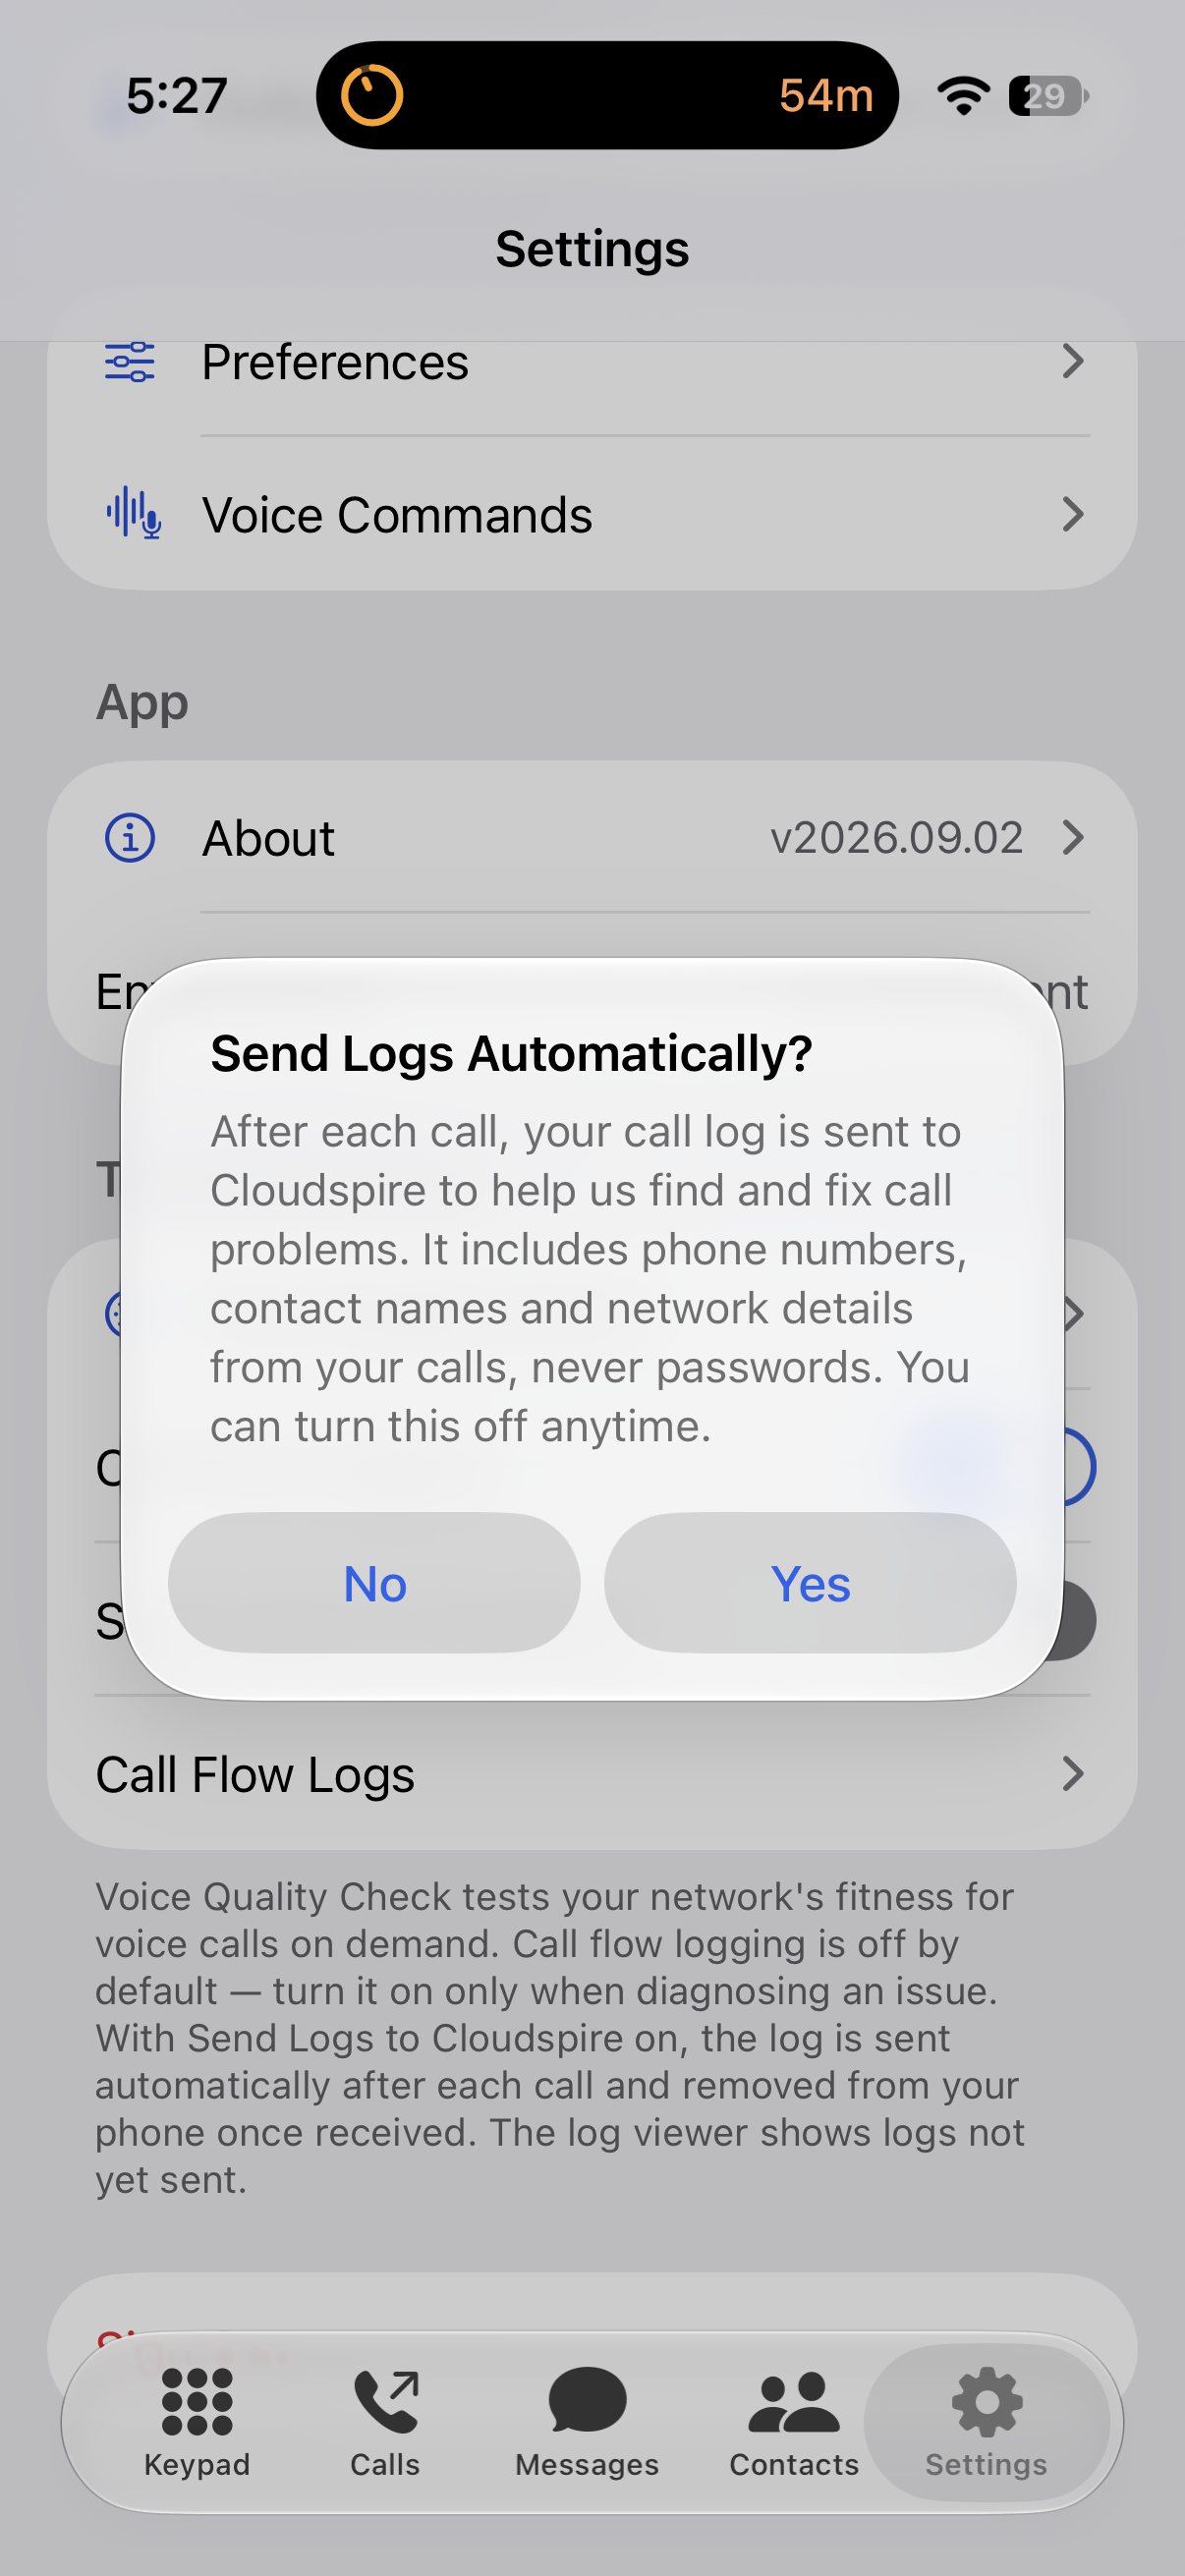
The Troubleshooting section with Send Logs to Cloudspire on, and the prompt that asks for your agreement the first time you turn it on
The Call Flow Logs link is also available on the login screen, so you can send diagnostics to support even if you can’t sign in.
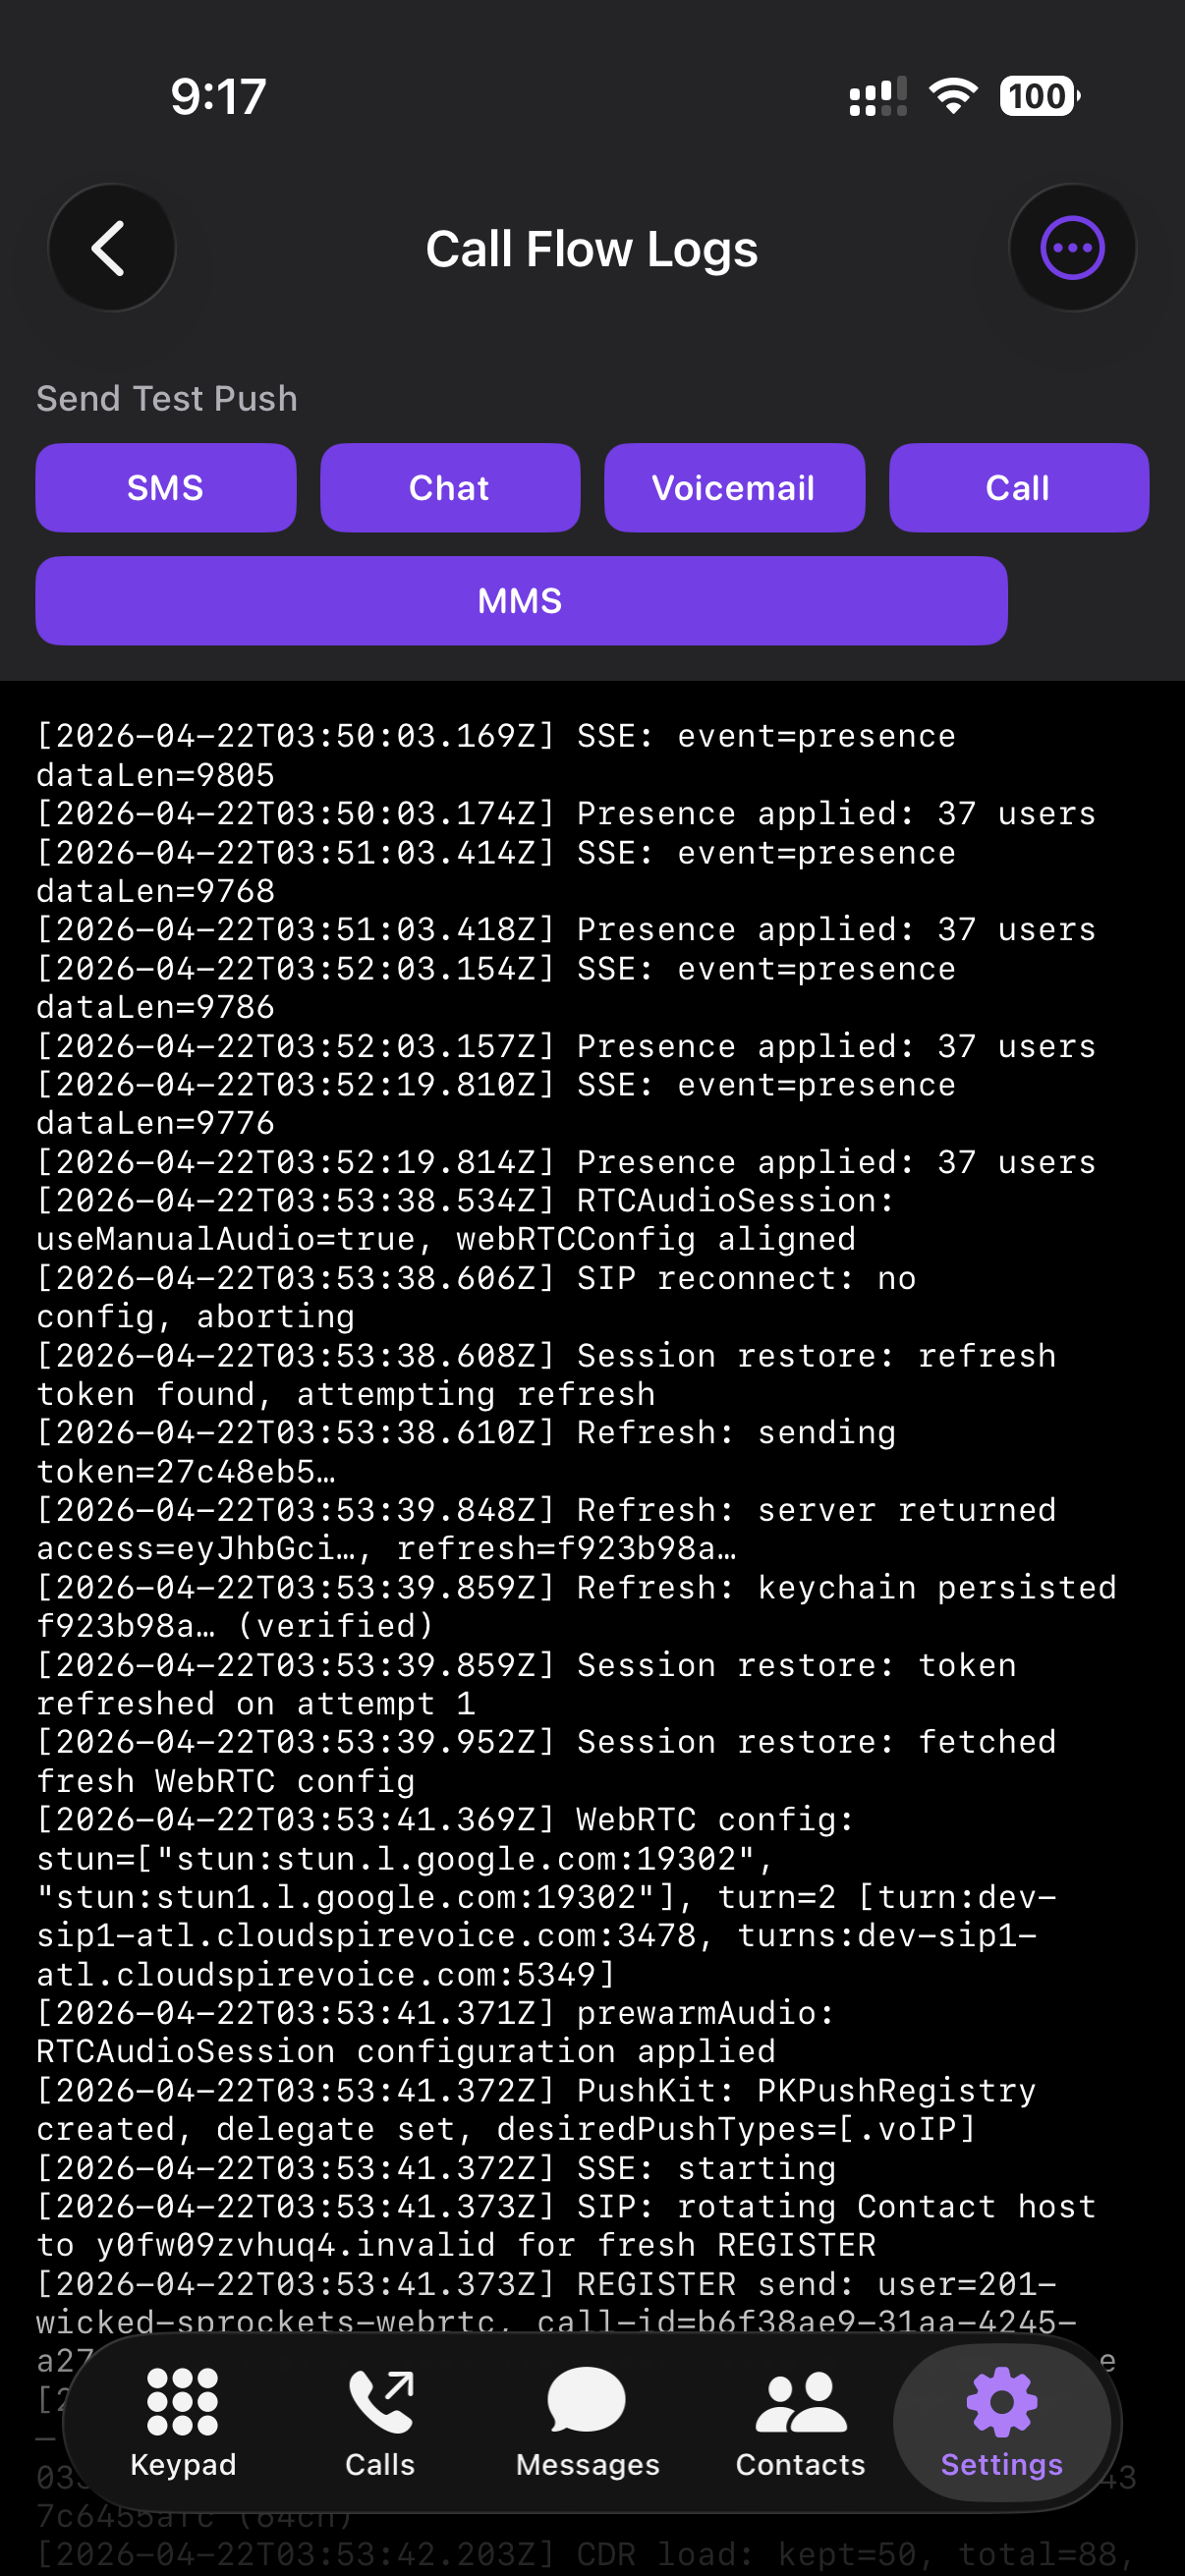
Call Flow Logs: Send Test Push buttons at the top (support uses these to verify notifications), scrollable log entries below
Siri & Shortcuts (Voice Commands)
The Cloudspire app supports Siri voice-dialing and three Shortcuts/App Intents. A complete Voice Commands cheat sheet is built into the app at Settings → Voice Commands; this section mirrors what’s on that screen so you can scan it before reaching for your phone.
First-time setup
- Open Settings → Siri & Search → Cloudspire and turn on Use with Siri.
- The very first Siri command may need an extra tap to grant permission; Siri pops a one-time confirmation.
- Recognition gets more reliable over time; every call placed or answered through the app quietly teaches Siri the contact-to-app association in the background.
Place a Call
Three accepted patterns:
"Call John Smith using Cloudspire": by name."Call extension 202 using Cloudspire": by internal extension number."Call 404 555 1234 using Cloudspire": by raw phone number.
The call honors whichever dial mode (App or ClearLine, which Siri calls Cell) you currently have selected on the keypad. When the spoken name matches more than one contact (including when you say only a first name and several contacts share it) Siri asks you to pick which one.
Pick a Number Type
When a contact has multiple numbers, specify which one in the same phrase:
"Call John's mobile using Cloudspire""Call John's work using Cloudspire""Call John's home using Cloudspire""Call John's iPhone using Cloudspire"
Other labels like Main, Pager, or Fax also work; just say the label Siri sees on the contact in your Contacts app.
Set Your Status
"Set my Cloudspire status to Available""Set my Cloudspire status to Away""Set my Cloudspire status to Meeting""Set my Cloudspire status to Do Not Disturb""Change my Cloudspire status": opens a picker if you don’t want to specify the status in the same breath.
Siri reads back a spoken confirmation when the status is set (e.g. "Status set to Away.").
Status with a Custom Message or Auto-Clear: use a Shortcut
Apple’s Siri framework only accepts one variable per spoken phrase, so the auto-clear timer and the optional custom message can’t be combined with the status in a single voice command. To get all three by voice, build a custom Shortcut once and trigger it by voice or tap thereafter:
- Open the Shortcuts app and tap +.
- Add the Set Cloudspire Status action.
- Fill in Status, Custom Message (optional, up to 100 characters), and Clear After.
- Name the Shortcut something memorable, e.g. "Heads down for an hour."; Siri will recognize that exact name as a trigger phrase.
- Tap the share icon to pin it to the home screen or assign it to the Action Button.
Supported Clear After options: 30 minutes, 1 hour, 2 hours, 4 hours, End of Day, or Don’t Clear (the default; leaves the status indefinite).
Do Not Disturb
"Turn on Cloudspire Do Not Disturb""Turn off Cloudspire Do Not Disturb""Set Cloudspire Do Not Disturb on"
This is the same system-wide DND toggle as Settings → Call Settings → Do Not Disturb; flipping it from Siri silences incoming calls server-side and routes them per your forwarding settings, synced to every device on your extension. Siri reads back "Do Not Disturb is on." or "Do Not Disturb is off." as confirmation.
Dial Mode
"Switch Cloudspire to Cell""Switch Cloudspire to App""Set Cloudspire dial mode to Cell"
App calling uses Wi-Fi or cell data over WebRTC (the normal path). Cell calling rings your mobile line and bridges the call server-side through the company trunk; useful when WiFi or cellular data is poor but cellular voice still works. Cell mode requires a Mobile Number on your account, set by your administrator or added by you; without one, the Siri command writes the preference but surfaces an eligibility warning the next time you place a call.
Where the three Shortcut intents show up
The Set Status, Toggle DND, and Switch Dial Mode commands each appear automatically in the Shortcuts app under Cloudspire. From there you can:
- Add them to the home screen as one-tap icons.
- Assign one to the Action Button (iPhone 15 Pro and later).
- Wire them into Focus-mode automations, e.g. "When my Work Focus turns on, set my Cloudspire status to Available and switch to App mode."
- Build them into multi-step Shortcuts that chain with other apps.
Audio Quality
Voice audio is sent in a secure, encrypted stream. Two separate controls govern how the app handles audio:
- Call Quality (under Preferences): the bitrate the app requests for its own outbound audio.
- HD: highest quality. Best on Wi-Fi or strong cellular.
- SD: uses less data. Use on slow or limited cellular connections.
- Dynamic (default): the app watches your connection and adjusts automatically.
- Connection Mode (under Preferences): how audio is routed between your phone and the Cloudspire server.
- Relay Only (default): calls survive switching between Wi-Fi and cellular mid-call because the server-side path doesn’t change when your phone’s local network does. Right choice for nearly everyone.
- Allow Direct: tries direct first for slightly lower latency, falls back to relay if direct fails. Direct calls drop audio when the network changes.
The Call Path chip below the call timer on the in-call screen (see Preferences above) shows exactly which combination you’re currently on for the active call (e.g. Cellular · Relayed). The app also runs through corporate firewalls and other restrictive networks, all behind the scenes, no setup required on your part. If audio quality on a particular network is in doubt, run a Voice Quality Check (Settings → Troubleshooting) before placing the call.
How Ringing Works
When someone calls you, Apple’s notification service wakes up your phone and the Cloudspire app shows the incoming call on your lock screen, just like a regular iPhone call. This happens whether the app is open, in the background, or closed.
Because the app doesn’t need to stay connected all the time to ring, your battery lasts much longer than with older business-phone apps. The tradeoff is a very brief (about a third of a second) connection step before the audio comes through; you’ll never notice it.
New messages, missed calls, voicemails, and typing indicators also arrive as notifications so you never miss anything even when the app is closed.
Requirements & Permissions
Device
- iPhone running iOS 16.0 or later
- A working data connection (cellular or Wi-Fi)
Permissions
| Permission | Why |
|---|---|
| Microphone | Required for calls. The app cannot place or accept calls without it. |
| Notifications | Required to receive incoming calls and new-message alerts. |
| Contacts | Optional; only needed if you want iPhone contacts to appear in the Contacts tab and in T9 search. |
| Camera | Optional; requested only when you tap Scan QR Code during setup. |
Security & Privacy
- All call audio and data is encrypted end-to-end between your phone and our servers.
- Your sign-in credentials are stored in your iPhone’s secure area (the same protected storage Apple uses for Apple Pay and saved passwords).
- The app does not include any usage analytics, ad tracking, or third-party tracking code.
- Crash reports are routed only through Apple’s App Store / TestFlight diagnostics channel to Cloudspire engineering.
Your call recordings, voicemails, and messages live on Cloudspire’s servers, not on your phone. If you sign out of the app, any cached copies on the device are removed.
Things to Know
- No 911 / emergency calling. The app cannot place calls to 911 or other emergency numbers. Use your iPhone’s built-in Phone app for emergencies.
- Notifications must be turned on. The app needs notification permission from iOS to ring when it’s closed. If you decline notifications, incoming calls will only arrive while the app is open in the foreground.
- Picture messages in previews show up to three images in a notification; Cloudspire keeps the notification small by attaching only the first three, and other attachment types are left out of the preview. Open the conversation in the app to see everything that was sent.
- Calls in the iPhone’s Recents list: Cloudspire calls appear in your iPhone’s regular call history, but tapping them there dials back through the iPhone’s built-in Phone app instead of Cloudspire Voice. This is how iPhones handle all business-phone apps.
Getting Help
- Email [email protected]
- Phone: (470) 305-1234
- When reporting a call-quality issue or a problem with calls not ringing, first turn on Call Flow Logging in Settings → Troubleshooting, reproduce the issue so the app captures it, then share the log file with support.